Crochet Jeanie Triangle Scarf
The Crochet Jeanie Triangle Scarf is a charming and versatile accessory that will jazz up any outfit with its cozy and trendy design. Perfect for beginners and seasoned crocheters alike, this pattern offers a fun and rewarding project to work on. The triangle shape provides ample styling options – wear it as a classic scarf, drape it over your shoulders as a shawl, or even rock it as a stylish headscarf. The possibilities are endless! With a few skeins of yarn and a trusty hook, you'll soon have a beautiful and practical accessory to keep you warm and stylish all season long. Crochet away and let your creativity shine with the lovely Jeanie Triangle Scarf!

Materials you will need
Yarn
Category 2, Fingering weigh Yarn
Crochet hook
4 mm crochet hook (US G size)
You will hide the ends
Scissors
Stitch marker (optional)
Pattern notes
The Jeanie Triangle Scarf is an easy to make accessory. To obtain the triangle shape we will increase at the beginning, in middle and at the end of the row.
Chain 3 at the beginning of the row, counts as first double crochet.
Ch 1, at the beginning of a single crochet row, doesn’t count as first single crochet.
The pattern is one size and you can make a bigger or smaller scarf just by working more or less rows.
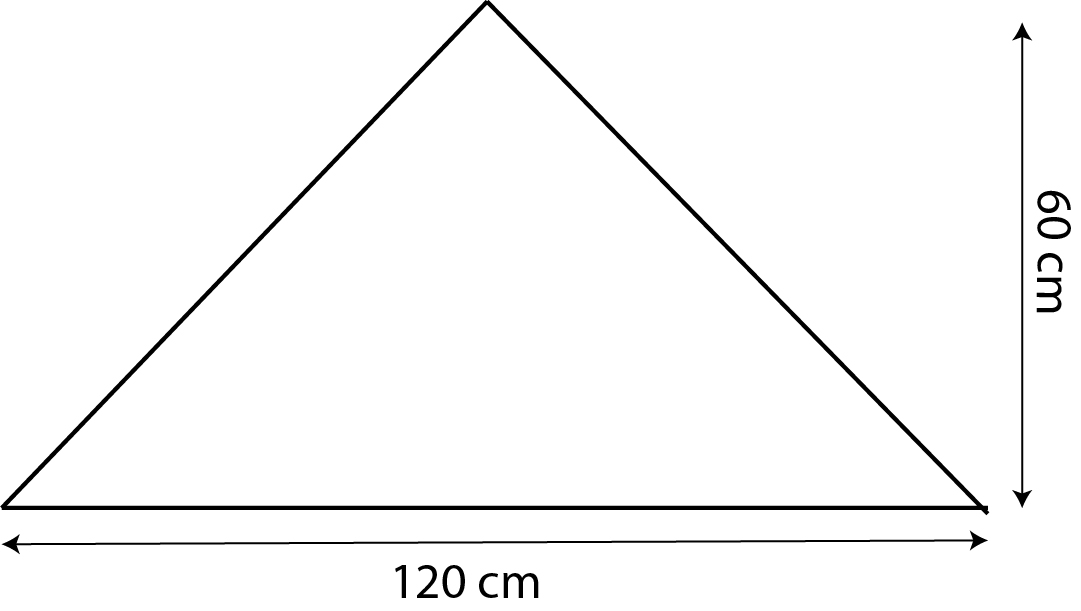
Final measurements
Final measurements of the scarf are listed below:
About the stitch pattern.
We are using for this Jeanie Triangle Scarf the stitch pattern known as “crosses and zeros”.
This pattern is 3 rows repeat: 1 row in window stitch, 1 row in double crochet cross stitches and 1 in single crochet.
Windows Stitch Pattern: 1 double crochet, chain 1, skip 1
Cross stitch Pattern: In this pattern the double crochet cross stitches pattern is made always after a window row.
1 dc in next window, 1 dc in previous window. In each window (ch 1 space of the previous window row) you will have 2 dc’s.
Below you can find the stitch pattern chart:
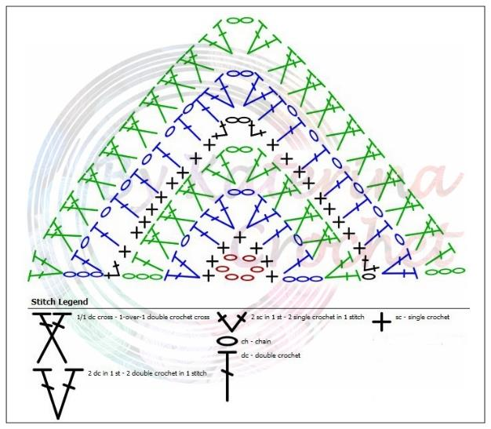
Abbreviations used in this pattern
Ch – chain
Sc – single crochet
Dc – double crochet
St(s) – stitch(es)
Gauge
After 2 patterns repeats, 7 rows, the triangle measures 18 cm width and 9 cm length.
Pattern
R1: Ch 6, sl st to make a circle, ch 1, 7 sc inside circle. Ch 3 and turn
R2: 1 dc in the first st ( the same st with ch 3), ch 1, skip 1 st, 1 dc in the next st, [2 dc, ch 2, 2 dc] in the next st – the center point of our triangle, 1 dc in the next, ch 1, skip 1, 2 dc in the last st. Ch 3 and turn.
R3: 1 dc in the first st, skip the next dc, 1 dc in the next ch 1 space, 1 dc in the skipped dc, 1 dc in the next st, 1 dc in the previous ch 1 space, skip next dc, 1 dc in the next (the last before center point), 1 dc in the skipped dc, [2 dc, ch 2, 2dc] in the ch 2 space of the center point.
Skip next dc (the first after center point), 1 dc in the next, 1 dc in the skipped dc, skip the next dc, 1 dc in the next ch 1 space, 1 dc in the skipped dc, 1 dc in the next dc, 1 dc in the previous ch 1 space, 2 dc in the 3rd st of the turning ch. Ch 1 and turn.
R4: 2 sc in the first st, 1 sc in each st to the center point, [2 sc, ch 2, 2 sc] in the ch 2 space of the center point, 1 sc in each st to the end of the row, ending with 2 sc in the 3rd st of the turning chain.
R5: 1 dc in the first st, [ch 1, skip 1, 1 dc in the next st] repeat until the center point. [2 dc, ch 2, 2 dc] in ch 2 space, [1 dc, ch 1, skip 1] repeat section to the end of the row, ending with 2 dc in the 3rd st of the turning chain. Ch 3 and turn
R6: 1 dc in the first st, skip 1 dc, 1 dc in the next ch 1 space, 1 dc in the skipped dc.
[1 dc in the next ch 1 space, 1 dc in the previous ch 1 space] repeat this section until you have 3 dc to the center point.
Then continue with 1 dc in the next dc, 1 dc in the previous ch 1 space, skip 1 dc, 1 dc in next, 1 dc in the skipped dc. Continue with center point [2 dc, ch 2, 2 dc] in the ch 2 space of the center point.
Skip next dc, 1 dc in next, 1 dc in the skipped dc, skip next dc, 1 dc in the next ch 1 space, 1 dc in the skipped dc, [1 dc in the next ch 1 space, 1 dc in the previous 1 ch space] repeat this section until you have 1 dc left. Continue with 1 dc in the last dc, 1 dc in the previous ch 1 space. Finish the row with 2 dc in the 3rd stitch of the turning ch.
Next, repeat rows 4 to 6 until you have in total 43 rows, or until you get to the desired width and length of the scarf.
Edging
From where your yarn is, continue on the width of the scarf to make a single crochet edge. When working into the side rows, make 2 sc in each dc row (crosses or windows) and 1 sc in each sc side row. Continue with 1 sc in each st to the center point. In the center point make the same increase as you did on each single crochet row and then continue with 1 sc in each st until you get to the end of the round.
Fringe
Cut 4 strands of yarn of about 20 cm, fold them in half, insert the loop through ch 2 space of the center point, pull the ends through the loop and tie. Repeat and add fringe at every 5 sts until you complete the entire edge of the scarf.
To finish
Wave in all ends and block to measurements.
No comments
Write a comment