Make a Cute Crochet Duck Amigurumi: Step-by-Step Pattern & Tips
Creating a crochet plush duck amigurumi is a delightful project that yields a soft, handmade toy ideal for gifting or displaying. This pattern uses common amigurumi techniques (magic ring, single crochet, increases and decreases) and provides clear round-by-round instructions to stitch the head, body, wings, legs and beak, then assemble them into a finished duck. Choose yarn and a hook that give you the fabric density you prefer, and use safety eyes or embroidered eyes for a child-safe option.
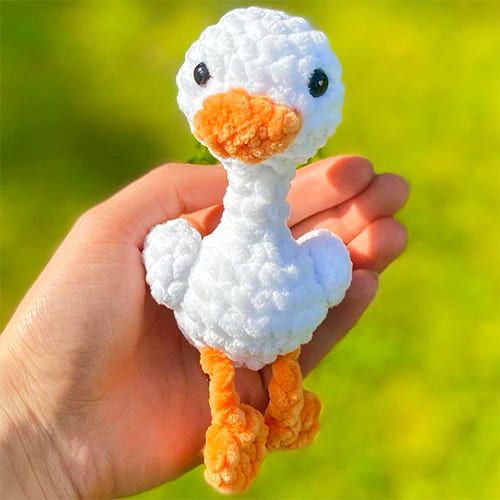
Finished crochet plush duck amigurumi in white with yellow beak and feet — a cute handmade companion or gift.
Abbreviations
Mc: Magic chain
MR: Magic ring
Sc: Single crochet
Ch: Chain
Dec: Decrease
Inc: Increase
Hdc: Half double crochet
Slst: Slip stitch
Fo: Fasten off
Materials
Yarn in white and yellow/orange
Crochet hook to suit your yarn
Darning needle
Stuffing
Scissors
Safety eyes
Head and body
Made in white.
Rnd 1. 6 sc in MR (6)
Rnd 2. 6 inc (12)
Rnd 3. (sc,inc)*6 (18)
Rnd 4-6. (sc)*18 (18)
Rnd 7. (sc,dec) *6 (12)
Put the safety eyes between round 4 and 5, 3-5 stitches apart.
Start stuffing the head.
Rnd 8. (dec)*6 (6)
Rnd 9-12. (sc)*6 (6)
Rnd 13. (inc)*6 (12)
Rnd 14. (sc,inc)*6 (18)
Rnd 15. (inc)*4, (sc)*6, (dec)*4 (18)
Rnd 16. (sc,inc)*3, (sc)*3, (sc,dec)*3 (18)
Rnd 17. (sc,dec)*6 (12)
Stuff the body.
Rnd 18. (dec)*6 (6)
Fasten off and cut the yarn.
Wings
Make two in white.
Rnd 1. 4 sc in MR (4)
Rnd 2. (sc,inc)*2 (6)
Rnd 3. 6 sc (6)
Stuff the wings lightly.
Rnd 4. (sc,dec)*2 (4)
Fasten off and cut the yarn leaving a long tail for sewing.
Legs
Make two in yellow.
Rnd 1. ch 2
Rnd 2. Hdc in first ch (this ch will work like a magic chain in the following stitches. To make it easier I will call this chain magic chain), ch 1, slst in magic chain again.
Rnd 3. ch 2, hdc in magic chain, ch 1, slst in magic chain (repeat one more time)
Rnd 4. chain 5
Fasten off and cut the yarn leaving a long tail for attaching the legs.
Beak
Make one in yellow.
ch 4, (start from 2nd chain from the hook) inc, sc, inc (start working on the other side), inc, sc, inc.
Fasten off and cut the yarn leaving a tail to sew.
Assembly
Wings: Attach the wings to the body between rounds 14–16, 8 stitches apart. Make sure they are positioned symmetrically and parallel to each other before sewing firmly in place.
Legs: Attach the legs between rounds 18–19, 3 stitches apart.
Beak: Sew the beak centered between the eyes around rounds 5–7.
Finishing tips: Secure all parts with hidden stitches and weave in ends. Adjust stuffing to achieve the desired firmness and shape. If the toy will be given to small children, use embroidered eyes instead of safety eyes for added safety.