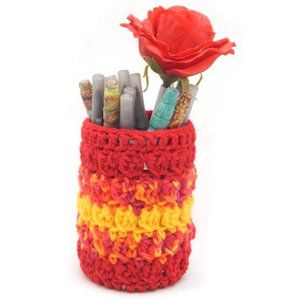
Crochet Checker Stitch Pencil Cup
The Crochet Checker Stitch Pencil Cup is a delightful and practical project that adds a touch of charm to your workspace. With its classic checker stitch pattern, this pencil cup is a fun way to keep your desk organized and stylish. Perfect for holding pens, pencils, or even crochet hooks, it's a versatile accessory that can be personalized with your favorite colors. Whether you're a crochet enthusiast looking for a quick and rewarding project or simply want to add a handmade touch to your desk, this pencil cup is sure to bring a smile to your face every time you reach for a writing utensil. Why settle for a boring old pencil cup when you can create something fun and unique with just a few skeins of yarn and a hook?

Materials Needed
- Red Heart Sport, ART. E289 Color: 0912 Cherry Red
- Red Heart Sport: Art. E289 Color:0230 Yellow
- Red Heart Super Saver: ART. E300 Color: 0798 Sunshine Print
- 1 Empty clean vegetable can. 14.75oz
- Size US G6/4.00mm Aluminum crochet hook
- Yarn Needle for weaving in ends
Yarn Thickness: 3-4mm
Gauge: 4dc = 1"
Finished Size: 5" x 3.25"
Skill Level: Intermediate
Special Stitch Used: Checker Stitch, ckr Sc in stitch indicated, while keeping loop on hook, insert hook in same st, yo, and ch3. Yo, pull through both lps on hook, then while keeping the first lp on hook. Pull up a lp in each of the 3 chs, then yo and pull yarn through all 4 lps on hook. Ch1.
Instructions
RND 1: With Red, Ch5. Join w/slst to first ch to form ring. Ch2, 14dc in ring. Join w/slst to first dc. (14dc)
RND 2: Ch3, dc in same st as slst. 2dc in each dc around. Join w/slst to top of ch3. (28dc)
RND 3: In back loop only for this round only, Ch2, dc in same st as slst. Dc in each back loop around. Join w/slst to first dc.
RND 4: Ckr in same st as slst. Sk 1 st. *Ckr in next st. Sk 1 st. Rep from * around. Join w/slst to first sc of first ckr st. Fasten off red.
RND 5: Join Sunshine Print to top of first ckr. Sc in same st. Sc in next ch1 sp. *Sc in top of next ckr. Sc in next ch1 sp. Rep from * around. Join w/slst to first sc.
RND 6: Repeat RND 4. Fasten off Sunshine Print.
RND 7 & 8: Join yellow and repeat RND 5, then 4. Fasten off yellow.
RND 9 & 10: Join Sunshine Print and repeat RND 5, then 4. Fasten off Sunshine Print.
RND 11 & 12: Join Red and repeat RND 5, then 4. Do not fasten off.
RND 13: Repeat RND 5.
RND 14: Ch2, dc in same st as slst. Dc in each st around. Join w/slst to first dc. At this point, weave all ends into work so far and slip it onto the can. It may be tight. You want to stitch the next round while on the can so this next round can cover the lip of the can.
RND 15: Ch1. Slst in each st around while the cover is on the can. Weave the final end into the inside of your work. Do not glue it in place so you can take it off and wash it or get a new can if needed.