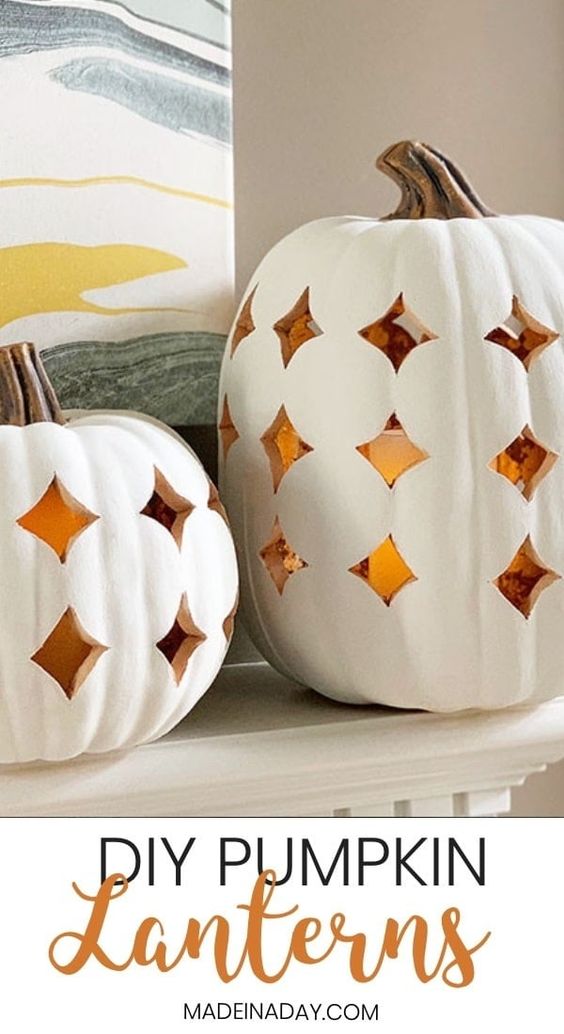
Shimmering Boho Pumpkin Luminaries
These Shimmering Boho Pumpkin Luminaries are a delightful addition to any fall decor. Their intricate designs and sparkling details bring a touch of magic to your space, creating a cozy and welcoming atmosphere. Whether you place them on your front porch to greet visitors or use them as a centerpiece for your autumn gatherings, these luminaries are sure to impress. With their warm, inviting glow and stylish bohemian twist, they are the perfect way to add a festive flair to your home this season. So go ahead and light up your home with these charming pumpkin luminaries and watch as they enchant everyone with their shimmering beauty.
Supplies:
- Faux Pumpkins mine were from Target
- Acrylic Paint: Peach, Brown, Black and Chalk Paint: White
- Walnut Hollow Versa Tool: With X-Acto Knife Attachment
- Paint Brushes
- Gold Gilding Sheets (20 sheets), Adhesive and Stiff Dry Paintbrush
- Large Finger Nail Files: (2) Coarse Grit
- Martha Stewart Stencil: Arabesque
- Washi Tape or Painters Tape
- Pencil
- Martha Stewart Spray Enamel (optional)

Instructions:
- For the pattern, I chose to use a large diamond-shaped stencil.
- It can be quite tricky to get a stencil to lay flat on a round object.

- Measure your pumpkin and figure out where the center of the pumpkin will be. I went by eye level and not particularly the exact center. The center can be different when you set the pumpkin on a flat surface. (I hope that makes sense).

- Mark dots with a pencil where the center is all around the pumpkin.
- Place washi tape or painter’s tape all the way around the center of the pumpkin.

- Place the stencil on the pumpkin and tape it down lightly.
- Draw the shape with a pencil.
- Repeat all the way around the pumpkin. If you get the shapes uneven that is ok just redo the shape and keep going.
- You will be painting over the pencil marks.
Set up the Versa Tool:
- Tape the base holder of the versa tool to your work table.
- Add the X-Acto knife attachment to the versa tool and heat it up on the highest heat setting.
Follow all directions on the Walnut Hollow packaging to be safe and not get burned from using this wood-burning hot tool. It is hot!

- Insert the versa tool into the pumpkin following the stencil line you drew.
- The foam will melt like butter.
- Go slow and take your time. You may need to go over the area twice to make sure it cuts all the way through the pumpkin.

- I made an X cut in the center of my diamonds and then pushed the pieces through with a pencil.
- Repeat cutting out the pattern all around the pumpkin.

- Cut a hole in the bottom of the pumpkin. make sure it is large enough to fit a candle.
- Sand the holes smooth with a coarse fingernail file.
- Pour out any remaining foam from the inside of the pumpkin and wipe out any remaining dust or foam particles.
LET’S TALK PAINT:
I was hoping this would be a simple project and I could just spray paint the inside of the pumpkin gold. From experience, I know spray paint and foam do not play nice together. The paint melts the foam because of the acetone it has in it. I did spray my pumpkins inside and they did not melt. But they were not the shiny gold I was looking for.
That is why my pumpkins are a dark gold color inside in the steps below. You can skip this spray paint step and go straight to the gold gilding or use gold spray paint and skip the gilding. It’s your choice how shiny you want your lanterns or if you want to paint them inside at all.

- Using a paintbrush paint the gilding adhesive inside the pumpkin.
- Let the adhesive dry until tacky, around 15 minutes.
- With clean hands gently break the gilding sheets into quarters and place them inside the pumpkin.

- Use a stiff dry paintbrush to push the gilding down and smooth it out. The gilding does not need to be perfect. I left small sections undone.
Your pumpkin will still have a bright shimmering effect. It is tough to apply it perfectly inside the pumpkin. Just take your time and work it around the inside.
- On the outside, paint the inside of the diamond cut sections with the peach acrylic paint.
- Let it dry.
- Paint the outside of the pumpkin with white chalk paint.
- Paint the stem with brown paint to create a more realistic pumpkin stem.
- Add paint stem accents with black paint for more drama.
- Let it dry and use a spray enamel to seal.
- Add a faux candle inside the pumpkin and display it!
HINT: I left my pumpkins plain with no enamel. If you use these pumpkins outside I would seal them. DO NOT USE A REAL CANDLE WITH FAUX PUMPKINS. They will melt and possibly cause a fire.