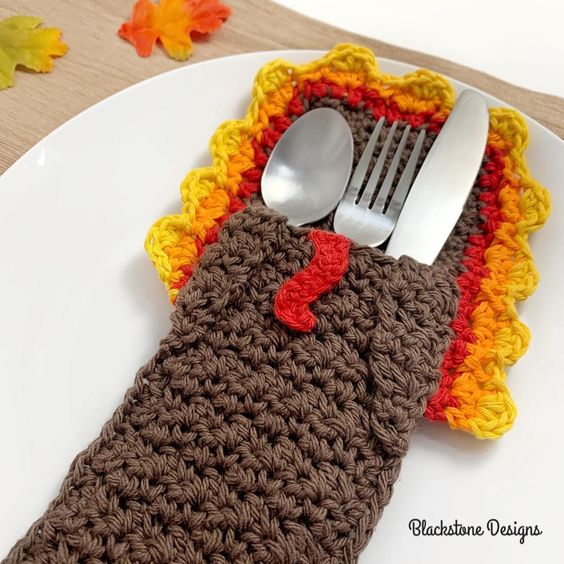
Crochet Turkey Belly Flatware Holder
Looking for a charming addition to your Thanksgiving table? Look no further than the Crochet Turkey Belly Flatware Holder! This delightful accessory adds a touch of whimsy to your dining experience, making your cutlery stand out in style. Handcrafted with care and attention to detail, each holder features intricate crochet work that beautifully showcases the festive spirit of the holiday season. Not only does it keep your flatware neatly organized, but it also doubles as a cute decoration that will surely be a conversation starter among your guests. Get ready to impress your friends and family with this adorable and practical accent piece that brings a warm and cozy vibe to your Thanksgiving celebrations!
Materials
Worsted Weight Yarn (#4)
-Brown [2oz/100g]
-Red [1oz/30g]
-Orange [1oz/30g]
-Yellow [1oz/30g]
H/8/5.00mm Hook
Yarn Needle
Gauge
7 sts x 6 rows = 2”
Gauge is not critical for this project
Finished Measurements
3.5″W x 9″H (Without Feathers)
5.5”W x 10”H (With Feathers)
Stitch Guide
arnd = around
ch = chain
dc = double crochet
dec = single crochet decrease
sc = single crochet
sl st(s) = slip stitch(es)
Skill Level
Easy
WRITTEN IN U.S. TERMS
Notes
- Beginning chains do not count as stitches.
- Where asterisks appear, repeat the instructions between them.
- Where parenthesis appears within the instructions, work all of those stitches in one stitch/space.
- For the edging: use a loose tension to avoid pulling and puckering. If you have difficulty loosening your tension, use a I/9/5.50mm crochet hook for these rows.
- Edging instructions can be found in the “finishing” section.
Instructions
With Brown,
R1. Ch 11, sc in the back bump of the 2nd ch, dc in next, *sc, dc* across, turn (10)
R2. Ch 1, *sc, dc* across, turn (10)
R3-41. Repeat R2; Fasten at the end of R41.
WING (Make 2) (leave long tails at both ends)
With Brown,
R1. Ch 2, sc in back bump of 2nd ch, turn (1)
R2. Ch 1, (sc, dc), turn (2)
R3. Ch 1, (dc, sc), dc, turn (3)
R4. Ch 1, sc, dc, sc, turn (3)
R5. Ch 1, dc, sc, dc, turn (3)
R6-9. Repeat R4 & 5; Fasten at the end of R9.
WATTLE (leave long tail for sewing)
With Red,
Ch 9, sc, 2 sc, sc x 2, dec, sc x 2; Fasten.
Finishing
- Fold between rows 16 & 17. Pin into place as needed. <Pocket created>
- With Brown yarn: Insert hook in bottom right corner, through both layers, and single crochet in the same space and in the end of each row up the side, in each stitch across the top, and in the end of each row down the left edge. Fasten. [Do not crochet across the top of the pocket].
- With Red yarn, attach yarn 7 stitches below the pocket edge (on the right side of the holder, and working over to approx. 7 stitches below the pocket edge on the left side of the holder): Ch 1, hdc x 3, *ch 1, skip 1, hdc x 3* across; Fasten.
- With Orange yarn, attach yarn to 1st sc, 3 hdc in middle sc, sl st to next sc, skip ch-1, *sl st in 1st hdc, 3 hdc in next, sl st in next* across; Fasten.
- With Yellow yarn, attach yarn to 1st hdc, 3 hdc in middle hdc, sl st in next, *sl st in 1st hdc, 3 hdc in middle hdc, sl st in next* across; Fasten.
- Attach wings by lining up the flat side with the edge of the holder and sew into place.
- Attach wattle/snood to top center of pocket, between the wings.
- Hide All Strings.