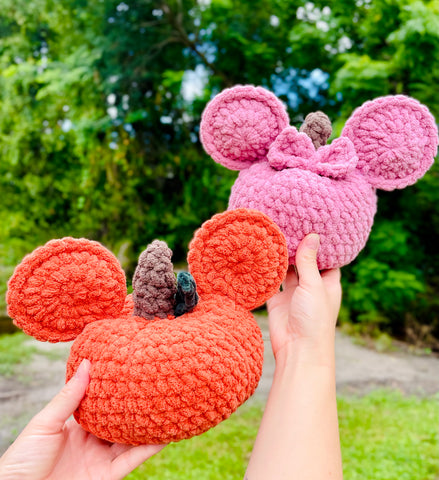
Crochet Mouse Pumpkins
If you're looking to add some adorable flair to your fall decor, crochet mouse pumpkins are a charming option to consider! These little creations bring a delightful touch of whimsy to any space, making them a perfect addition for the autumn season. With their cute mouse ears and pumpkin shape, they are sure to bring a smile to your face. Whether you're an experienced crocheter or just starting out, crafting these sweet mouse pumpkins can be a fun and rewarding project. You can customize them with different yarn colors to match your home decor or create a whole family of mice in various sizes. So, grab your crochet hook and yarn, and get ready to bring a touch of cozy cuteness to your home with these charming crochet mouse pumpkins!

Materials:
- Weight 6 yarn
- Size J/6.0mm
- Stuffing
- Safety Eyes or felt eyes
- Yarn needle
- Stitch Marker
Abbreviations:
- sc = single crochet
- dc = double crochet
- hdc = half double crochet
- inc = increase (2 sc in next stitch)
- dec = invisible decrease (sc 2 stitches together)
- st = stitch
- FO = fasten off
This pattern uses weight 6 blanket yarn. Any yarn may be used, but your crochet hook size will be different. Use a hook 1-2 sizes smaller than your yarn calls for. This pattern is in US crochet terms.
This pattern is worked in continuous rounds and using a stitch marker to mark the first stitch is recommended.
*Safety eyes are NOT recommended for children who are three years old or younger.
The pumpkins pictured in the pattern are made with Bernat Blanket Yarn.
Ears
Make two for each ear:
R1: 8 sc in a magic ring
R2: 8 inc (16)
R3: (1 sc, inc) x 8 (24)
Fasten off the first piece only. Once completed the second piece, line up the two circles and sc through BOTH circles around (24). Fasten off and leave a long tail for sewing.
Pumpkin
In orange:
R1: 8 sc in a magic ring
R2: 8 inc (16)
R3: (1 sc, inc) x 8 (24)
R4: (2 sc, inc) x 8 (32)
R5: (3 sc, inc) x 8 (40)
R6-13 (8 rounds): 40 sc
R14: (3 sc, dec) x 8 (32)
R15: (2 sc, dec) x 8 (24)
Begin stuffing the pumpkin and continue stuffing as you go. Shape out the pumpkin well while stuffing and do not overstuff the pumpkin.
R16: (1 sc, dec) x 8 (16)
R17: 8 dec (8)
Change color to brown:
R18-21 (4 rounds): 8 sc
R22: (2 sc, dec) x 2 (6)
R23: 6 sc
Fasten off and sew hole shut. Weave in your ends.
We are now going to make the pumpkin segments. Thread a long piece of yarn in the same color as the pumpkin and stick in through the bottom of the pumpkin up out of the top, near the base of the stem.
Take the yarn and thread it through the same place you just went into. Pull slightly on the yarn to tighten it (be careful with blanket yarn – it snaps easy!)
Repeat this 4-5 more times around the pumpkin, ensuring that your pumpkin segments are even.
Weave in your ends.
Mouse Leaf
R1: ch 7
R2: In the second chain from the hook, sl st. sc, hdc, dc, dc. Work *dc, hdc, ch 1, sl st* in the last stitch.
Mouse Bow
R1: Chain 5. Beginning in the second chain from the hook, sc 4 down the chain.
R2: Ch 1 and turn. 4 sc.
Repeat R2 5 more times for a total of 6 rows. Fasten off.
Take a spare piece of yarn and wrap it around the center of the rectangle to create a bow shape. Fasten off by knotting the ends together.
Assembly
Sew the ears onto the top of the pumpkin on either side of the stem at rounds 15-16. If making a girl mouse, attach the bow. If making a boy mouse, attach the pumpkin leaf.