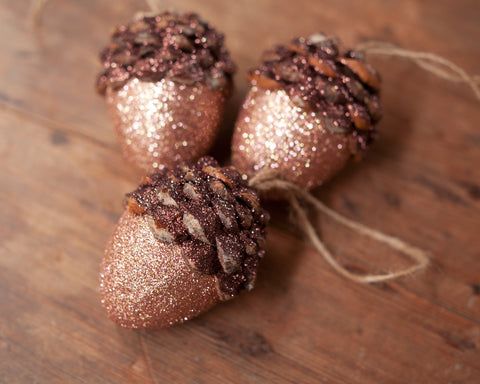
DIY Beautiful Acorn Ornaments with Pine Cones and Glitter
Get ready to add a touch of natural charm to your holiday decorations by making DIY beautiful acorn ornaments with pine cones and glitter! This fun and easy craft project is not only a great way to bring a festive vibe to your home but also a fantastic activity to do with family and friends. Start by collecting some acorns and pine cones from your backyard or a nearby park. Then, using a hot glue gun, attach the pine cones to the acorn caps to create a base for your ornaments. Next, sprinkle some glitter onto the pine cones and acorns to add a sparkly touch. Hang them on your Christmas tree or use them to adorn your holiday wreaths for a rustic yet elegant look that will surely impress your guests. Get creative and experiment with different colors of glitter to make each ornament unique and personalized. Enjoy the process and let your imagination run wild as you craft these beautiful ornaments that will bring joy and warmth to your holiday season.

Supplies:
- 2 1/2 inch craft egg
- Medium 4-5" inch sized pine cone (approx. one pine cone per ornament)
- Jute Twine
- Fine Glitter: one color for the acorn, and brown for the cap
- Sharp, fine tipped pruning scissors
- Low temp hot glue gun, glue sticks
- Elmers Glue-All Liquid glue
- Awl, Pencil, Ruler, Paint Brushes, Bowls and spoons for glitter
Step 1:
Use sharp fine-tipped pruning scissors to cut pine cone pieces. Depending on the species, some pine cones have sharp barbs at the ends of the tips. If you are working with a pokey pine cone, snip off the barbs first before cutting the pieces for your craft. Cut the "leaves" of the pine cone about 1/2 inch or so up from the ends. You can cut straight across, or make two diagonal snips so that the finished piece is roughly diamond shaped. Each acorn ornament needs roundabout 35-50 pieces, depending on the size of the pine cone you are using, but I like to cut way more pieces than I think I will need. This lets me pick and choose the best-fitting pieces when I assemble the acorn. You will want pieces in a variety of sizes.
Step 2:
Prepare the form. Use an awl to poke a hole in the wide end of the craft egg. Cut a length of twine, and knot the ends to make a hanging loop about 4 inches long. Apply a dot of hot glue into the hole, and then press the knot into it. Before the glue has a chance to set, hold the ornament by the hanging loop for just a second to assess if it is hanging straight. Adjust the placement of the knot until the ornament will hang nicely. Hold a ruler up to the egg, and make marks with a pencil 1 inch down from the top. Make several marks, and then draw a line to connect them.
Step 3:
Begin gluing pine cone pieces along the drawn line. Start with larger pieces, and attach them using a single dot of hot glue. Complete an entire row around the egg. For the next row, stagger the placement so that you will cover the egg's surface, and slightly overlap the last row of pine cone pieces. Imagine them to be shingles on a roof, leaving no surface uncovered. As you move on to the third row, start decreasing the size of the pine cone pieces, and cover the tail of your hanging loop when you reach that portion. You will want to use some very small pieces up at the very top to fill in the gaps.
Step 4:
Hold the ornament by the pine cone end, and use a flat paint brush to apply an even coat of liquid glue to the "nut" portion of the acorn. Work the glue right up under the lip of the first row of pine cone pieces so that the glitter will fully cover the lower part of the acorn. Apply the glue to the whole thing at once rather than in smaller sections. Brush away any drips. When ready, spoon or pour the glitter over the acorn, and collect the excess glitter into a bowl. Prop it up on the pine cone end, or set it glitter-side up in an egg carton. Let the glittered end dry completely before continuing.
Step 5:
Use a smaller paint brush to apply glue just to the tops of the pine cone pieces. You can work it into the crevices, and under the lips of the pine cones, but be sure to leave the lower scallops of the pine cone pieces exposed. This is what gives the ornament such a beautiful texture. Spoon or pour the brown glitter over the glue, and use the back of a spoon to tap off the excess. Prop the ornament up to dry completely.
To finish, I like to use a dry paint brush, or an old toothbrush, to brush away any glitter that did not adhere to the glue. You can get up into the crevices and release any that got trapped, and this will help keep the ornament from "shedding" too much.