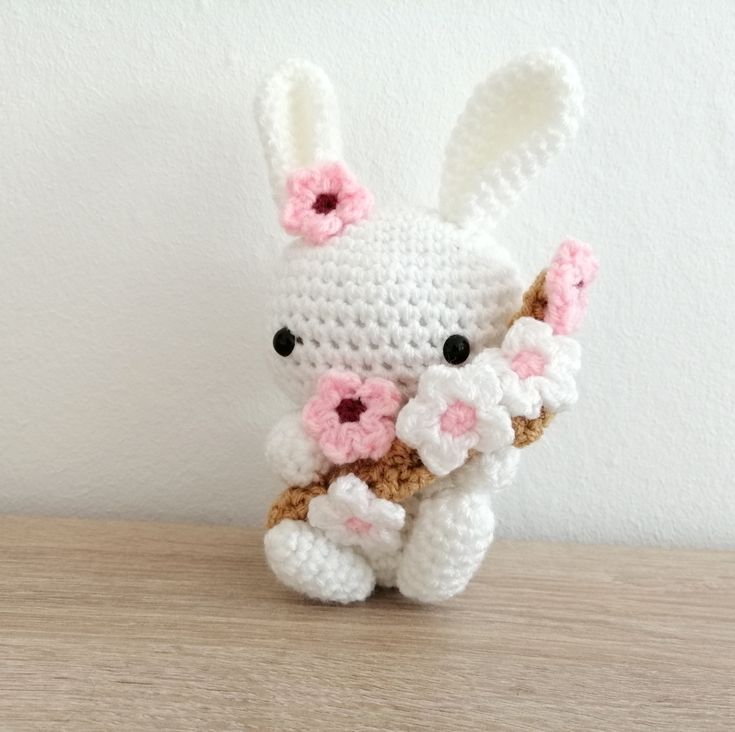
Crochet Sakura Bunny
Oh, the Crochet Sakura Bunny is an absolute delight! Just imagine a sweet little bunny with delicate sakura blossoms crocheted into its design. This charming creation combines the cuteness of a bunny with the elegance of cherry blossoms, making it a perfect handmade gift for anyone who adores both animals and nature. Every stitch is infused with care and creativity, resulting in a unique and heartwarming bunny that will surely bring joy to anyone lucky enough to receive it. So, grab your yarn and crochet hook, and let's create some adorable magic with the Crochet Sakura Bunny!
Materials
To make the Sakura bunny you will need:
– A 2.5mm crochet hook
– Yarn for the bunny in your choice (I used white), brown for the stem and white, light pink and dark pink for the petals
– A tapestry needle and scissors
– Stuffing
– Safety eyes
– Optional: wire for the stem
– A stitch marker to help you keep track of the start of the round
Please note that you can make the Sakura bunny using any size crochet hook and yarn weight for a smaller or bigger result. I like using DK as it’s most commonly available. If you make amigurumi, it is usually recommended to go down a bit from the recommended hook size for the yarn to allow for a no-hole look (we don’t want to see the stuffing show through in between stitches)! Using DK yarn and a 2.5mm crochet hook, she should be be about 15cm tall.
Stitches & Abbreviations
The pattern is written using US crochet terms in continuous spirals. You will need to know the following kinds of stitches to make him:
– Magic Ring (MR)
– Chaning (ch)
– Single crochet (sc)
– Decrease (dec); preferably using the invisible decrease method
– Increase (inc)
– Half double crochet (hdc)
– Double crochet (dc)
– Slip stitch (sl)
And now, let’s get started!
Head
Round 1: In a MR, sc 6
Round 2: Inc around (12)
Round 3: (Sc, inc) around (18)
Round 4: (Sc 2, inc) around (24)
Round 5: (Sc 3, inc) around (30)
Round 6: (Sc 4, inc) around (36)
Round 7: (Sc 5, inc) around (42)
Round 8-13 (6 rounds): Sc around (42)
Round 14: (Sc 5, dec) around (36)
Round 15: (Sc 4, dec) around (30)
Round 16: (Sc 3, dec) around (24)
Round 17: (Sc 2, dec) around (18), add the safety eyes between rounds 11 and 12, about 8-9 stitches apart and stuff
Round 18: (Sc, dec) around (12)
Round 19: Dec around (6), fasten off and sew closed
Body
Make a magic ring.
Round 1: In a MR, sc 6
Round 2: Inc around (12)
Round 3: (Sc, inc) around (18)
Round 4: (Sc 2, inc) around (24)
Round 5: (Sc 3, inc) around (30)
Round 6: (Sc 4, inc) around (36)
Round 7-10 (4 rounds): Sc around (36)
Round 11: (Sc 4, dec) around (30)
Round 12: Sc around (30)
Round 13: (Sc 3, dec) around (24)
Round 14: Sc around (24)
Round 15: (Sc 2, dec) around (18), fasten off and stuff
Ears (make 2)
Round 1: In a MR, sc 6
Round 2: (Sc, inc) around (9)
Round 3: (Sc 2, inc) around (12)
Round 4: (Sc 3, inc) around (15)
Round 5-12 (8 rounds): Sc around (15)
Round 13: (Sc 3, dec) around (12), fasten off
Feet (make 2)
Round 1: In a MR, sc 6
Round 2: (Sc, inc) around (9)
Round 3-10 (8 rounds): Sc around (9), fasten off and sew closed
Tail
Round 1: In a MR, sc 6
Round 2: Inc around (12)
Round 3: Sc around (12)
Round 4: Dec around (6)
Arms (make 2)
Round 1: In a MR, sc 6
Round 2: (Sc, inc) around (9)
Round 3-8 (6 rounds): Sc around (9), fasten off and sew closed
Branch (in brown)
For the main branch, chain 5, and then sc across (4 stitches) for 25 rows. Note that you could do this in the round, if you prefer. For the smaller branches, I made 2 of: chain 3 and sc across (2 stitches) for five rows, one of: chain 3 and sc across (2 stitches) for 4 rows, and one of: chain 3 and sc across (2 stitches) for 6 rows.
Flowers
Round 1: In the center color, in a MR, sc 5, change to your main color at the end
Round 2: In the same stitch, (hdc, dc, hdc, sl). Then slip stitch into the next stitch. Repeat this five times around and fasten off
Assembly
First, we assemble the bunny. Take the body and sew it to the head. Then, fold the ears in half and sew them on as well. Sew on the feet, arms, and tail. Sew on one of your flowers to the head. Now, take your branch pieces. If using, put your wire onto the main branch piece and then sew along the edge to turn the flat piece into a round one. Then, sew on the smaller pieces, making sure they’re positioned so that the bunny can actually hold the branch. Once you’re done, sew the remaining flowers to the branch. Done!