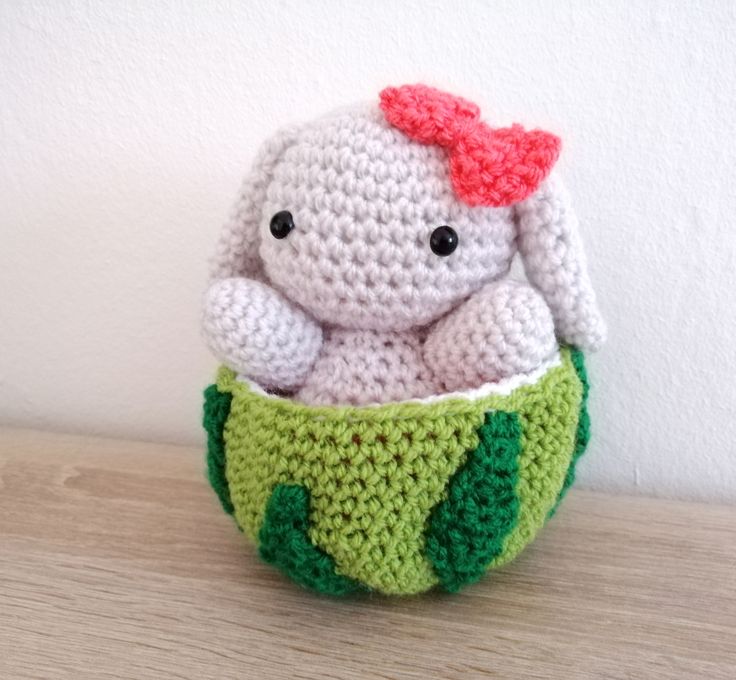
Crochet Watermelon Bunny
The Crochet Watermelon Bunny is an adorable and whimsical creation that combines the sweetness of a bunny with the refreshing vibes of a watermelon. This little crochet friend is sure to bring a smile to anyone's face with its vibrant colors and charming design. Whether you're gifting it to a loved one or keeping it for yourself, the Crochet Watermelon Bunny is a delightful addition to any collection of handmade treasures. Its intricate stitching and attention to detail make it a true work of art that will be cherished for years to come. So, grab your crochet hook and some yarn, and get ready to create your own cuddly companion that is guaranteed to brighten even the gloomiest of days!
Materials
To make the watermelon bunny you will need:
– A 2.5mm Crochet hook
– Green, dark green, white and pink yarn for the watermelon and any color yarn for your bunny (I chose light grey)
– A tapestry needle and scissors
– Stuffing
– A stitch marker to help you keep track of the start of the round
– Safety eyes
Please note that you can make the watermelon bunny using any size crochet hook and yarn weight for a smaller or bigger result. I like using DK as it’s most commonly available. If you make amigurumi, it is usually recommended to go down a bit from the recommended hook size for the yarn to allow for a no-hole look (we don’t want to see the stuffing show through in between stitches)! Using DK yarn and a 2.5mm crochet hook, the watermelon bunny should be about 15cm tall.
Stitches & Abbreviations
The pattern is written using US crochet terms in continuous spirals. You will need to know the following kinds of stitches to make him:
– Magic Ring (MR)
– Chaning (Ch)
– Single crochet (sc)
– Decrease (dec); preferably using the invisible decrease method
– Increase (inc)
And now, let’s get started!
Outer watermelon shell (in green)
Round 1: In a MR, sc 6
Round 2: Inc around (12)
Round 3: (Sc, inc) around (18)
Round 4: (Sc 2, inc) around (24)
Round 5: (Sc 3, inc) around (30)
Round 6: (Sc 4, inc) around (36)
Round 7: (Sc 5, inc) around (42)
Round 8: (Sc 6, inc) around (48)
Round 9: (Sc 7, inc) around (54)
Round 10-21 (12 rounds): Sc around (54), fasten off
Inner watermelon shell
Round 1: In pink, in a MR, sc 6
Round 2: Inc around (12)
Round 3: (Sc, inc) around (18)
Round 4: (Sc 2, inc) around (24)
Round 5: (Sc 3, inc) around (30)
Round 6: (Sc 4, inc) around (36)
Round 7: (Sc 5, inc) around (42)
Round 8: (Sc 6, inc) around (48)
Round 9: (Sc 7, inc) around (54)
Round 10-18 (9 rounds): Sc around (54), change to white
Round 19: Sc around (54), fasten off
Long watermelon stripes (in dark green; make 4)
Row 1: Ch 3, sc 2
Row 2-4 (3 rows): Sc across (2)
Row 5: Inc, sc (3)
Row 6: Sc across (3)
Row 7: Sc 2, inc (4)
Row 8-10 (3 rows): Sc across (4)
Row 11: Skip the first stitch, sc across (3)
Row 12: Sc across (3)
Row 13: Skip the first stitch, sc across (2)
Row 14: Skip the first stitch, sc (1)
Row 15-16: Sc across (1), fasten off
Short watermelon stripes (in dark green; make 4)
Row 1: Ch 3, sc 2
Row 2-3: Sc across (2)
Row 5: Inc, sc (3)
Row 6: Sc across (3)
Row 7: Sc 2, inc (4)
Row 8-9: Sc across (4)
Row 10: Skip the first stitch, sc across (3)
Row 11: Skip the first stitch, sc across (2)
Row 12: Skip the first stitch, sc (1)
Row 13-14: Sc across (1), fasten off
Head
Round 1: In a MR, sc 6
Round 2: Inc around (12)
Round 3: (Sc, inc) around (18)
Round 4: (Sc 2, inc) around (24)
Round 5: (Sc 3, inc) around (30)
Round 6: (Sc 4, inc) around (36)
Round 7-13 (7 rounds): Sc around (36)
Round 14: (Sc 4, dec) around (30)
Round 15: (Sc 3, dec) around (24)
Round 16: (Sc 2, dec) around (18), stuff and inster safety eyes between rounds 10 and 11, approx. 7 stitches apart
Round 17: (Sc, dec) around (12)
Round 18: Dec around (6), fasten off and sew closed
Ears (make 2)
Round 1: In a MR, sc 6
Round 2: Inc around (12)
Round 3: (Sc 3, inc) around (15)
Round 4-12 (9 rounds): Sc around (15)
Round 13: (Sc 3, dec) around (12)
Round 14-16 (3 rounds): Sc around (12), fasten off
Body
Round 1: In a MR, sc 6
Round 2: Inc around (12)
Round 3: (Sc, inc) around (18)
Round 4: (Sc 2, inc) around (24)
Round 5: (Sc 3, inc) around (30)
Round 6: (Sc 4, inc) around (36)
Round 7-9 (3 rounds): Sc around (36)
Round 10: (Sc 4, dec) around (30)
Round 11-14 (4 rounds): Sc around (30)
Round 15: (Sc 3, dec) around (24)
Round 16: Sc around (24)
Round 17: (Sc 2, dec) around (18), fasten off and stuff
Tail
Round 1: In a MR, sc 6
Round 2: Inc around (12)
Round 3-4: Sc around (12)
Round 5: Dec around (6), fasten off and stuff
Arms (make 2)
Round 1: In a MR, sc 6
Round 2: Inc around (12)
Round 3-9 (7 rounds): Sc around (12), fasten off and stuff
Feet (make 2)
Round 1: In a MR, sc 6
Round 2: (Sc, inc) around (9)
Round 3-7 (5 rounds): Sc around (9)
Round 8: (Sc, dec) around (6), fasten off
Bow (in pink)
Row 1: Chain 6, sc 5
Row 2-10: Sc across (5), fasten off, leaving a long tail. Weave the tail through to the center of this rectangle, then wrap it around the center a few times to create the bow.
Assembly
First, let’s make the watermelon. This couldn’t be simpler, all you need to do is put the inner shell inside the outer shell (with the right side being visible) and then sewing the top rounds together. Sew on the stripes, alternating between long and short (you could also embroider or felt this instead). Optionally, you could add some black dotted embroidery for watermelon seeds, but I opted not to as they won’t really be visible with the bunny sitting inside the watermelon anyways. For the bunny, sew the body to the head first. Then, sew on the ears (I sewed them on around rounds 5-6), then the feet, arms, and lastly, the tail. If you made one, sew on the bow. Put the bunny inside the watermelon and tell it how cute it is!