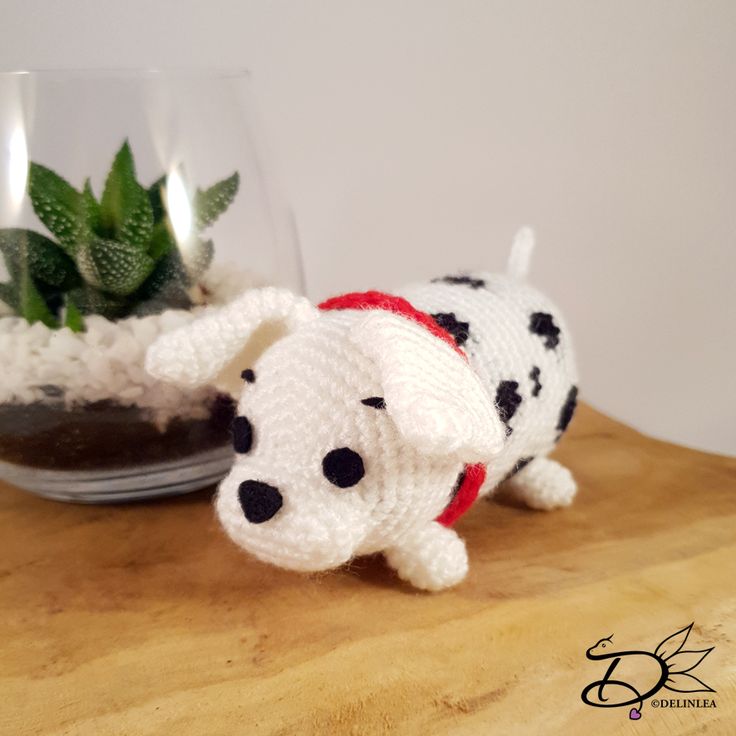
Crochet Rolley Tsum Tsum Amigurumi Toy
Have you ever heard of the Crochet Rolley Tsum Tsum Amigurumi Toy? It's absolutely adorable! This little amigurumi toy is perfect for anyone who loves cute and cuddly things. With its intricate crochet work and vibrant colors, it's hard not to smile when you see it. The Rolley Tsum Tsum Amigurumi Toy is a fun addition to any collection and could make a lovely gift for a friend or loved one who appreciates handmade goodies. Why not try your hand at crocheting one yourself and see the joy it brings? Happy crafting!
So for this DIY you will need:
Yarn: in the colors White, Red and Black. (I used zeeman supersoft)
Crochet hook. (I used a 2mm hook)
Stitch marker.
Stuffing
Yarn needle.
Sewing Pins.
Felt in Black.
Scissors.
(Fabric) Glue.
Stitches used (US Terms):
Magic Ring.
Color Changing.
CH = Chain.
SLST = Slip Stitch.
SC = Single Crochet.
ST = Stitch.
FSC = Foundation Single Crochet. (Optional)
Inc = Increase.
Dec = Decrease.
Slst = Slip Stitch.
(…) = Repeat the space in brackets the given number of times.
[…] = Total number of stitches.
Pattern
This pattern will be worked in continues rounds, unless stated otherwise.
Body
Start with the color White.
1: 6SC in magic ring. [6]
2: Inc in each st around. [12]
3: (1SC, inc) 6 times. [18]
4: (2SC, inc) 6 times. [24]
5: (3SC, inc) 6 times. [30]
6: (4SC, inc) 6 times. [36]
7: (5SC, inc) 6 times. [42]
8: SC in each st around. [42]
|
12: SC in each st around. [42]
From here on the colors will change every several stitches to create his dots, I will state the number of stitches for each color. (W = White, B = Black
13: W 6SC, B 2SC, W 4SC, B 2SC, W 7SC, B 2SC, W 5SC, B 2SC, W 12SC. [42]
14: W 5SC, B 3SC, W 12SC, B 3SC, W 4SC, B 4SC, W 11SC. [42]
15: W 6SC, B 2SC, W 8SC, B 1SC, W 4SC, B 3SC, W 4SC, B 3SC, W 11SC. [42]
16: W 15SC, B 3SC, W 11SC, B 2SC, W 5SC, B 2SC, W 4SC. [42]
17: W 10SC, B 2SC, W 4SC, B 2SC, W 7SC, B 2SC, W 8SC, B 3SC, W 4SC. [42]
18: W 9SC, B 4SC, W 11SC, B 3SC, W 9SC, B 3SC, W 3SC. [42]
19: W 11SC, B 2SC, W 19SC, B 2SC, W 3SC, B 1SC, W 4SC. [42]
20: All White, SC in each st around. [42]
21: All White, SC in each st around. [42]
22 – 28: Repeat row 13 to 19
29: All White, SC in each st around. [42]
30: All White, (5SC, dec), 6 times. [36]
31: (W 4SC, dec, 1SC, B 2SC, W 1SC, dec) 3 times. [30]
32: (W 3SC, dec, 2SC, B 1SC, W dec) 6 times. [24]
Continue with White.
33: (2SC, dec), 6 times. [18] Stuff the body here.
34: (1SC, dec), 6 times. [12]
35: Dec around. [6]
Fasten off and weave in tail.
Ears (Make 2)
Use the color White.
1: 6SC in Magic Ring. [6]
2: (1SC, inc) 3 times. [9]
3: 9SC. [9]
4: (2SC, inc) 3 times. [12]
5: 12SC. [12]
6: (3SC, inc) 3 times. [15]
7: (4SC, inc) 3 times. [18]
8: (5SC, inc) 3 times. [21]
9: 21SC. [21]
|
11: 21SC. [21]
Fasten off and leave a long tail for sewing.
Snout
Use the color White, you won’t work in continues rounds, close every round with a slst in the first st.
1: Ch7, insert in 2nd chain from hook, 5SC, 3SC in the next st, 4SC, inc. [14]
2: Ch1, inc, 4SC, inc 3 times, 4SC, inc 2 times. [20]
3: Ch1, 20SC [20]
4: Ch1, 20SC [20]
Fasten off, leave long tail for sewing. Stuff the snout lightly.
Legs (Make 4)
Use the color White
1: 4SC in magic ring. [4]
2: Inc in each st around. [8]
3: SC in each st around. [8]
|
5: SC in each st around. [8]
Fasten off and leave a long tail for sewing. You don’t have to stuff the legs.
Tail
Use the color White
Chain 9, insert in second chain from hook and make 8 slst. Fasten off and leave long tail for sewing.
Collar
Use the color Red
Make a chain of either FSC or CH, measure around the body to know how many stitches you want. If you used FSC you are done, if you used CH, insert in 2nd chain from hook, and crochet SC all the way back.
Fasten off and make a round collar.
Assembling
I always try to use sewing pins to position all of my parts first, before sewing on, this way I am able to move parts around until I am happy.
At one part of the body there’s less dots, this will be the belly, so keep that in mind. Start with positioning the snout first, place it just under the middle of the face. Sew it on. Now position the legs and sew them on. Same for the tail. Last you will place the ears, keep in mind that you will fold those over. and sew those on.
Put on his collar just behind his ears and front legs.
Last, cut eyes, a nose and eyebrows from felt and glue those to the face. And Rolly is already done!