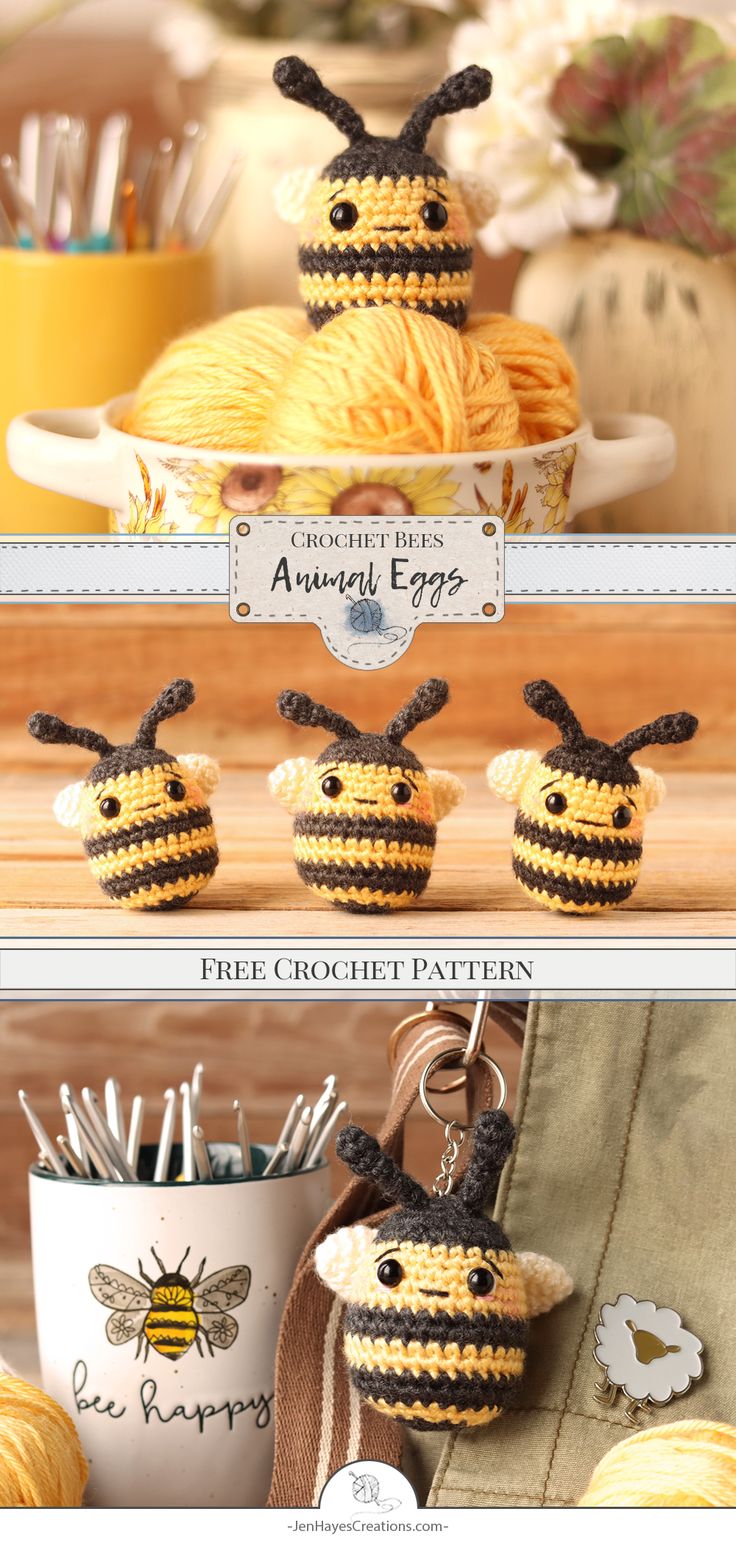
Crochet Bee Egg
The Crochet Bee Egg is a delightful and whimsical addition to any Easter celebration or spring decor. With its intricate yellow and black design reminiscent of a busy little bee, this charming creation adds a touch of sweetness to your home. Whether displayed in a basket, used as a table centerpiece, or given as a thoughtful gift, the Crochet Bee Egg is sure to bring a smile to anyone who sees it. Its handmade quality and attention to detail make it a unique piece that stands out, spreading joy and cheer wherever it goes.
Difficulty: Easy
Materials
- Crochet Hook, Size E/4 (3.5 mm) (I use Clover Amour hooks)
- Stitch Marker(s)
- Scissors
- Stuffing
- Pins
- Tapestry Needle
- Safety eyes, 8 mm (miniature 3.5 mm or embroidered)
- Embroidery Floss, Black (DMC 310), White (DMC BLANC), Pink (DMC 776)
- Embroidery Needle
- Dritz Disc Needle Pullers (optional)
- Chopstick, dowel, or something similar to help with stuffing small parts
- Yarnspirations Caron Simply Soft Heathers (worsted 4-Medium, 100% acrylic, 250 yds/228 m, 5 oz/141 g), Color (A) Charcoal Heather (Dark Grey), used approx. 20 yds/18 m
- Yarnspirations Caron Simply Soft (worsted 4-Medium, 100% acrylic, 315 yds/288 m, 6 oz/170 g), Color (B) Sunshine (Yellow), used approx. 15 yds/14 m, Color (C) Off White, used approx. 10 yds/9 m
- The Miniature Crochet Bee Egg shown in some of the images was made using hook size 1.50 mm and size 10 crochet thread. Color (A): Hobby Lobby Artiste #10 thread, Coal Black, Color (B): Aunt Lydia’s #10 thread, Golden Yellow, and Color (C): Hobby Lobby Artiste #10 thread, Ivory. The same pattern is used with a minor change: use 3.5mm safety eyes or embroider them.
Gauge
- Using hook size E/4 (3.5 mm) and worsted yarn the first 4 Rnds of the body measure approx.1.5 inches (3.8 cm) in diameter.
- Using hook size 1.50 mm and size 10 crochet thread the first 4 Rnds of the body measure approx. 9/16 inch (1.4 cm) in diameter.
Finished Measurement:
- Using hook size E/4 (3.5 mm) and worsted yarn the Crochet Bee Egg measures approx. 3 inches (7.6 cm) tall including the slightly bent antennae.
- Using hook size 1.50 mm and size 10 crochet thread the Miniature Crochet Bee Egg measures approx. 1.5 inches (3.5 cm) tall including the antennae.
Design Notes
- The pattern is written in English using US crochet terminology.
- The pattern is written primarily in continuous rounds, it will be helpful to place a stitch marker at the beginning stitch of the round and move it up at the start of each additional round.
- At the end of each round/row, the number of stitches for completion is noted in parentheses.
- Further design notes, tips, and options will be provided throughout the pattern to help aid in construction.
- Color changes in the pattern should be made during the last step of the stitch prior to the noted color change throughout the pattern. >Design Tip: To help minimize the stair-step/jogging that occurs with color changes, make the first st in the new color a sl st (counts as a st).
- Caution! If using safety eyes, take into consideration who will be using the item. The use of safety eyes is not recommended for children under the age of three or for those prone to putting things in their mouths as they may cause a choking hazard. Crocheted or hand-embroidered eyes are a great alternative!
Abbreviations/Stitches Used
- approx. – approximately
- ch – chain
- MR – magic ring (aka. magic circle, adjustable ring)
- Rnd(s) – round(s)
- Row(s) – row(s)
- sc – single crochet
- sc2tog – single crochet 2 stitches together (invisible decrease)
- sl st – slip stitch
- st(s) – stitch(es)
- [ ] / ( ) – work instructions between brackets/parenthesis as many times as directed
- Some hand embroidery
Body:
Design Note: The body is made from the top down.
Design Tip: The colors will change several times when making the stripes for the body. There is no need to fasten off each time. Drop and pick up colors as needed to make the color changes.
Using Color (A)
- Rnd 1: 6sc in MR. (6sts)
- Rnd 1 alternative: If preferred, ch2 and then 6sc in 2nd chain from hook. (6sts)
- Rnd 2: 2sc in each st around. (12sts)
- Rnd 3: [Sc in the next st, 2sc in next st] 6 times. (18sts)
- Rnd 4: Sc in the next st, 2sc in the next st, [sc in the next 2sts, 2sc in the next st] 5 times, sc in the next st. (24sts)
- Rnds 5: Sc in each st around. (24sts)
Switch to Color (B)
- Rnd 6: Sc in each st around. (24sts)
- Rnd 7: [Sc in the next 7sts, 2sc in the next st] 3 times. (27sts)
- Rnd 8: Sc in the next 4sts, 2sc in the next st, [sc in the next 8sts, 2sc in the next st] 2 times, sc in the next 4sts. (30sts)
- Rnds 9-10: Sc in each st around. (30sts for 2 Rnds)
Switch to Color (A)
- Rnds 11-12: Sc in each st around. (30sts for 2 Rnds)
Insert the safety eyes, then embroider the other desired features.
- Suggested Eye Placement: Place the eyes between Rnds 8 and 9 approximately 5sts apart. (>Design Tip: It may be helpful to wait to add the backs to the eyes until some parts of the embroidery are complete (like eyelashes). This makes it easier to make adjustments and get behind the eyes with the embroidery floss if needed.)
- Embroidery Suggestions: Using embroidery floss and an embroidery needle, add eyelashes, eyebrows, cheeks, eye accents, a nose, etc. as desired. (>Design Tip: For thicker features use 6 strands of DMC floss and 3 strands for thinner features.)
- Remember to put the backs on the eyes once the embroidery is complete.
- Coloring the Cheeks Suggestions: Coloring for the cheeks can be embroidered or colored using crayons, colored pencils, blush, watercolor, marker, and chalk or oil pastels. (Pictured embroidery and crayon were used.)
Switch to Color (B)
- Rnds 13-14: Sc in each st around. (30sts for 2 Rnds)
Switch to Color (A)
- Rnds 15-16: Sc in each st around. (30sts for 2 Rnds)
Switch to Color (B)
- Rnd 17: [Sc in the next 3sts, sc2tog] 6 times. (24sts)
- Rnd 18: Sc in the next st, sc2tog, [sc in the next 2sts, sc2tog] 5 times, sc in the next st. (18sts)
Firmly stuff and shape the body and continue to do so as the pattern progresses.
Switch to Color (A)
- Rnd 19: [Sc in the next st, sc2tog] 6 times. (12sts)
- Rnd 20: [Sc in the next st, sc2tog] 4 times. (8sts)
- Sl st to the first st and fasten off leaving a long tail to close up the hole. Close the hole with a tapestry needle stitching only through the front loops until the hole pulls nicely closed, secure, and weave in the end.
Antennae
Make 2
Using Color (A)
- Rnd 1: 5sc in MR. (5sts)
- Rnd 1 alternative: If preferred, ch 2 and then 5sc in 2nd chain from hook. (5sts)
- Rnd 2: Sc in the next 2sts, 2sc in next st, sc in the next 2sts. (6sts)
- Rnd 3: [Sc in the next st, sc2tog] 2 times. (4sts)
Firmly stuff and shape the antenna.
- Rnd 4: Sc in the next 2sts, leave the remaining 2sts unworked. (2sts)
The next section of the antenna is worked in turned Rows, creating the length of the antennae.
- Rows 5-7: Turn, sc in the next 2sts. (2sts for 3 Rows)
- Fasten off leaving an extra long tail for shaping the antenna and stitching it to the body.
Shape the Antennae
- Fold the long Row portion of the antenna in half lengthwise towards the previously unworked stitches in the ball portion of the antenna. Using the yarn tail and a tapestry needle, whip stitch the edges of the rows together to form a tube (from the base up to the ball portion of the antenna). Then close up the unworked stitches at the base of the ball.
- Weave the tail back down to the base of the antenna to use for stitching it to the body.
Stinger
Make 1
Using Color (A)
- Rnd 1: 4sc in MR. (4sts)
- Rnd 1 alternative: If preferred, ch 2 and then 4sc in 2nd chain from hook. (4sts)
- Rnd 2: Sc in each st around. (4sts)
- Rnd 3: 2sc in the next st, sc in the next 3sts. (5sts)
- Firmly stuff and shape the stinger.
- Sl st to the first st and fasten off leaving a long tail for attaching the stinger to the body.
Wings:
Make 2
Using Color (C)
- Rnd 1: 6sc in MR. (6sts)
- Rnd 1 alternative: If preferred, ch 2 and then 6sc in 2nd chain from hook. (6sts)
- Rnd 2: [Sc in the next st, 2sc in next st] 3 times. (9sts)
- Rnd 3: [Sc in the next 2sts, 2sc in next st] 3 times. (12sts)
- Rnd 4: Sc in each st around. (12sts)
- Rnd 5: [Sc in the next 2sts, sc2tog] 3 times. (9sts)
- Rnd 6: [Sc in the next st, sc2tog] 3 times. (6sts)
- The wing is not stuffed.
- Press the top edges together so the starting st is at the right side of the wing and sc both sides together across. (3sts)
- Fasten off leaving a long tail for stitching the wing to the body.
Assembly
Pin all the pieces together to determine the desired placement for the entire Crochet Bee Egg and stitch securely into place.
General placement and stitching suggestions:
- Antennae: Pin the antennae between approx. Rnds 2 and 3, approx. 2sts apart, at the top front of the body.
- Wings: Center the wings at the back of the body over approx. Rnds 8-11, approx. 2-3sts apart. They can be positioned pointing up, out to the sides, or down, as desired. It may be helpful to stitch along the base of the wing and then tack it up a little from the base on the underside of the wing in a spot or two to keep it resting closer to the body.
- Design Tip: When pinned, look at the wings from both the back and the front of the bee to ensure a desired placement before stitching.
- Stinger: Center the stinger at the back of the body over approx. Rnds 15-17. >Design Tip: It may be helpful to pin the stinger and then look at it from the bottom of the bee to ensure alignment with the center back, wings, face, and antennae.