Crochet Echoes Pullover
The Crochet Echoes Pullover is a cozy and stylish piece that will quickly become your go-to favorite! With its intricate crochet design and soft yarn, this pullover exudes charm and warmth. Whether you're lounging at home or out for a casual day, the Crochet Echoes Pullover effortlessly blends comfort and fashion. Its flattering fit and eye-catching pattern make it a must-have addition to your wardrobe. Get ready to receive compliments wherever you go in this delightful piece!
Materials:
Light (3) Weight Yarn, Lion Brand Mandala in “Warlock” 3(3, 4, 4, 4, 5, 5, 5, 6) Skeins or 1570(1690, 1800,1980, 2250, 2430, 2610, 2840, 3000) yards
H/5.00mm Crochet Hook
Yarn Needle
Scissors
Stitch Markers (3)
Gauge:
16 Sts by 8.5 Rows= 4×4” (blocked)
To make a gauge swatch work 25 Fsc and then work rows 1-10 of the back panel. Then, measure 4×4” within it to check gauge.
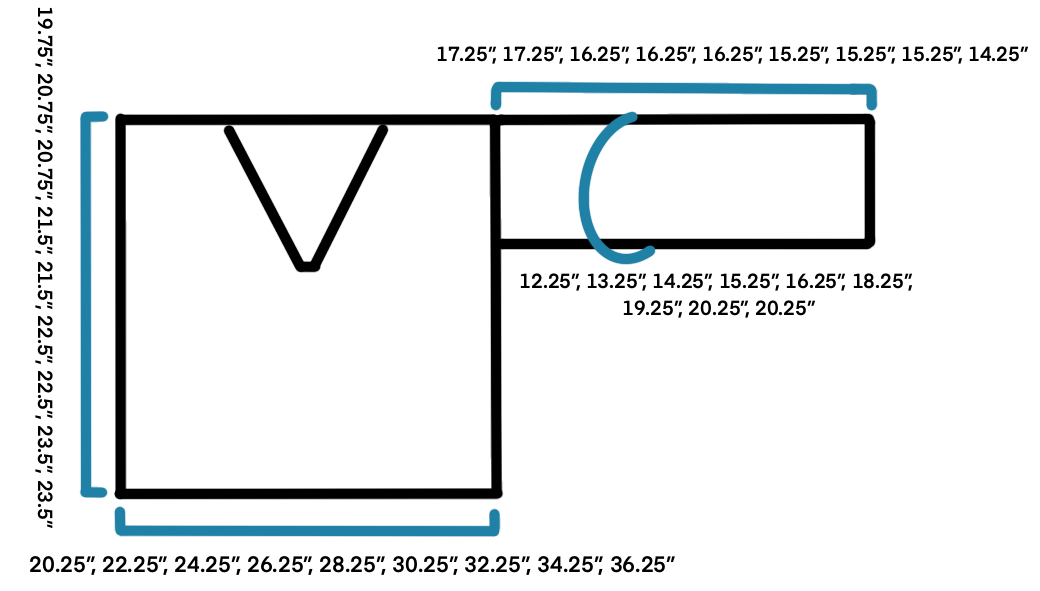
Sizes:
XS(S, M, L, XL, 2X, 3X, 4X, 5X)

Notes:
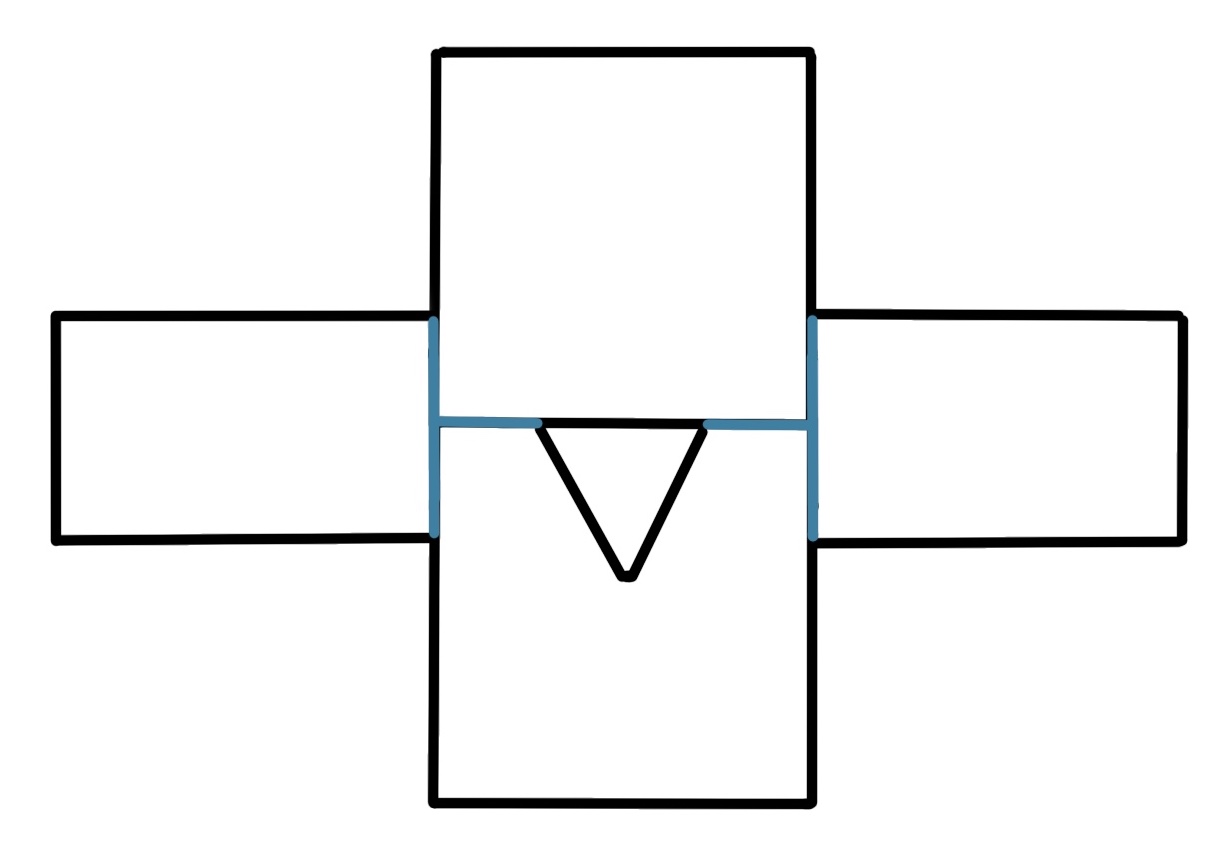
This pullover is worked in separate panels. The Back and Front panels are worked bottom up. The sleeves are worked top down.
The starting Ch 3 counts as 1 St.
The starting Ch 4 counts as 1 St and 1 Ch Sp.
The Ch 3’s within the row do not count towards the St count.
I did not cut and join the yarn to achieve certain colors in different spots. I worked through an entire skein before joining in the next.
You can adjust the length of the pullover by adding or removing rows in multiples of 2 on the back panel. Add or remove the same amount of rows to the front panel before you begin the neckline shaping. Take into account this will alter your yardage requirement for your size.
The parenthesis at the beginning of the row are the row counts for all 9 sizes. The parenthesis at the end of the row are the stitch counts for all 9 sizes. The parenthesis within the row are the instructions for all 9 sizes.
Stitches and Abbreviations (US Terms):
Ch(s)- Chain(s)
Fsc- Foundation Single Crochet
Sc- Single Crochet
Sp- Space
St(s)- Stitch(es)
YO- Yarn Over
Dc- Double Crochet
Sc2tog- Single Crochet 2 Together (decrease)
Hdc- Half Double Crochet
Sl St- Slip Stitch
RS- Right Side
BLO- Back Loop Only
Special Stitch-
YO, insert hook in the first Dc of the set of 3, YO and pull up a loop, YO, pull through 2 loops on hook, YO, insert hook in next Dc, YO and pull up a loop, YO, pull through 2 loops on hook, YO, insert hook in SAME Dc, YO, pull up a loop, YO and pull through 2 loops on hook, YO, insert hook in last Dc, YO, pull up a loop, YO and pull through 2 loops on hook, YO and pull through all 5 loops on hook.
Pattern:
Back Panel-
Row 1: 81(89, 97, 105, 113, 121, 129, 137, 145) Fsc, turn. (81(89, 97, 105, 113, 121, 129, 137, 145) Sc) Alternatively, you can Ch 1 more than the number listed above, work 1 Sc in the second Ch from the hook and each Ch across for the same St count.
Row 2 (RS): Ch 3(counts as 1 St here and throughout), 3 Dc in first St, *Sk 3 Sts, 1 Sc in next Sc St, Ch 3, 3 Dc in the same St as the Sc*, repeat from * to * across row until 4 Sts remain, Sk 3, 1 Sc in final St, turn. (81(89, 97, 105, 113, 121, 129, 137, 145) Sts)
Row 3: Ch 4(counts as 1 Dc and 1 Ch-1 here and throughout), *Special St in next 3 Dc, Ch 1, 1 Sc in Ch-3 Sp, Ch 1*, repeat from * to * across row until 4 Sts remain, Special St in last 3 Dc, Ch 1, 1 Sc in top of last St (the starting Ch 3), turn. (81(89, 97, 105, 113, 121, 129, 137, 145) Sts)
Row 4: Ch 3, 3 Dc in first St, *Sk 3 Sts, 1 Sc in next Sc St, Ch 3, 3 Dc in same St as the Sc*, repeat from * to * across row until 4 Sts remain, Sk 3, 1 Sc in final St (the 3rd Ch of the starting Ch 4), turn. (81(89, 97, 105, 113, 121, 129, 137, 145) Sts)
Rows 5-43(45, 45, 47, 47, 49, 49, 51, 51): Repeat Rows 3 & 4.
Fasten off.
Front Panel-
Repeat Rows 1-35(37, 37, 39, 39, 41, 41, 43, 43) of the back panel. We will now be splitting and shaping the neckline.
First Shoulder (left when worn)-
Row 36(38, 38, 40, 40, 42, 42, 44, 44): Ch 3(counts as 1 St here and throughout), 3 Dc in first St, *Sk 3 Sts, 1 Sc in next Sc St, Ch 3, 3 Dc in the same St as the Sc*, repeat from * to * 7(8, 9, 10, 11, 12, 13, 14, 15) more times, Sk 3 Sts, 1 Sc in next Sc St, leave remaining Sts unworked, turn. (37(41, 45, 49, 53, 57, 61, 65, 69) Sts)
Row 37(39, 39, 41, 41, 43, 43, 45, 45): Ch 4, *Special St in next 3 Dc, Ch 1, 1 Sc in Ch-3 Sp, Ch 1*, repeat from * to * across row until 4 Sts remain, Special St in last 3 Dc, Ch 1, 1 Sc in top of last St (the starting Ch 3), turn. (37(41, 45, 49, 53, 57, 61, 65, 69) Sts)
Row 38(40, 40, 42, 42, 44, 44, 46, 46): Ch 3, 3 Dc in first St, *Sk 3 Sts, 1 Sc in next Sc St**, Ch 3, 3 Dc in same St as the Sc*, repeat from * to * across row ending last repeat at ** and leaving the remaining 4 Sts unworked, turn. 33(37, 41, 45, 49, 53, 57, 61, 65) Sts)
Row 39(41, 41, 43, 43, 45, 45, 47, 47): Repeat Row 37(39, 39, 41, 41, 43, 43, 45, 45). (33(37, 41, 45, 49, 53, 57, 61, 65) Sts)
Row 40(42, 42, 44, 44, 46, 46, 48, 48): Repeat Row 38(40, 40, 42, 42, 44, 44, 46, 46). (29(33, 37, 41, 45, 49, 53, 57, 61) Sts)
Row 41(43, 43, 45, 45, 47, 47, 49, 49): Repeat Row 37(39, 39, 41, 41, 43, 43, 45, 45). (29(33, 37, 41, 45, 49, 53, 57, 61) Sts)
Row 42(44, 44, 46, 46, 48, 48, 50, 50): Repeat Row 38(40, 40, 42, 42, 44, 44, 46, 46). (25(29, 33, 37, 41, 45, 49, 53, 57) Sts)
Row 43(45, 45, 47, 47, 49, 49, 51, 51): Repeat Row 37(39, 39, 41, 41, 43, 43, 45, 45). (25(29, 33, 37, 41, 45, 49, 53, 57) Sts)
Fasten off, leave a long tail for seaming the last row to the back panel.
Opposite Shoulder (right when worn)-
With your panel RS up and the finished shoulder on the right hand side, count (37(41, 45, 49, 53, 57, 61, 65, 69) Sts) in from left to right and join yarn with a Sl St. There will be 7 Sts left unworked in the center.
Row 36(38, 38, 40, 40, 42, 42, 44, 44): Ch 1, 1 Sc in same St, Ch 3, 3 Dc in same St as the Sc, *Sk 3 Sts, 1 Sc in next Sc St, Ch 3, 3 Dc in the same St as the Sc*, repeat from * to * across row until 4 Sts remain, Sk 3, 1 Sc in final St, turn. (37(41, 45, 49, 53, 57, 61, 65, 69) Sts)
Row 37(39, 39, 41, 41, 43, 43, 45, 45): Ch 4, *Special St in next 3 Dc, Ch 1, 1 Sc in Ch-3 Sp, Ch 1*, repeat from * to * across row until 4 Sts remain, Special St in last 3 Dc, Ch 1, 1 Sc in top of last St (the starting Ch 3), turn. (37(41, 45, 49, 53, 57, 61, 65, 69) Sts)
Row 38(40, 40, 42, 42, 44, 44, 46, 46): 1 Sl St in first 4 Sts, 1 Sc in next Sc St, Ch 3, 3 Dc in same St as the Sc, *Sk 3 Sts, 1 Sc in next Sc St, Ch 3, 3 Dc in same St as the Sc*, repeat from * to * across row until 4 Sts remain, Sk 3, 1 Sc in final St (the 3rd Ch of the starting Ch 4), turn. (33(37, 41, 45, 49, 53, 57, 61, 65) Sts)
Row 39(41, 41, 43, 43, 45, 45, 47, 47): Repeat Row 37(39, 39, 41, 41, 43, 43, 45, 45). (33(37, 41, 45, 49, 53, 57, 61, 65) Sts)
Row 40(42, 42, 44, 44, 46, 46, 48, 48): Repeat Row 38(40, 40, 42, 42, 44, 44, 46, 46). (29(33, 37, 41, 45, 49, 53, 57, 61) Sts)
Row 41(43, 43, 45, 45, 47, 47, 49, 49): Repeat Row 37(39, 39, 41, 41, 43, 43, 45, 45). (29(33, 37, 41, 45, 49, 53, 57, 61) Sts)
Row 42(44, 44, 46, 46, 48, 48, 50, 50): Repeat Row 38(40, 40, 42, 42, 44, 44, 46, 46). (25(29, 33, 37, 41, 45, 49, 53, 57) Sts)
Row 43(45, 45, 47, 47, 49, 49, 51, 51): Repeat Row 37(39, 39, 41, 41, 43, 43, 45, 45). (25(29, 33, 37, 41, 45, 49, 53, 57) Sts)
Fasten off, leave a long tail for seaming the last row to the back panel.
Sleeves (make 2)-
Leave a long tail to sew the first row of the sleeve to the front/back panels.
Row 1: 49(53, 57, 61, 65, 73, 77, 81, 81) Fsc, turn. (49(53, 57, 61, 65, 73, 77, 81, 81) Sc) Alternatively, you can Ch 1 more than the number listed above, work 1 Sc in the second Ch from the hook and each Ch across for the same St count.
Row 2 (RS): Ch 3, 3 Dc in first St, *Sk 3 Sts, 1 Sc in next Sc St, Ch 3, 3 Dc in the same St as the Sc*, repeat from * to * across row until 4 Sts remain, Sk 3, 1 Sc in final St, turn. (49(53, 57, 61, 65, 73, 77, 81, 81) Sts)
Row 3: Ch 4, *Special St in next 3 Dc, Ch 1, 1 Sc in Ch-3 Sp, Ch 1*, repeat from * to * across row until 4 Sts remain, Special St in last 3 Dc, Ch 1, 1 Sc in top of last St (the starting Ch 3), turn. (49(53, 57, 61, 65, 73, 77, 81, 81) Sts)
Row 4: Ch 3, 3 Dc in first St, *Sk 3 Sts, 1 Sc in next Sc St, Ch 3, 3 Dc in same St as the Sc*, repeat from * to * across row until 4 Sts remain, Sk 3, 1 Sc in final St (the 3rd Ch of the starting Ch 4), turn. (49(53, 57, 61, 65, 73, 77, 81, 81) Sts)
Rows 5-35(35, 33, 33, 33, 31, 31, 31, 29): Repeat Rows 3 & 4.
Add or remove rows here in multiples of 2 to adjust the sleeve length.
Row 36(36, 34, 34, 34, 32, 32, 32, 30): Ch 1, 1 Sc in each St across, turn. (49(53, 57, 61, 65, 73, 77, 81, 81) Sc)
Row 37(37, 35, 35, 35, 33, 33, 33, 31): Ch 1, *Sc2tog*, repeat from * to * across row until 1 St remains, 1 Sc in final St, turn. (25(27, 29, 31, 33, 37, 39, 41, 41) Sc)
Row 38(38, 36, 36, 36, 34, 34, 34, 32): Ch 1, 1 Sc in each St across, turn. (25(27, 29, 31, 33, 37, 39, 41, 41) Sc)
Row 39(39, 37, 37, 37, 35, 35, 35, 33): Ch 2, 1 Hdc in each St across, turn. (25(27, 29, 31, 33, 37, 39, 41, 41) Hdc)
Fasten off, leave a long tail to seam the side of your sleeve.
Note- This is an oversized drop-shoulder style pullover. The wider the front/back panels are, the shorter the sleeve needs to be because they join further down your bicep. That’s why the smaller sizes have more rows than the larger. You an easily adjust your sleeve length by adding or taking away as many rows as needed before beginning the “cuff”.
Assembly:
Block your panels to the measurements listed above. I recommend a steam block.
Place your front and back panels together RS facing.
Using your preferred seaming method attach the front panel to the back panel at the shoulders (I used a needle and did the mattress stitch across). Be sure your panels are aligned and that you aren’t bunching or skipping stitches.
Next, using the same joining process as above, we will be attaching the sleeves to the pullover. Make sure the center of the sleeve is aligned
with the shoulder seam. Be sure to check that your sleeves are even on both the front and back panel as you go. It is helpful to use SM’s here to keep your sleeve in place as you join.
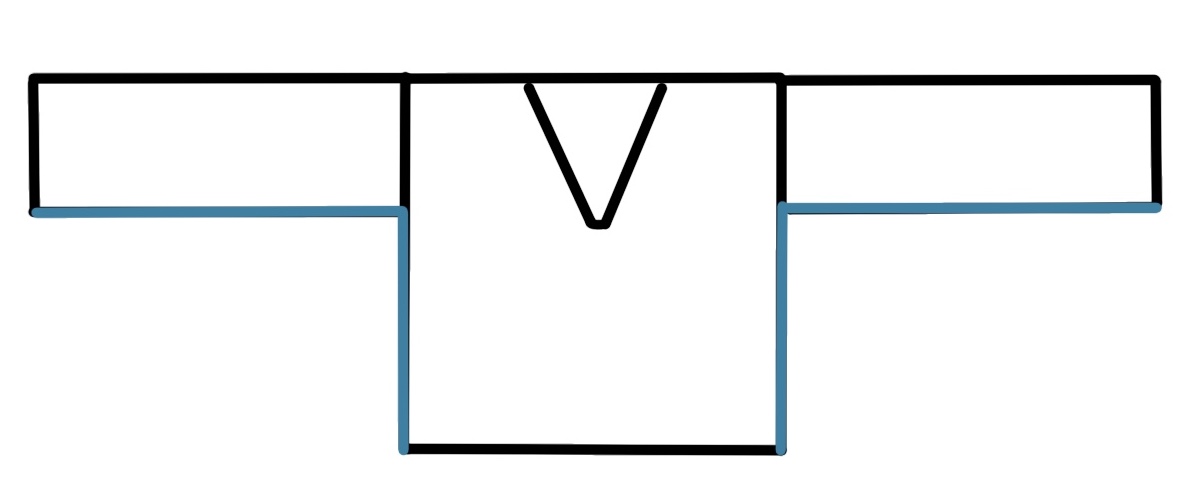
Finally, fold your pullover so that the back and front panels are on top of each other, RS facing. Seam from the cuffs to the underarm and down the side of the pullover.
Neckline Trim:
With your pullover RS out, join yarn with a Sl St to the left of the side seam on the back panel.
Round 1: Ch 1, 1 Sc in each St across the back of the neckline, when you reach left shoulder of the front panel, work your Sc Sts evenly down the side, approximately 3 Sc with each row and 1 Sc into each of the 4 Sts left unworked in the next row, 1 Sc in each St across the unworked 7 Sts of the front panel, Sc evenly up the other side working 1 Sc into each of the 4 Sl Sts and aprroximatley 3 Sc on the end of each row below the sl sts. Sl St to the first Sc to join, fasten off. Exact St count is not crucial here. You are trying to “show off” the wavy effect of the neckline, not hide it.
Weave in any ends.
No comments
Write a comment