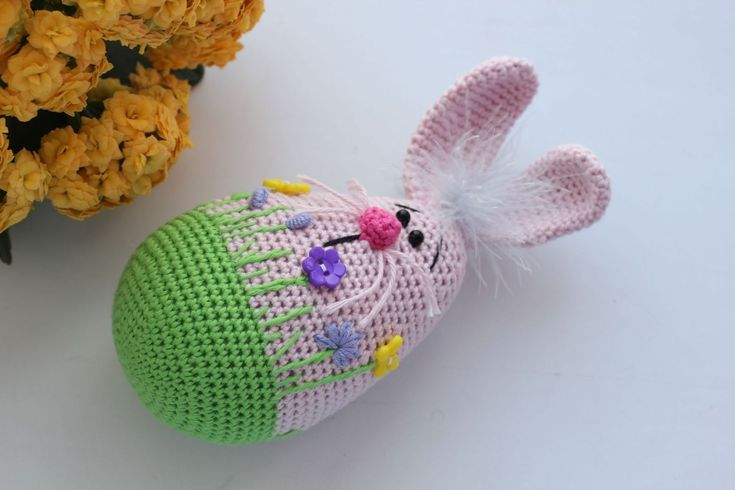
Crochet Easter Bunny
Crochet Easter bunnies are such a delightful addition to any Easter celebration! Crafting these adorable little bunnies can bring so much joy and sweetness to the holiday season. The soft yarn, intricate patterns, and cute details make each bunny unique and special. Whether you're gifting them to loved ones or using them as charming decorations, these crocheted Easter bunnies are perfect for adding a touch of whimsy and handmade warmth to your spring festivities. Have fun creating these lovable bunnies and spreading some Easter cheer!
SUPPLIES
cotton yarn (e.g. Schachenmayr Catania 125m/50g) in three colors: rose and green, a bit of pink for the nose and black for eyebrows, crochet hook 3 mm, Polyester fiberfill stuffing, scissors, buttons or beads, 2 black beads or safety eyes, yarn needle.
SKILL LEVEL
Easy
SIZE
The ready amigurumi is approx. 17 cm, can be made bigger or smaller depending on the yarn and hook you use.
SKILLS YOU NEED
chain, single crochet, double crochet, half double crochet, slip stitch, increase, decrease
ABBREVIATIONS
Ch =chain
St = stitch
Sc =single crochet
Sl st = slip stitch
dec = decrease stitch (two single crochets together)
inc = increase stitch (two single crochets into one stitch)
Dc = double crochet
Rnd = Round
TIPPS
- Do not join rounds, work in a continuous spiral.
- Use a stitch marker or a piece of yarn to mark the end or the beginning of a round
- All stitches are worked into both loops, unless stated otherwise in the pattern.
- Amigurumi can be made in any desired colours.
Seamsless way of changing color when working in the round
Pick up the new color at the end of the round: inset your hook into the stitch, yarn over the new color and pull through the stitch and the loop on your hook to complete the stitch.
SHIFT STITCH
Sometimes during a work of the spiral amigurumi, you need to keep the work symmetrically. As work tends to twist to the right you need to adjust position of the marker periodically (beginning of the round).
Shift stitchis an extra stitch you work at the end of a round to make your work look symmetrical. If you notice that marker moves right, you need to work one extra stitch in the end of the round and move marker for one stitch (now 2nd st of the round becomes 1st). this is shift stitch.
The shift stitch is not included in the round description. To check if it’s time to work shift stitch fold your work in half and check if marker still goes straight or use a yarn that marks a straight line.
You may think this is a increase, but it isn’t. This way you don’t increase or decrease the amount of stitches. The stitches count remains the same.
INSTRUCTIONS
HEAD and BODY
Use green color yarn or any you wish, begin with a magic ring.
Rnd 1: 6 sc into Magic Ring.
Rnd 2: inc 6 times (12 stitches)
Rnd 3: *sc in next st, inc* (18 stitches)
Rnd 4: *sc in each of next 2 stitches, inc* (24 stitches)
Rnd 5: *sc in each of next 3 stitches, inc* (30 stitches)
Rnd 6: *sc in each of next 4 stitches, inc* (36 stitches)
Rnd 7: *sc in each of next 5 stitches, inc* (42 stitches)
Rnd 8: *sc in each of next 6 stitches, inc* (48 stitches)
Rnd 9: sc in each of next 6 stitches, *sc in the next stitch, inc*, repeat from* six times, sc in each of next 12 stitches, *sc in the next stitch, inc*, repeat from* six times, sc in each of next 6 stitches (60 stitches)
Rnd 10-15: sc in each of next 60 stitches
Bind off leaving a long tail for embroidering the grass.
Continue crocheting using rose color yarn.
Change the yarn color.
Rnd 16-20: sc in each of next 60 stitches
Rnd 21: *dec, sc in each of next 8 stitches* (54 stitches)
Rnd 22-24: sc in each of next 54 stitches
Rnd 25: *dec, sc in each of next 7 stitches* (48 stitches)
Rnd 26-28: sc in each of next 48 stitches
Rnd 29: *dec, sc in each of next 6 stitches* (42 stitches)
Rnd 30-31: sc in each of next 42 stitches
Rnd 32: *dec, sc in each of next 5 stitches* (36 stitches)
Rnd 33-34: sc in each of next 36 stitches
Rnd 35: *dec, sc in each of next 4 stitches* (30 stitches)
Rnd 36-37: sc in each of next 30 stitches
Rnd 38: *dec, sc in each of next 3 stitches* (24 stitches)
Rnd 39: sc in each of next 24 stitches
Stuff the body firmly.
Rnd 40: *dec, sc in each of next 2 stitches* (18 stitches)
Rnd 41: *dec, sc in the next stitch* (18 stitches)
Rnd 42: *dec* six times.
Bind off. Weave in yarn end.
EAR (2x)
Work in rose color yarn.
Rnd 1: 6 sc into Magic Ring.
Rnd 2: inc 6 times (12 stitches)
Rnd 3: *sc in next st, inc* (18 stitches)
Rnd 4-13: sc in each of next 18 stitches
Rnd 14: *dec, sc in each of next 4 stitches* (15 stitches)
Rnd 15-17: sc in each of next 15 stitches
Rnd 18: *dec, sc in each of next 3 stitches* (12 stitches)
Rnd 19-20: sc in each of next 12 stitches
Bind off leaving a long tail for sewing. Work the second ear the same way.
NOSE
Work in pink color yarn.
Rnd 1: 6 sc into Magic Ring.
Rnd 2: *sc in next st, inc* (9 stitches)
Rnd 3: sc in each of next 9 stitches
Bind off leaving a long tail for sewing.
ASSEMBLY
Since all the elements of your bunny are crocheted, it´s time to sew them together. Use a blunt sewing needle.
Ears are attached to the head now. Thread a needle on one of the yarn tails left from the ears, fold the bottom of the ear toward center and sew it to the other side. Place the ears in their right place on the head. Using the yarn left sew them to the head of your bunny. Be sure to step back and take a look to make sure they are even.
Mark where you want the eyes to be placed with pins and sew them with the distance of 4-5 stitches to the head of the bunny.
Embroider eyebrows with black color yarn. Embroider mouth if desired. Proceed to the smile if desired. You can also add eyelashes. Add a line to the nose using pink color yarn. Weave in all ends.
Embroider grass and some lovely flowers, sew buttons or beads. Weave in all ends.