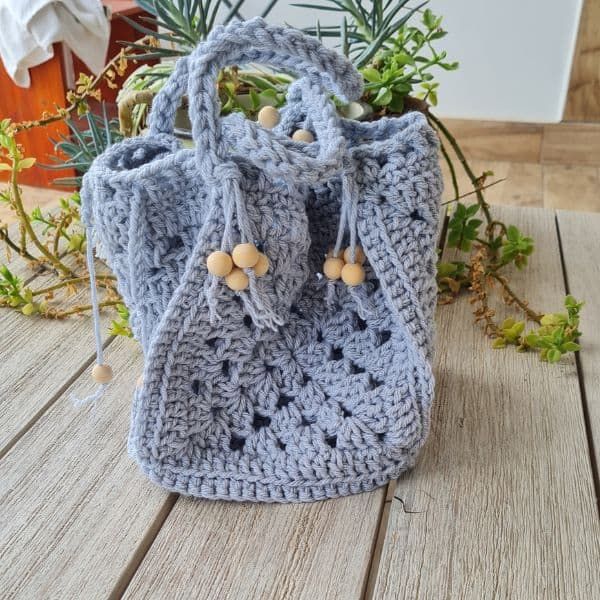
Crochet Square Granny Beach Bag
The Crochet Square Granny Beach Bag is a charming and practical accessory for your sunny adventures! This chic and colorful bag is perfect for carrying your little essentials in style. With its classic granny square design, it brings a touch of nostalgia while being oh-so trendy. Whether you're lounging by the shore or strolling down the boardwalk, this playful bag will definitely turn heads and add a fun twist to your beach look! So, grab your yarn and crochet hook, and let's create a fabulous beach bag that will make waves wherever you go!
Difficulty
Project-Level-Intermediate
Materials
Hayfield Bonus Chunky Extra Value, 100gr, 100% Acrylic, 150 yds, 137 m, color Starling (1.5 skeins)
Weight-5-Bulky
Hook: US Size H-8 ( 5 mm)
I used a smaller hook size to give the bag more sturdiness
Yarn Needle, Scissors, Measuring Tape
Sizes
This sample is 8.5” X 8.5”
Stitch Key
Ch = Chain
Sc = Single Crochet
St = Stitch
Dc = Double Crochet
Yo = Yarn over
Slst = Slip stitch
Ch-Sp = Chain space
Specialty Stitch
Granny cluster (3 dc cluster): A granny cluster is a set of 3 double crochet stitches, all worked into one stitch or space. In this pattern, the granny clusters are separated from one another with chain stitches.
Notes
The pattern is worked in rounds and rows
Starting Ch3 counts as first stitch in round and row.
You can work this pattern with one color or multiple as you wish- I used one color
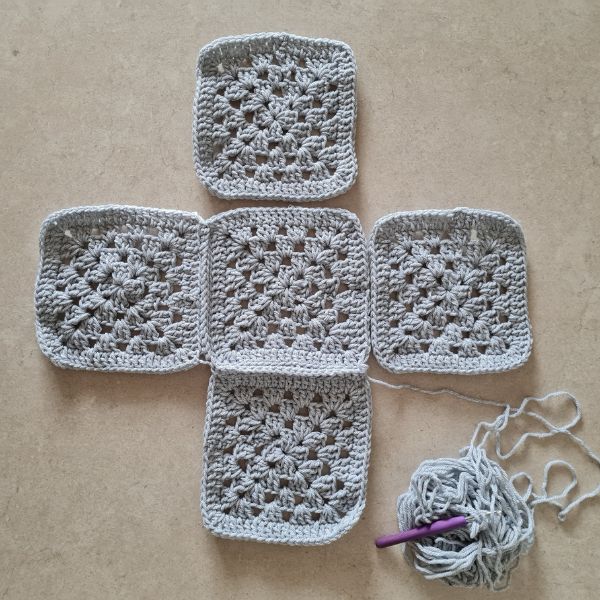
This pattern consists of 5 identical granny squares joined and handles
If changing colors make sure to have a changing technique and weave your ends in.
You can decide on the size of the square by adding rounds.
Instructions
The Bag
Make 5 identical squares- alternating colors as you wish
Ch 4, join with a SIst to form a ring.
Round 1: Ch 3. Into the center ring, make 2 dc, ch 2, (3 dc, ch 2) three times. Join with a sl st to the top of first ch-3.
Round 2: Chain 4. (This counts as the first dc and ch-1 space.)Work in the next ch-2 space (aka the first corner space): (3 dc, ch 2, 3 dc), ch 1. Repeat Step 2 twice more for a total of three times. In the last ch-2 space, work: 3 dc, 2 ch, 2 dc. Join with a sl st to the 3rd chain of the beginning chain stitches.
Round 3: Chain 3. (This counts as 1 dc.) into the ch-1 space just below in the previous round, work 2 dc, ch 1. (This makes the first granny cluster of this round.), Into the next ch-2 corner space, work: 3 dc, ch 2, 3 dc, ch 1 Into the next ch-1 space, work: 3 dc, ch 1. Repeat steps 3 and 4 around to the beginning chain. join with a sl st to the top of the starting ch-3.
Round 4: Chain 4. (This counts as 1 dc and the ch-1 space.)Into the next ch-1 space, work: 3 dc, ch-1.Into the next ch-3 corner space, work 3 dc, ch 2, 3 dc, ch 1. Repeat steps 2 and 3 in each of the remaining ch-1 and ch-2 spaces .In the last ch-1 space, work 2 dc. Join with a sl st to the top of the starting ch-3.
Round 5: Ch3, dc1 in next st, dc1 in next st, and around- when in corners ( dc2+ch1+dc 2) on each corner, secure yarn and cut.
To make bigger squares, repeat rounds 3 and 4 until you reach the desired size
Handle – make 2 identical
I used double strands for more thickness
Single Crochet Cord:
Measure the length of the handle you want X 5 times and slip knot, so you have two long strands ( I have 4), Yarn over your hook one strand and finish a single crochet, Yarn over again and finish a single crochet, continue the length desired.
You can leave a strand for a tassel or secure the yarn and weave in the ends.
Construction
Lay all squares as in the photo, and join to form a square by using Sc 1 on each st using the middle loops only as in the photo, on corners Sc1 joins all corners to secure.
When a square is formed:
Round 1: Ch 1,sc1 around the top part of the bag, Sl st to 1st ch, turn
Round 2: Ch3, dc1 in next st, skip 1 st, ch1, dc1 in next, skip 1 st , ch 1, dc1 in next around, When in corner, dc 3 in 3 stitches and continue (skip 1, ch1, dc1) to next corner. Finish by Slst to 1st ch,
Secure yarn, cut, and weave in ends.
Finishing
Attach the handles to both sides by sewing them to the bag. Use the tapestry needle and secure the handles.
You can sew fabric to the bottom square to avoid the holes.
You can line the bag with fabric.
You can add fringe, tassels, or beads to make it prettier. I used these wooden beads
No comments
Write a comment