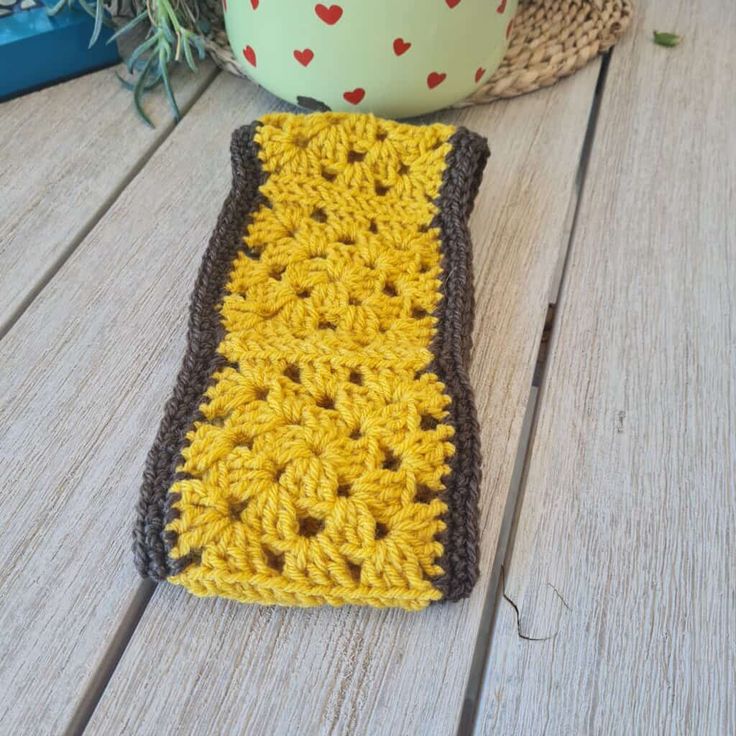
Crochet Sunshine Granny Square Headband
The Crochet Sunshine Granny Square Headband is a delightful accessory that brings a touch of charm to any outfit! With vibrant colors and intricate stitch work, this headband is perfect for adding a pop of fun to your day. Its cozy design keeps your ears warm while you flaunt your unique style. Whether you're going for a walk in the park or meeting friends for brunch, this headband is sure to brighten your day and bring a smile to your face. So, why not treat yourself to this handmade beauty and spread some sunshine wherever you go!
Difficulty
Easy, Beginner
Materials
Cygnet Chunky, 100gr 100% Superior Acrylic, 156 m, color yellow and brown, I used 33gr or any #4 yarn
Hook: US Size H-8 (5 mm)
Yarn Needle, Scissors, Measuring Tape
Gauge
Each square is 4” X 4”
Sizes
This sample is: 21” in circumference X 5” in width
Stitch Key
Ch = Chain
St = Stitch
Dc = Double Crochet
Yo = Yarn over
Sl St = Slip Stitch
Specialty Stitches
Grst : Granny stitch ( Dc3 in ch1 space,(dc3+ch2+dc3 in corners)
Notes
The pattern is worked in rounds
This pattern consists of squares joined together to form a rectangle
Ch2 does count as st at the beginning of each row
Ch1 does not count as st at the beginning of each row
You can work this pattern with one color or multiple as you wish- I used two colors
If changing colors make sure to have a changing technique and weave your ends in.
This pattern uses pattern repeats.
Instructions
Granny stitch squares – make 5
Round 1: Make a magic ring (or ch 4 and join with a sl st to form a ring).Ch 3 (counts as first dc here and throughout), 2 dc into the ring, ch 2, 3 dc into the ring repeat from * to * 2 more times. Ch 2 and sl st to the top of the beginning ch 3 to join. Pull the magic ring tight or weave in the yarn tail to secure the center.
Round 2: Sl st in the next 2 dc and into the ch-2 corner space. Ch 3, 2 dc in the same ch-2 space, ch 2, 3 dc in the next ch-2 space repeat from * to * until you reach the beginning corner. Ch 2 and sl st to the top of the beginning ch 3 to join.
Round 3: Sl st in the next 2 dc and into the ch-2 corner space. Ch 3, 2 dc in the same ch-2 space, ch 2, 3 dc in the next ch-2 space, ch 1, 3 dc in the next ch-2 space repeat from * to * until you reach the beginning corner. Ch 2, dc in the first ch-2 space of the corner (middle dc of the 3-dc group), ch 2, and sl st to the top of the beginning ch 3 to join.
Round 4: Continue the pattern, increasing the ch-1 spaces between the 3-dc groups by 1 in each round. For example, in Round 4, you would have ch 2, 3 dc in the next ch-2 space, ch 1, 3 dc in the next ch-1 space, ch 1, 3 dc in the next ch-1 space repeat from * to * until you reach the beginning corner. After each corner, continue to add ch-1 spaces to separate the 3-dc groups in each side of the square.
Secure yarn, cut and weave in ends
Joining the squares
Lay two squares right side up next to each other, join using the tapestry needle, and both middle loops from each square on one side.
Lay the next square to form a rectangle and join, continue to join all 5 squares.
Join the rectangle on both sides to form a circle.
Switch sides of the headband- right side out!
Finishing
Introduce a second yarn color (optional)
Round 1+ 2: Ch 1, sc 1 in 1st st from hook, sc 1 in next and around to end of round, Slst to 1st st.
Secure, cut your yarn, and weave in the ends.
No comments
Write a comment