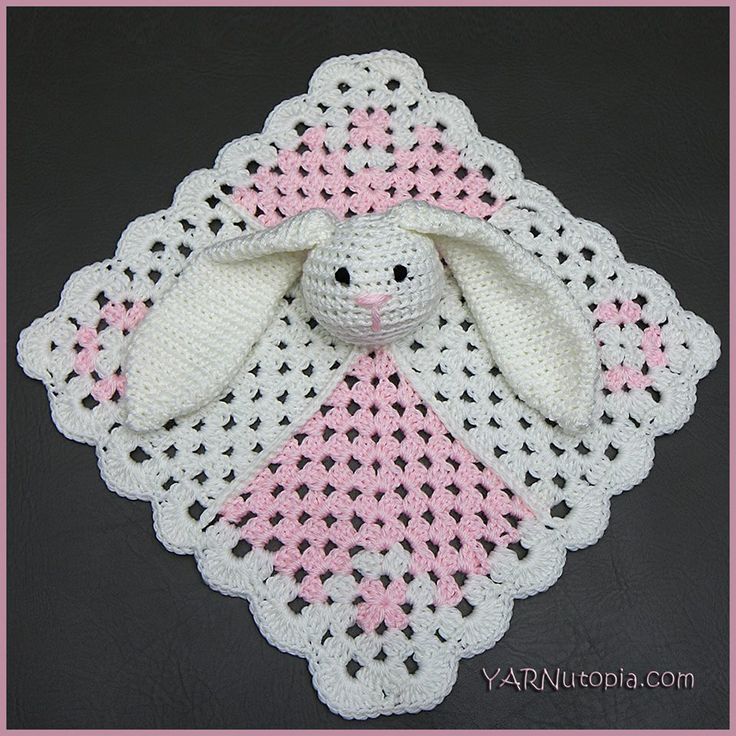
The Crochet Mini Square Bunny Lovey Throw is a delightful and charming addition to any nursery or baby's room. With its small size and adorable bunny design, this lovey throw is perfect for keeping little ones cozy and comforted. The intricate crochet work gives it a handmade touch and adds a special, personalized feel to the space. Whether you're looking for a unique gift for a baby shower or simply want to add a touch of warmth to your child's room, this lovey throw is sure to bring smiles and cuddles all around.
Materials:
–Bernat Softee Baby in Pink (Approx. 70 yards)
–Herrschners Whisper Soft Yarn in White (Approx. 150 Yards)
–Size G6-4.25mm Crochet Hook
–Yarn Needle
–Scissors
NOTES:
You can make the Granny Squares bigger to make this lovey bigger.
Special stitches:
Ch: chain
St(s): Stitch(es)
Sl st: slip stitch
SC: Single Crochet
DC: Double Crochet
Mini Granny Square: Make 4
Ch 4
Rnd 1: Work 2 dc in 4th ch from hook, ch 2, work (3 dc in same ch sp, ch 2) 3 times; join with a sl st in top of ch 3. Fasten off.
Rnd 2: Attach new color in any ch 2 sp, ch 3 (counts as 1 dc), work 2 dc in same sp; ch 1, * work (3 dc, ch 2, 3 dc) in next sp (corner made); ch 1, repeat form * twice more, ending with 3 DC in beginning ch 2 sp where we started. join. Fasten off. (See video tutorial for visual instructions)
Outer part of granny square:
Row 1: In any corner of the mini granny square, ch 3, 2 dc in same sp; ch 1, 3dc in next ch 1 sp, ch 1, *[3dc, ch 2, 3dc] in corner, ch 1 sp, 3 dc in next corner. Ch 4, turn
Row 2: 3 dc in next ch 1 sp, ch 1, 3 dc in next ch 1 sp, [3dc, ch 2, 3dc] in corner, ch 1, 3 dc in next ch 1 sp, ch 1, 3dc in next ch 1 sp, ch 1, dc in last st on row. Ch 3, turn
Row 3: 2 dc in same sp, ch 1, [3dc, ch 1] in each sp until corner, [3dc, ch 2, 3dc] in corner, ch 1 [3dc, ch 1] ending with 3 dc in last sp.
Repeat the same concept of row 2 and row 3 until you make your square big enough. End on an odd row. I ended mine on row 7.
Assembly Step:
Once you have all 4 squares complete and as big as you want them to be, single crochet them together then continue on to the border.
Border of lovey:
Rnd 1: In any corner, ch 3, 2 dc in same sp, [3dc, ch 1] in each sp until you get to the intersection where the two squares meet. Dc in the single crochet from the meeting (see video tutorial for visual instructions), then continue working [3dc, ch 1] in each sp. (Corner: 3dc, ch 2, 3dc), work this pattern all the way around.
Rnd 2: In any ch 1 sp, ch 1, sc in same sp, *7dc in next ch 1 sp, sc in next ch 1 sp, repeat from * around.
Fasten off, weave in all ends.
Bunny:
Head:
ch 2
Rnd 1: Sc 6 in 2nd ch from hook. (6)
Rnd 2: Sc 2 in each st. (12)
Rnd 3: (Sc 2 in next st, sc in next st) 6 times. (18)
Rnd 4: (Sc 2 in next st, sc in next 2 sts) 6 times. (24)
Rnd 5: (Sc 2 in next st, sc in next 3 sts) 6 times. (30)
Rnd 6: (Sc 2 in next st, sc in next 4 sts) 6 times. (36)
Rnds 7-10: Sc in each st. (36)
Rnd 11: (Sc2tog, sc in next 4 sts) 6 times. (30)
Rnd 12: (Sc2tog, sc in next 3 sts) 6 times. (24)
Rnd 13: (Sc2tog, sc in next 2 sts) 6 times. (18)
Rnd 14: (Sc2tog, sc in next st) 6 times. (12)
Rnd 15: sc2tog 6 times. (6)
Fasten off with long tail
Embroider Eyes and nose using photo as a guide
Ear: Make 2
ch 2
Rnd 1: Sc 6 in 2nd ch from hook. (6)
Rnd 2: SC in each st around. (6)
Rnd 3: Sc 2 in each st. (12)
Rnd 4: SC in each st around. (12)
Rnd 5: (Sc 2 in next st, sc in next st) 6 times. (18)
Rnd 6: (Sc 2 in next st, sc in next 2 sts) 6 times. (24)
Rnds 7-10: SC in each st around. (24)
Rnd 11: [sc2tog, sc in the next 10 sts] 2 times. (22)
Rnds 12-15: SC in each st around. (22)
Rnd 16: [sc2tog, sc in the next 9 sts] 2 times. (20)
Rnds 17-20: SC in each st around. (20)
Rnd 21: [sc2tog, sc in the next 8 sts] 2 times. (18)
Rnd 22-23: SC in each st around. (18)
Rnd 24: [sc2tog, sc in the next 7 sts] 2 times. (16)
Rnds 25-26: SC in each st around. (16)
Rnd 27: [sc2tog, sc in the next 6 sts] 2 times. (14)
Fasten off with long tail for sewing
Assembly step:
Sew ears to head, use photo for visual guide. Sew head to center of blanket.
Weave in all loose ends.
Enjoy!