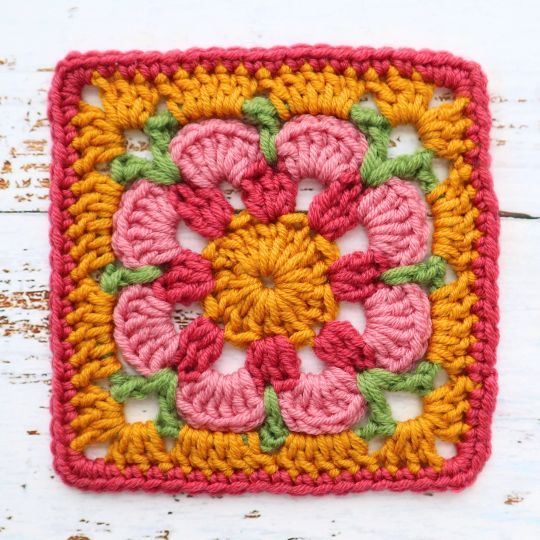
Crochet Camellia Flower Granny Square
The Crochet Camellia Flower Granny Square is a lovely and charming pattern that adds a touch of elegance to any crochet project. With its intricate detailing and beautiful flower design, this granny square is perfect for creating blankets, scarves, or even decorative pillows. Whether you're a beginner or a seasoned crocheter, working on this pattern will surely bring you a sense of joy and accomplishment. So pick up your crochet hook and some colorful yarn, and let's create something truly special together!
Materials
- 115 Merino yarn (any colors you prefer)
- 4mm crochet hook
- Scissors
- Yarn needle (for weaving in ends)
Abbreviations
- ch = chain
- dc = double crochet
- sc = single crochet
- sl st = slip stitch
- st = stitch
- sp = space
- standing dc = starting a double crochet without chaining
Finished size
Approx. 4-5 inches (10-12 cm) square, depending on your tension and yarn thickness.
Instructions
Center Circle
Begin with a slip knot and chain 5. Join with a slip stitch to form a ring.
Round 1. Ch 3 (counts as first dc), work 15 more dc into the ring. You should now have 16 dc in total. Join with a sl st to the top of the beginning ch 3. Fasten off yarn (16 dc).
Round 2. (New Color)
Start with a standing dc in any st.
Make 2 more dc in the same st.
Ch 2, then skip 1 st. Work 3 dc into the next st.
Repeat steps 2-3 around, forming 8 clusters of 3 dc with a ch 2 between each cluster.
Join with a sl st to the first dc. Fasten off yarn. (8 clusters)
Round 3. (New Color)
Start with a standing dc in any ch-2 space.
Make 5 more dc in the same ch-2 space (6 dc in total).
Repeat step 2 in each ch-2 space around, making 6 dc in each of the 8 ch-2 spaces.
Join with a sl st to the first dc. Fasten off yarn. (8 groups of 6 dc)
Round 4. (New Color)
Start with a standing dc in the middle st of any cluster from Round 2.
Ch 5, and make a dc in the middle st of the next cluster from Round 2.
Ch 4, then make another dc in the same st (this creates the first corner).
Ch 5, and make a dc in the middle st of the next cluster from Round 2.
Repeat steps 2-4 around, ensuring you have 4 corner spaces and 4 sides between them.
Join with a sl st to the first dc. Fasten off yarn.
Round 5. (New Color)
Start with a standing dc in any corner sp (created by the ch-4 from Round 4).
Work 2 more dc in the same sp.
Ch 2, then work 3 more dc in the same sp (corner made).
Work 5 dc in the next 2 ch-5 space.
Repeat steps 3-4 in the next corner and side spaces, around the square.
Join with a sl st to the first dc. Fasten off yarn. (4 corners, 4 sides)
Round 6. (New Color)
Start with a standing sc in any st on the side of the square.
Sc in every st along the side of the square.
In each corner sp, work 2 sc, ch 1, and 2 sc (forming a small corner).
Rep steps 2-3 for the remaining sides and corners of the square (each side has 16 st and each corner 5 st = 84 st total).
Join with a sl st to the first sc. Fasten off yarn and weave in any loose ends.
Finishing
Weave in all yarn ends using a yarn needle.
Block the square if needed to give it a nice, even shape.
No comments
Write a comment