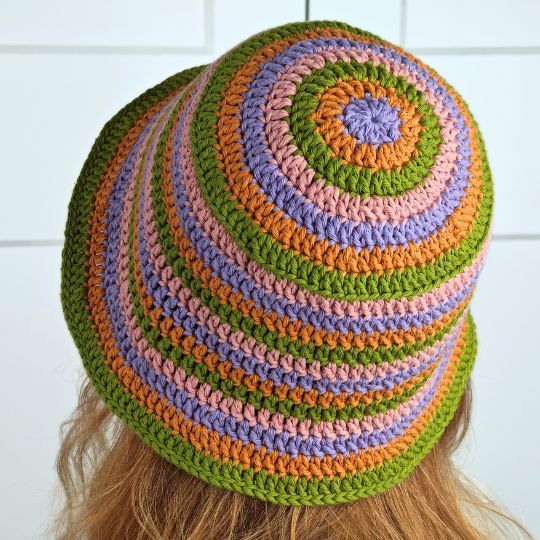
Crochet Striped Bucket Hat
The crochet striped bucket hat is an absolute must-have for any sunny day outing! With its charming style and playful colors, this hat adds a touch of fun to your outfit while providing excellent sun protection. Whether you're heading to the beach or enjoying a picnic in the park, this trendy accessory is sure to become your go-to favorite. Don't be surprised if you start receiving compliments left and right - this hat is as cute as it is practical!
Materials
- Yarn: LindeHobby Cotton 8/8 (100% Cotton, 50g = approx. 80–85 meters)
- Hook: 4.0 mm (or size needed to meet gauge)
- Scissors & Yarn needle
Gauge
15 st x 9,5 rows = 10 cm x 10 cm in double crochet
Finished Size
Adult (head circumference approx. 21–23 inches)
Abbreviations (US Terms)
- ch = chain
- dc = double crochet
- sc = single crochet
- sl st = slip stitch
- inc = increase (2 dc in one stitch)
- BLO = back loop only
- FLO = front loop only
- st = stitch
Pattern Notes
- The hat is made in rounds of double crochet (dc).
- Each round starts with a standing single crochet followed by 1 chain, which together count as the first dc of the round. This technique helps create an almost invisible join.
- You will change color at the beginning of each round, except the final round.
- The hat is made in three parts: the crown (top), the main body, and the brim.
- You will increase by 12 stitches per round in the crown.
- Stitch counts are provided at the end of each round.
- Count your stitches before moving to the next round to ensure accuracy.
Instructions
Crown (Top of the Hat)
We start by making a flat circle that forms the top of the bucket hat.
Round 1.
Begin with a magic circle.
Make 12 double crochet (dc) stitches into the magic circle.
Pull the ring tight to close the hole.
Join to the top of the first dc with a slip stitch (sl st). (12 dc)
Round 2.
Join a new color with a standing sc into any stitch from the previous round. Ch 1.
Make 1 dc in the same stitch (this is your first dc inc).
Now make 2 dc in each stitch around.
You have made 12 increases.
Join with sl st into the first st. (24 dc)
Round 3.
Join a new color with a standing sc and chain 1. Dc in same st.
Make (1 dc in the next st, 2 dc in the next st) — repeat this pattern all the way around. have made 12 increases.
Join with sl st into the first st. (36 dc)
Round 4.
Join a new color with a standing sc and chain 1. Dc in same st.
Make (1 dc in each of the next 2 st, 2 dc in the next st) — repeat around.
You have made 12 increases.
Join with sl st into the first st. (48 dc)
Round 5.
New color, standing sc and chain 1. Dc in same st.
Make (1 dc in each of the next 3 st, 2 dc in the next st) — repeat around.
You have made 12 increases.
Join with sl st into the first st. (60 dc)
Round 6.
New color, standing sc and chain 1. Dc in same st.
Make (1 dc in each of the next 4 stitches, 2 dc in the next stitch) — repeat around.
Join with sl st into the first st. (72 dc)
Round 7.
New color, standing sc and chain 1. Dc in same st.
Make (1 dc in each of the next 5 stitches, 2 dc in the next stitch) — repeat around.
Join with sl st into the first st. (84 dc)
Transition round (Ridge)
This round marks where the crown ends and the main part of the hat begins. To create a neat ridge, we work into the back loop only of each stitch.
Round 8. (BLO)
New color, standing sc and chain 1.
Make 1 dc in the back loop only of each stitch around (no increases).
Join with sl st into the first st. (84 dc)
Main Part of the Hat
Now we work even — meaning no increases — for a few rounds to build the straight sides of the hat.
Rounds 9 to 15.
For each round:
Join a new color with a standing sc and chain 1.
Make 1 dc in each stitch around (work normally through both loops).
Repeat this for a total of 7 rounds.
Join with sl st into the first st. (84 dc)
Brim
We will now increase the stitch count to flare out the brim and work in the front loop only in the first round of the brim to create a clean edge.
Round 16. (FLO)
New color, standing sc and chain 1. Dc in same st (work in the front loop only of each stitch).
Make (1 dc in each of the next 5 stitches, 2 dc in the next stitch) — repeat around.
You will have 14 increases total.
Join with sl st into the first st. (98 dc)
Round 17.
New color, standing sc and chain 1. Dc in same st.
Make (1 dc in each of the next 6 stitches, 2 dc in the next stitch) — repeat around.
You will have 14 increases total.
Join with sl st into the first st. (112 dc)
Round 18.
New color, standing sc and chain 1. Dc in same st.
Make (1 dc in each of the next 7 stitches, 2 dc in the next stitch) — repeat around.
You will have 14 increases total.
Join with sl st into the first st. (126 dc)
Round 19.
New color, standing sc and chain 1. Dc in same st.
Make (1 dc in each of the next 8 stitches, 2 dc in the next stitch) — repeat around.
You will have 14 increases total.
Join with sl st into the first st. (140 dc)
Round 20. (Finishing Round)
Use same color as previuous round.
Make 1 slip stitch (sl st) in each stitch around.
This creates a neat, firm edge.
Join with sl st into the first st. (140 st)
Finishing
Cut your yarn and pull it through the final loop to fasten off.
Weave in all loose ends with a yarn needle.
If the brim curls or feels uneven, gently steam or block the hat to shape it.
Your striped bucket hat is ready to wear.
No comments
Write a comment