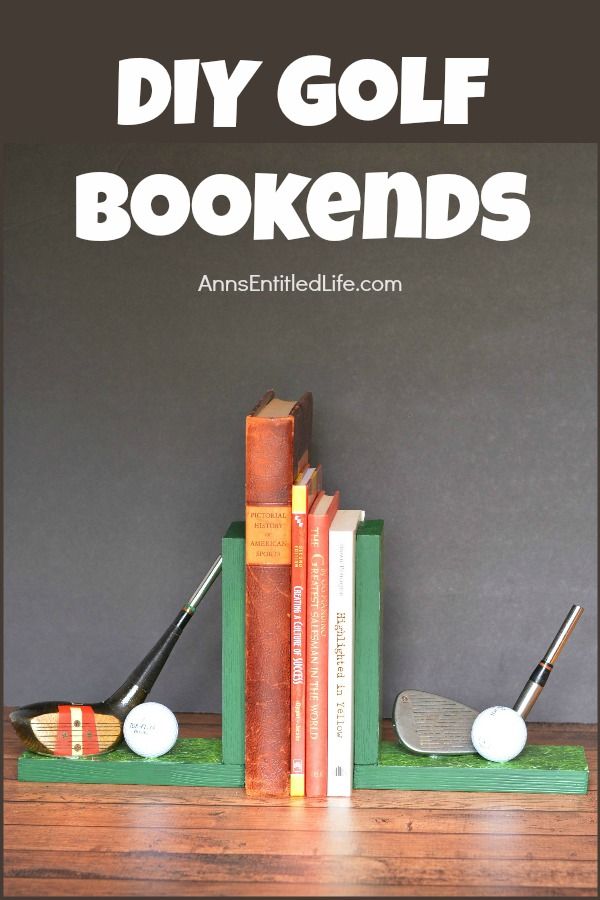
DIY Golf Bookends
If you're looking to add a touch of charm to your bookshelf while showcasing your love for golf, DIY golf bookends are a fantastic project to try out! By repurposing old golf clubs or crafting new ones from scratch, you can create unique and personalized bookends that will bring a smile to any golfer's face. Get creative with paint or decorative elements to make them pop and reflect your style. This fun and easy DIY project not only adds a fun and practical element to your home decor but also makes for a thoughtful and personalized gift for the golf enthusiasts in your life. So, grab your tools and let your creativity tee off for some swingin' bookends that are sure to make a hole-in-one on your bookshelf!
Materials
Sander with 220 Grit Paper (or just 220 Grit Paper and you sand by hand)
Wood – Measured 3.25″ x 7″ x 5/8″. Used were four pieces of board 7″ long (think old fence post, pallets, leftover project wood)
E6000® Craft Adhesive
4 Wood Screws, about 1.5″
2 pieces 12×12 Scrapbook Paper – Grass
Christmas Green Paint
Thicket Paint Color
Mod Podge
2 Golf Balls
2 Golf Clubs
Green Felt
Tools
Hacksaw
Metal File
Cordless Drill
Sander with 220 Grit Paper (or just 220 Grit Paper and you sand by hand)
Scissors
Ruler
Foam Paintbrush
Small Paintbrush
Instructions
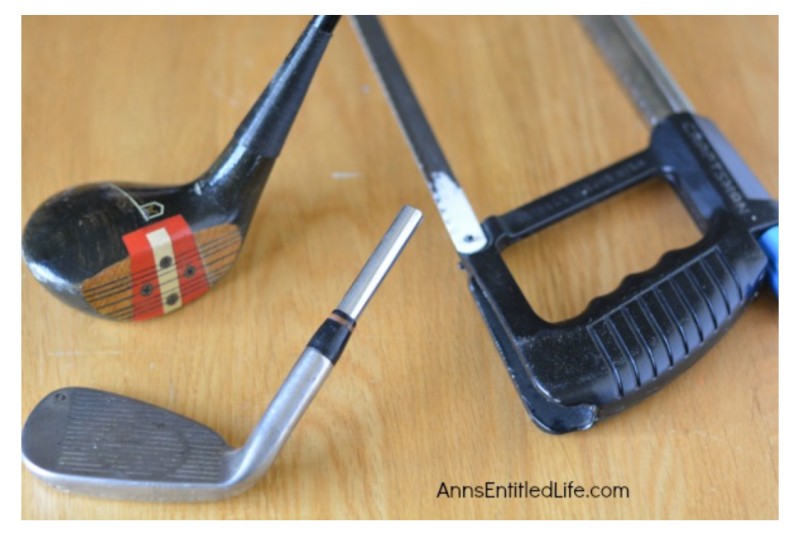

Use a hacksaw to trim your golf clubs. Hacksaws are inexpensive and come with the metal blade you will need to cut the golf clubs.
The golf clubs used in this project are trimmed to 2″ from the end.
Use a metal file to file down any rough metal edges that occurred when cutting the clubs.
Set aside.
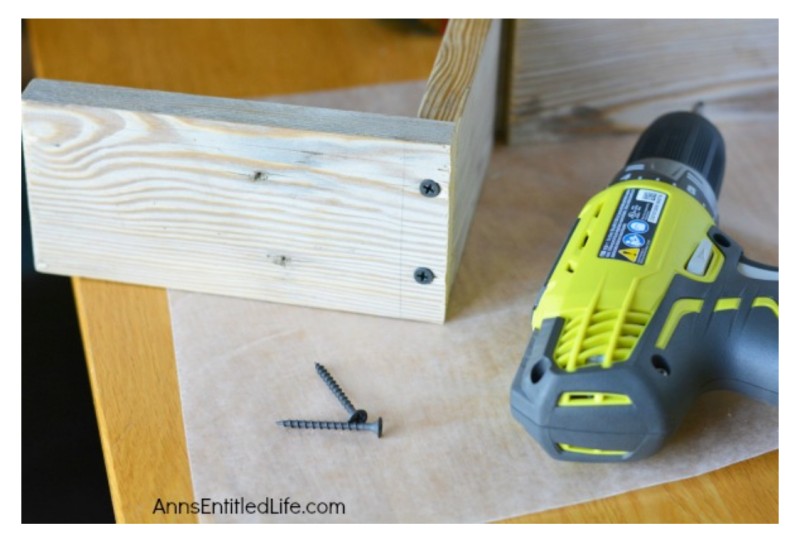
Trim your boards to the length you desire for your bookends.
The length of the wood used in this project is 7″ long and 3.25″ wide (based on the length of the cut golf clubs). The thickness of the wood was 5/8″ thick.
Sand your wood with sandpaper where necessary. You want the wood to be smooth. Make sure you break the edges at the bottom of each cut piece of wood and sand it smooth.
Wipe away dust.
Drill pilot holes into the corner of your bottom piece of wood.
Align your wood bottom flat to top-bottom.
Screw in your screws. Suggestions:
• You can draw a line to trace the board so that you can center your screw in that area.
• A thin line of glue… whether Elmer’s or the E6000 placed down on the wood before screwing the wood together will also add strength.
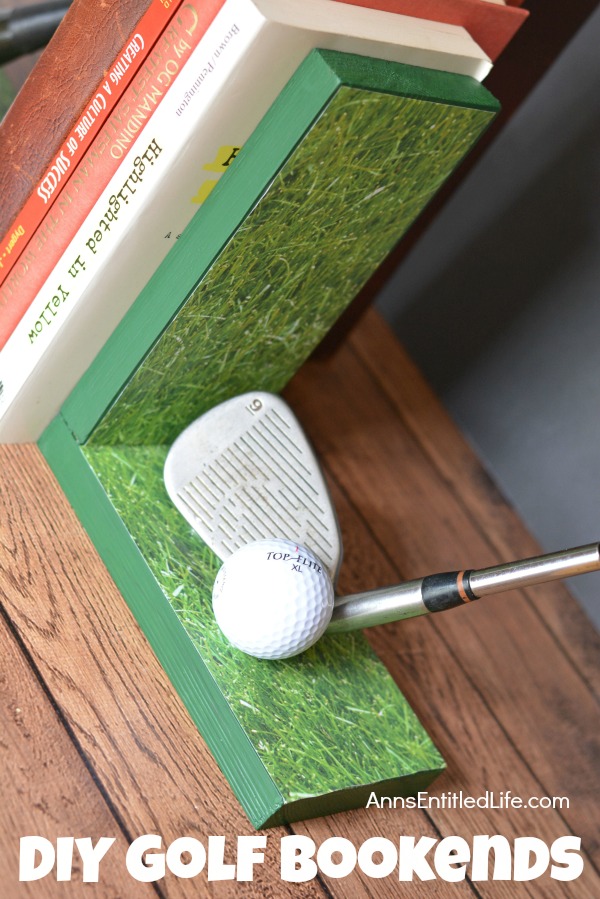
Paint your bookends with green acrylic paint and a paintbrush.
Mix two colors together for a different, unique look. This look was achieved by mixing Christmas Green Paint and Thicket Paint together.
Pay special attention to the sides of the wood. These will be exposed and not have a covering (the grass scrapbook paper or felt).
Make sure the screws are on the downside (the bottom) of your bookends. Be mindful of that when you paint and apply the paper in the next step. If you are adding felt to the bottom of your bookends, that will cover the screws and you won’t have to paint that section.
You don’t have to paint the area you are covering with the scrapbook paper (or felt) if you do not want to, but make certain there is a slight overlap of paint so no raw wood shows through if you do indeed decide not to paint the entire piece.
Trim your scrapbook paper a little smaller than the actual size of the bookends. Use scissors or a paper trimmer.
Apply a thin coat of Mod Podge to the wood with your foam paintbrush.
Apply a thin coat of Mod Podge to the scrapbook paper and place that scrapbook paper onto the coated wood. Having both the wood and the scrapbook paper coated allows you to move the paper around a bit for better placement before the Mod Podge begins to dry. Use the palm of your hand and fingers to smooth out the air bubbles and excess Mod Podge.
Repeat on all four flat wood surfaces. Set aside to dry for about two hours.
Cover the wood and paper with Mod Podge. Let set to dry, about 1 hour.
Use your E6000® Craft Adhesive to affix the clubs and balls to the bookends at the desired placement. These are probably not going to be centered. Try several positions before actually gluing, and always goes with what looks best to you!
You will want to find an undisturbed space to set your bookends when you are finished so the glue can set up and dry as directed on the package. These were left on a table out of reach for two days before using to hold books.
Optional: add green felt to the bottom of the bookends to protect the surface. Honestly, in my opinion, this should never be an option; you should always attach felt so as not to scratch furniture or shelving.
Display as desired.
Notes
If you can find clubs that face the opposite way, it would flow better. Drivers, wedges, woods will add more impact than say, a putter.

No comments
Write a comment