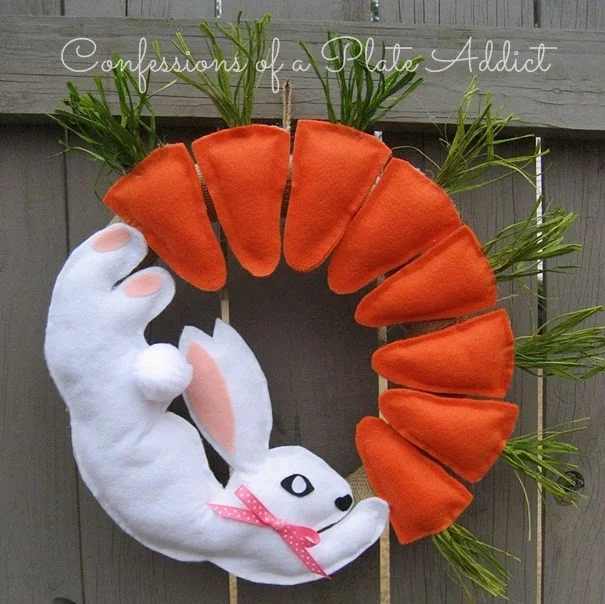
If you're looking to add a touch of whimsy to your front door, a DIY Bunny and Carrot Wreath is just the ticket! This adorable craft is guaranteed to bring a smile to your face every time you come home. Hang up your creation and get ready for a springtime welcome that's sure to delight all your visitors!

Here’s what you will do to make the bunny:
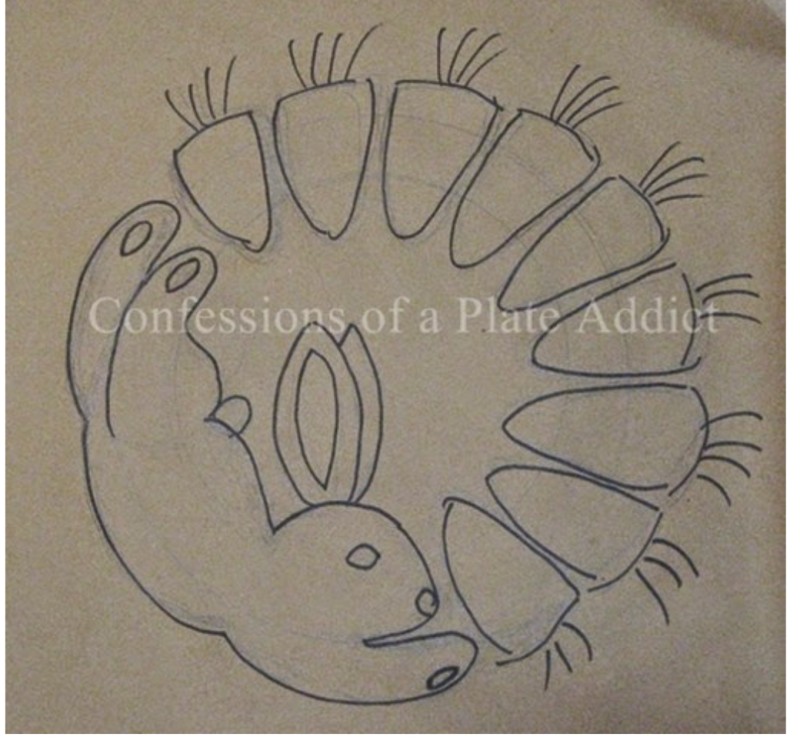
With the felt doubled, cut out two bunnies using the bunny pattern above.
Without separating them, work around the bunny shapes, gently lifting up the edges and applying a bead of fabric glue. Press down to seal the seam as you go, leaving an opening at the bunny’s belly.
Add the ear, nose, eye and paw embellishments with fabric glue. For the bow and tail, use a dot of hot glue. Hint: I always use a bamboo skewer to press down when working with hot glue to avoid being burned.
Allow the bunny to dry overnight.
Gently stuff the bunny with the fiberfill, using the eraser end of a pencil to push it into the ears and the legs. Do not worry if the seam comes undone in a few spots since you can go back and reseal it with a small bead of hot glue.
Once the bunny is stuffed, close the opening in the belly with a thin bead of hot glue.
Here’s what you will do to make the carrots:
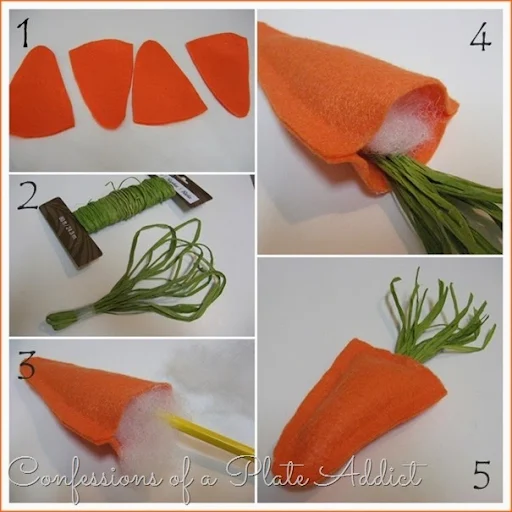
Double the orange felt and, using one of the carrots from the design above as your pattern, cut out eight carrots (a front and a back for each carrot, for a total of 16 carrots pieces.) Add a bead of fabric glue around the edges, leaving the tops of the carrots open. Let them dry overnight.
Cut the raffia into pieces that are 3 yards long then fold double four times until you have a bundle that is approximately 6 inches long. Secure one end of the bundle with Scotch tape. Then, with the iron on low heat, press the top part of the bundle flat.
Using the eraser end of a pencil, gently stuff the carrot with fiberfill, allowing a bit of room at the top.
Slip the raffia bundle inside and to the back of the carrot behind the fiberfill. Add a small dot of hot glue to the inside back of the carrot and press to hold the raffia bundle in place.
Finish off the carrot with a thin bead of hot glue and press down with a bamboo skewer so as not to get burned. Hint: If any glue oozes out, use the skewer to remove it before it hardens. Trim the raffia to approximately 3 1/2 inches.
Repeat until you have created eight carrots.

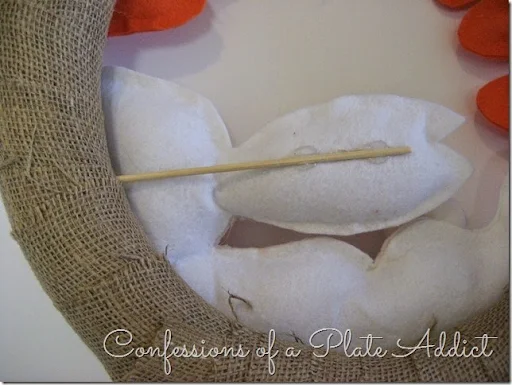
Next, wrap the wreath form in the strips of burlap, making sure that each strip begins and ends on the back side of the wreath so that the ends will not show, hot gluing the ends of each strip as you go.
Once the wreath form is completely covered with the burlap, place the bunny and carrots in position and secure them by pushing straight pins through to hold them. This gives you an idea of placement. Then, gently take out the pins and hot glue the carrots to the wreath one at a time, holding them in place to be sure that the glue has had time to cool and set. Finish by gluing the bunny in place last in case you need to have his paws overlap the carrots a bit to fit.
I found that his ears were too floppy, so I inserted a bamboo skewer (my best crafting friend…can you tell?) into the wreath form behind the ears, cut it to the right length and then hot glued the ears to it. Finally, I made a loop from jute twine and hot glued it to the back of the wreath to serve as a hanger.