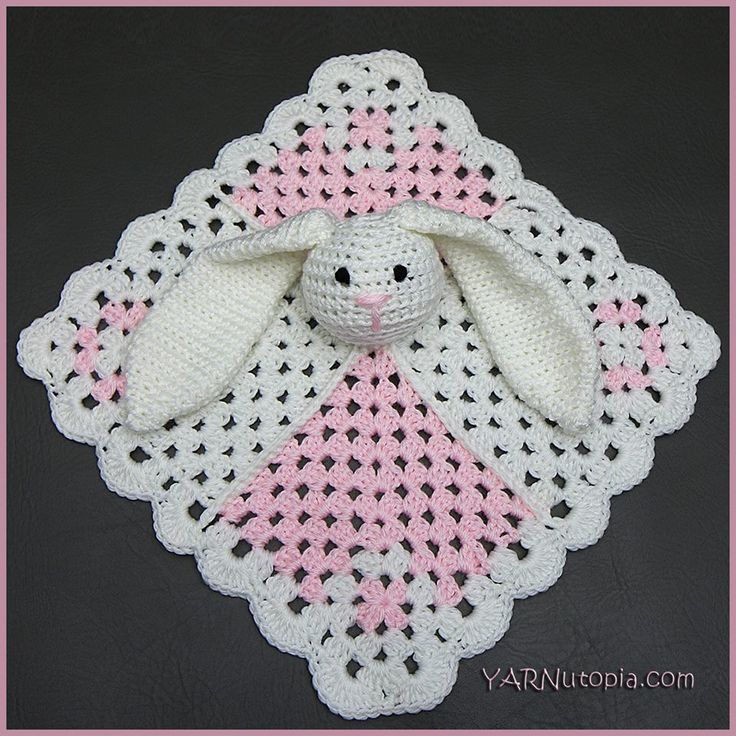
Crochet Mini Square Bunny Lovey
How adorable is the Crochet Mini Square Bunny Lovey? This charming creation combines the coziness of a soft lovey with the cuteness of a little bunny, making it the perfect snuggle companion for little ones. The intricate crochet work gives it a handmade feel that adds extra warmth and love to every stitch. Whether you're crafting one for your own bundle of joy or as a thoughtful gift for a friend, this delightful bunny lovey is sure to bring smiles and cozy moments wherever it goes. Get ready for some serious cuddle sessions with this sweet and lovable crochet creation!
Materials:
–Bernat Softee Baby in Pink (Approx. 70 yards)
–Herrschners Whisper Soft Yarn in White (Approx. 150 Yards)
–Size G6-4.25mm Crochet Hook
–Yarn Needle
–Scissors
NOTES:
-You can make the Granny Squares bigger to make this lovey bigger.
Special stitches:
Ch: chain
St(s): Stitch(es)
Sl st: slip stitch
SC: Single Crochet
DC: Double Crochet
Mini Granny Square: Make 4
Ch 4
Rnd 1: Work 2 dc in 4th ch from hook, ch 2, work (3 dc in same ch sp, ch 2) 3 times; join with a sl st in top of ch 3. Fasten off.
Rnd 2: Attach new color in any ch 2 sp, ch 3 (counts as 1 dc), work 2 dc in same sp; ch 1, * work (3 dc, ch 2, 3 dc) in next sp (corner made); ch 1, repeat form * twice more, ending with 3 DC in beginning ch 2 sp where we started. join. Fasten off.
Outer part of granny square:
Row 1: In any corner of the mini granny square, ch 3, 2 dc in same sp; ch 1, 3dc in next ch 1 sp, ch 1, *[3dc, ch 2, 3dc] in corner, ch 1 sp, 3 dc in next corner. Ch 4, turn
Row 2: 3 dc in next ch 1 sp, ch 1, 3 dc in next ch 1 sp, [3dc, ch 2, 3dc] in corner, ch 1, 3 dc in next ch 1 sp, ch 1, 3dc in next ch 1 sp, ch 1, dc in last st on row. Ch 3, turn
Row 3: 2 dc in same sp, ch 1, [3dc, ch 1] in each sp until corner, [3dc, ch 2, 3dc] in corner, ch 1 [3dc, ch 1] ending with 3 dc in last sp.
Repeat the same concept of row 2 and row 3 until you make your square big enough. End on an odd row. I ended mine on row 7.
Assembly Step:
Once you have all 4 squares complete and as big as you want them to be, single crochet them together then continue on to the border.
Border of lovey:
Rnd 1: In any corner, ch 3, 2 dc in same sp, [3dc, ch 1] in each sp until you get to the intersection where the two squares meet. Dc in the single crochet from the meeting, then continue working [3dc, ch 1] in each sp. (Corner: 3dc, ch 2, 3dc), work this pattern all the way around.
Rnd 2: In any ch 1 sp, ch 1, sc in same sp, *7dc in next ch 1 sp, sc in next ch 1 sp, repeat from * around.
Fasten off, weave in all ends.
Bunny:
Head:
ch 2
Rnd 1: Sc 6 in 2nd ch from hook. (6)
Rnd 2: Sc 2 in each st. (12)
Rnd 3: (Sc 2 in next st, sc in next st) 6 times. (18)
Rnd 4: (Sc 2 in next st, sc in next 2 sts) 6 times. (24)
Rnd 5: (Sc 2 in next st, sc in next 3 sts) 6 times. (30)
Rnd 6: (Sc 2 in next st, sc in next 4 sts) 6 times. (36)
Rnds 7-10: Sc in each st. (36)
Rnd 11: (Sc2tog, sc in next 4 sts) 6 times. (30)
Rnd 12: (Sc2tog, sc in next 3 sts) 6 times. (24)
Rnd 13: (Sc2tog, sc in next 2 sts) 6 times. (18)
Rnd 14: (Sc2tog, sc in next st) 6 times. (12)
Rnd 15: sc2tog 6 times. (6)
Fasten off with long tail
Embroider Eyes and nose using photo as a guide
Ear: Make 2
ch 2
Rnd 1: Sc 6 in 2nd ch from hook. (6)
Rnd 2: SC in each st around. (6)
Rnd 3: Sc 2 in each st. (12)
Rnd 4: SC in each st around. (12)
Rnd 5: (Sc 2 in next st, sc in next st) 6 times. (18)
Rnd 6: (Sc 2 in next st, sc in next 2 sts) 6 times. (24)
Rnds 7-10: SC in each st around. (24)
Rnd 11: [sc2tog, sc in the next 10 sts] 2 times. (22)
Rnds 12-15: SC in each st around. (22)
Rnd 16: [sc2tog, sc in the next 9 sts] 2 times. (20)
Rnds 17-20: SC in each st around. (20)
Rnd 21: [sc2tog, sc in the next 8 sts] 2 times. (18)
Rnd 22-23: SC in each st around. (18)
Rnd 24: [sc2tog, sc in the next 7 sts] 2 times. (16)
Rnds 25-26: SC in each st around. (16)
Rnd 27: [sc2tog, sc in the next 6 sts] 2 times. (14)
Fasten off with long tail for sewing
Assembly step:
Sew ears to head, use photo for visual guide. Sew head to center of blanket.
Weave in all loose ends.
Enjoy!
No comments
Write a comment