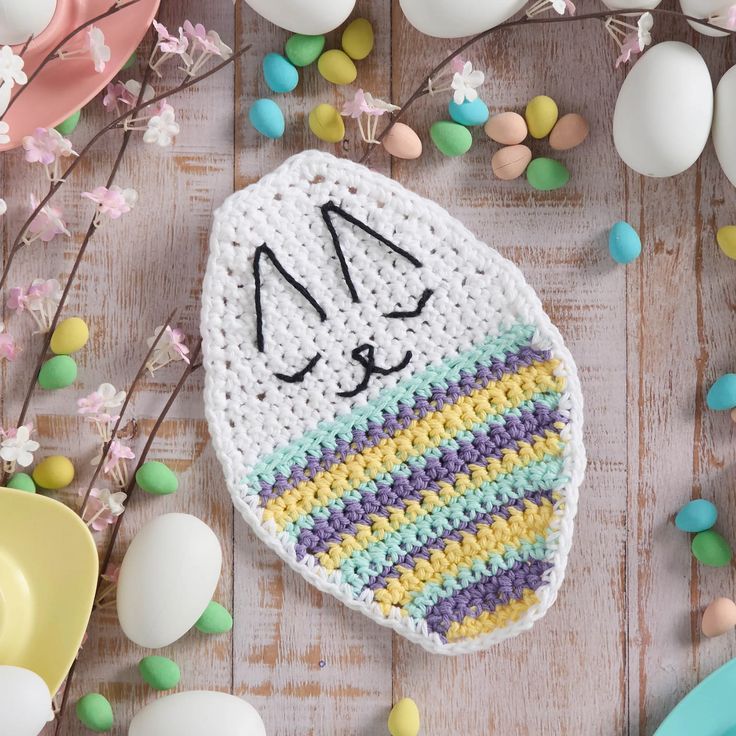
Crochet Bunny Dishcloth
Create a delightful touch to your kitchen with a Crochet Bunny Dishcloth! This charming and practical addition will bring a smile to your face each time you reach for it. Perfect for adding a bit of whimsy to your daily chores, this soft and cozy dishcloth is not only adorable but also incredibly useful. Whether you're wiping down countertops or drying dishes, this bunny dishcloth is sure to become a favorite in your home. Spruce up your kitchen with this friendly and fun crochet creation!
Materials You’ll Need
Gather your supplies!
Yarn: Lily Sugar’n Cream® The Original™ (Worsted weight, Medium 4; 100% Cotton; 2.5 oz/70.9 g; 120 yds/109 m per ball)
Main Color (MC): White (00001) – 1 ball or approx. 25 yds/23 m (for the bunny head)
Contrast A: Hot Purple (01317) – 1 ball or approx. 11 yds/10 m
Contrast B: Beach Glass (01132) – 1 ball or approx. 11 yds/10 m
Contrast C: Yellow (00010) – 1 ball or approx. 11 yds/10 m
Contrast D: Black (00002) – 1 ball or approx. 2 yds/2 m (for embroidery)
Crochet Hook: Size U.S. H/8 (5 mm) or the size needed to obtain the correct gauge.
Yarn Needle: Susan Bates® yarn needle (or any tapestry needle) for weaving in ends and embroidery.
Scissors: For cutting yarn.
(Optional but Recommended): Stitch markers to mark the first or last stitch of a row, especially helpful during shaping.
Understanding Gauge: The Key to Perfect Size
Gauge: 13 single crochet (sc) stitches and 14 rows = 4 inches [10 cm]
Finished Measurements
Your completed Egg-cellent Bunny Dishcloth should measure approximately:
10¾ inches (27.5 cm) long x 6½ inches (16.5 cm) wide.
Crochet Abbreviations & Special Stitches Explained
This pattern uses standard US crochet terminology. Here’s a breakdown:
- Approx = Approximately
- Beg = Beginning
- Ch = Chain(s) – To make a chain, yarn over hook and pull through the loop on the hook.
- Cont = Continue(ity)
- Hdc = Half Double Crochet – Yarn over, insert hook into stitch, yarn over, pull up a loop (3 loops on hook), yarn over, pull through all 3 loops.
- MC = Main Color (White)
- Pat = Pattern
- Rep = Repeat
- Rnd(s) = Round(s) – Though primarily worked in rows, the border is worked in a round.
- RS = Right Side (the side meant to face outwards)
- Sc = Single Crochet – Insert hook into stitch, yarn over, pull up a loop (2 loops on hook), yarn over, pull through both loops.
- Sc2tog = Single Crochet 2 Together (Decrease) – Insert hook into next stitch, yarn over, pull up a loop (2 loops on hook). Insert hook into the following stitch, yarn over, pull up a loop (3 loops on hook). Yarn over, pull through all 3 loops on hook. This turns two stitches into one.
- Sl st = Slip Stitch – Insert hook into stitch, yarn over, pull through both the stitch and the loop on the hook. Used for joining.
- St(s) = Stitch(es)
- WS = Wrong Side (the side meant to face inwards)
- Yoh = Yarn Over Hook
Special Techniques Explained:
Changing Color: The pattern notes: “To change color, work to last 2 loops on hook and draw new color through last 2 loops, then proceed in new color.”
How-to: When working the very last step of the stitch before the color change (e.g., the final yarn over and pull through of a single crochet), stop when you have 2 loops left on your hook. Drop the old color (leave a tail to weave in later). Pick up the new color, yarn over with the new color, and pull it through the 2 loops on your hook to complete the stitch. Now continue crocheting with the new color. This creates a seamless transition.
Working in the Horizontal Bar of Hdc (Row 18): This creates a nice textured line and helps define the bunny’s head.
How-to: Look at the back (WS) of the half double crochet stitch from the previous row (Row 17). You’ll see the usual top ‘V’ loops. Just below that ‘V’, on the back side of the stitch, there’s a horizontal strand of yarn. This is the “horizontal bar” or sometimes called the “third loop” of the hdc. For Row 18, you’ll insert your hook under only this horizontal bar to make your single crochet stitches, instead of going under the top ‘V’ loops. The pattern includes a helpful diagram for this.
Stem Stitch (Embroidery): Used for the bunny’s face and ear details.
How-to: This is a basic embroidery stitch that creates a solid, slightly raised line. Bring your needle up from the back at the start of your line. Make a small straight stitch forward along the line. Bring the needle up again halfway back along that first stitch, slightly to one side of the stitch. Make another stitch forward, the same length as the first. Repeat, always bringing the needle up halfway back along the previous stitch and slightly to the side. Keep your stitches consistent. The pattern provides a visual diagram.
Important Pattern Notes (Read Before You Start!)
Turning Chains: The “Ch 1” at the beginning of single crochet rows does not count as a stitch throughout the pattern. Always make your first stitch in the very first stitch of the row unless otherwise specified. The “Ch 2” for the hdc row (Row 17) also does not count as a stitch.
Stitch Counts: Pay attention to the stitch count given at the end of some rows. It’s a good idea to count your stitches periodically, especially on increase/decrease rows, to ensure you’re on track.
Color Changes: Follow the color change instructions carefully for neat stripes. Leave tails of about 6 inches when changing colors or fastening off to weave in securely later.
Right Side/Wrong Side: Keep track of the Right Side (RS) and Wrong Side (WS). The first row is the RS. The stripes will look slightly different on each side. The special texture from Row 18 will be visible on the RS.
The Stripe Pattern Sequence
The bottom, colored portion of the dishcloth follows a specific 17-row stripe pattern. You’ll work the first few rows individually, then follow this sequence:
(Remember: You start with C for Row 1, then A for Row 2, then C for Row 3 as per the initial instructions. The pattern below lists the sequence used for repeats)
With C: Work 1 row.
With A: Work 2 rows.
With B: Work 1 row.
With C: Work 2 rows.
With A: Work 1 row.
With B: Work 2 rows.
With C: Work 1 row.
With A: Work 2 rows.
With B: Work 1 row.
With C: Work 2 rows.
With A: Work 1 row.
With B: Work 1 row.
Total: 17 rows make up one full Stripe Pattern repeat. The pattern instructions will tell you when to start and stop following this sequence.
Crochet Egg-cellent Bunny Dishcloth: Step-by-Step Instructions
Okay, grab your hook and yarn (starting with Contrast C – Yellow), and let’s begin crocheting!
Starting the Base (Increases)
With Contrast C (Yellow), Ch 6.
1st row: (RS). Work 2 sc in the 2nd ch from the hook (this is your first increase). Work 1 sc in each of the next 3 ch. Work 2 sc in the last ch (second increase). Turn. (You should have 7 sc stitches).
End of Row 1: Join Contrast A (Hot Purple). Break Contrast C, leaving a 6-inch tail.
2nd row: (WS). With A, ch 1. Work 2 sc in the first sc. Work 1 sc in each sc across until the last sc. Work 2 sc in the last sc. Turn. (9 sc stitches).
3rd row: (RS). With A, ch 1. Work 1 sc in the first sc and in each sc across to the end of the row. Turn. (9 sc stitches).
End of Row 3: Join Contrast C (Yellow). Break Contrast A, leaving a 6-inch tail.
No comments
Write a comment