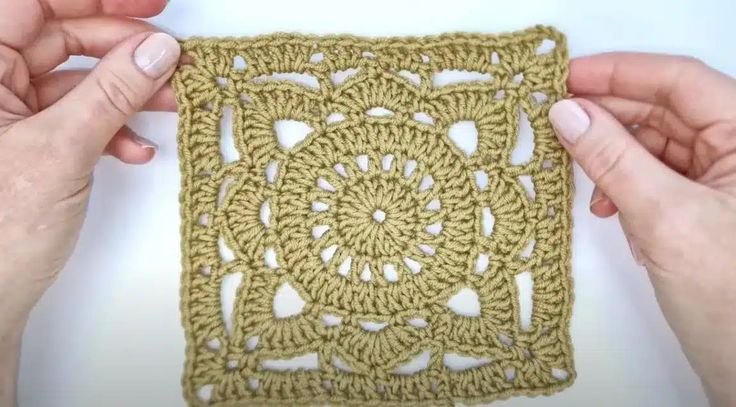
Crochet the Elegant Willow Granny Square
Crocheting the Elegant Willow Granny Square is a delightful project that allows you to showcase your creativity and skills. This beautiful crochet pattern combines intricate details with a charming design, making it a perfect choice for creating blankets, bags, or even decorative items. The soft willow green color adds a touch of elegance to any project, while the granny square pattern brings a classic and timeless appeal. Get ready to enjoy the meditative rhythm of crocheting and the rewarding feeling of completing each intricate stitch. Happy crocheting!
What You’ll Need
Yarn: A DK or light worsted weight yarn works beautifully. The project in the tutorial uses Drops Merino Extra Fine (a DK weight yarn).
Crochet Hook: A 4.5 mm hook is used in the tutorial, but be sure to use a hook that corresponds to your yarn weight.
Scissors
Yarn Needle: For weaving in those ends.
Abbreviations (US Terms)
ch: chain
sl st: slip stitch
sc: single crochet
dc: double crochet
st(s): stitch(es)
sp: space
The Pattern
Round 1: The Foundation
We begin by creating a central ring.
Make a slip knot and ch 4.
Join with a sl st to the first ch to form a ring.
Ch 3 (this counts as your first dc).
Work 15 more dc into the center of the ring.
Join with a sl st to the top of the beginning ch-3.
(You should have a total of 16 dc, including the initial ch-3.)
Round 2: Creating Spaces
This round builds the foundation for our lacy details.
Ch 4 (this counts as 1 dc and a ch-1 sp).
Work 1 dc into the next st.
Ch 1.
Repeat steps 2 and 3 all the way around.
To finish the round, ch 1 and join with a sl st to the 3rd ch of the beginning ch-4.
(You should have 16 dc and 16 ch-1 spaces.)
Round 3: Filling It In
Now, we’ll build up the body of the circle.
Ch 3 (counts as your first dc).
Work 2 dc into the first ch-1 sp from the previous round.
Work 1 dc into the next st.
Repeat steps 2 and 3 all the way around.
Join with a sl st to the top of the beginning ch-3.
(You should have a total of 48 sts.)
Round 4: Squaring Off
This is the magic round where our circle starts to become a square.
Ch 1 and make 1 sc in the same first st.
Corner: Ch 5, skip the next 2 sts, 1 sc in the next st.
Side: Ch 3, skip the next 2 sts, 1 sc in the next st. Repeat this two more times. (You will have 3 ch-3 side spaces).
Repeat steps 2 and 3 three more times to form the remaining corners and sides.
To finish, after your last side section, join with a sl st to the very first sc you made.
(You should have 4 ch-5 corner spaces and 3 ch-3 spaces on each of the 4 sides.)
Round 5: The Willow Branches
Here we add the beautiful fan details that give the square its name.
Sl st into the first ch-5 corner space.
Corner: Ch 3 (counts as 1 dc), work 4 dc into the same space. Ch 3, then work 5 more dc into the same corner space.
Side: 1 sc into the next ch-3 sp. Work 7 dc into the following ch-3 sp. 1 sc into the final ch-3 sp on this side.
Repeat steps 2 and 3 for the remaining three sides.
Join with a sl st to the top of the beginning ch-3.
Round 6: The Lacy Framework
This round creates the openwork frame for our final border.
Ch 3 (counts as 1 dc). Ch 5, then work 1 sc into the ch-3 corner space. Ch 3, and work 1 more sc into the same corner space. Ch 5.
Skip the next 5 sts, work 1 dc into the sc from the previous round.
Ch 3, skip the next 3 sts, work 1 sc into the 4th (center) dc of the 7-dc fan.
Ch 3, skip the next 3 sts, work 1 dc into the next sc.
You have now reached the next corner. Repeat steps 1-4 for the remaining three sides.
To finish the round, after your last dc, join with a sl st to the 3rd ch of the very first ch-8 you made (the ch-3 that counts as a dc + the ch-5).
Round 7: The Final Border
The last round fills in the framework to create a solid, beautiful edge.
Sl st into the first ch-5 space.
Ch 3 (counts as 1 dc), then work 4 more dc into the same ch-5 sp.
Corner: Work 3 dc, ch 3, 3 dc all into the ch-3 corner space.
Work 5 dc into the next ch-5 sp.
Work 3 dc into the next ch-3 sp.
Work 3 dc into the next ch-3 sp.
You’ve reached the next ch-5 space before the corner. Repeat steps 4-6 along the next three sides, and work the corner as described in step 3.
Join with a sl st to the top of the beginning ch-3.
Finishing Your Square
Fasten Off: Cut your yarn, leaving a 6-inch tail. Yarn over and pull the tail completely through the loop on your hook to secure it.
Weave in Ends: Use your yarn needle to weave the starting and ending tails into the back of your work for a clean, professional finish.
Block (Optional but Recommended): To give your square a perfectly straight and defined shape, you can block it. Wet the square, gently squeeze out the excess water, pin it into a perfect square shape on a blocking mat, and let it air dry completely.
And there you have it! A stunning Willow Granny Square, ready to become part of your next beautiful project.
No comments
Write a comment