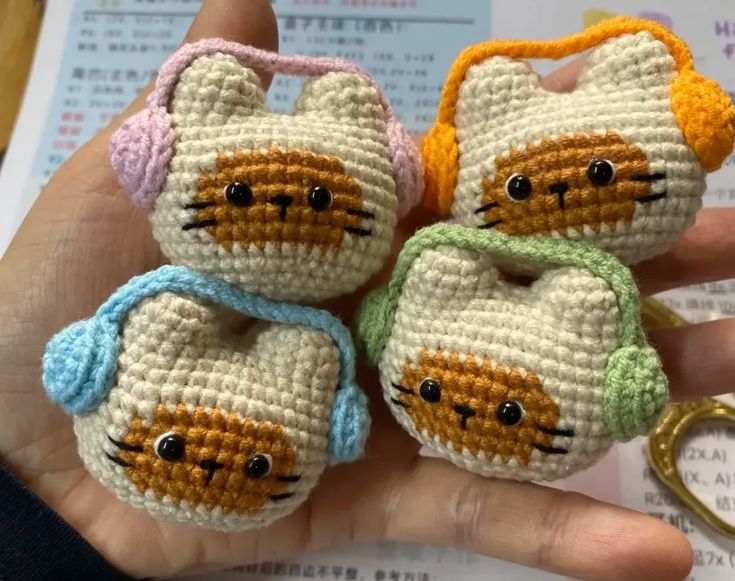
Crochet Cat with Headphones
Crocheting a cat with headphones can be such a delightful project! Picture this cute feline, with its tiny paws and whiskers, all snuggled up in a cozy yarn creation while sporting trendy headphones. It's a quirky and fun way to combine the love for crafting with a touch of modern style. Whether you're making it for yourself or as a gift for a fellow cat lover, this unique creation is sure to bring smiles and warmth wherever it goes. Happy crocheting!
Materials You’ll Need
Before you start, gather these essentials:
Worsted weight yarn in two or three colors (e.g., white for the bunny, pink for the inner ears, and black or grey for the headphones).
Crochet hooks: E (3.5 mm) and C (2.75 mm).
Stitch markers.
Yarn needle.
Scissors.
Polyester stuffing.
Optional: Safety eyes (6-8 mm) or embroidery thread for the bunny’s face.
Pattern: Bunny Body
Step 1: Begin the Body
R1: Create a magic ring and crochet 6 single crochets (SC) into the ring. Tighten the loop.
R2: Make 6 increases (1 SC in the first stitch, 2 SC in the next). Repeat 6 times for a total of 12 stitches.
Note: The ears will be crocheted separately and attached later.
R3: 12 SC (1 SC in each stitch).
Step 2: Attach the Ears
Crochet the ears separately using the following steps:
Ear Pattern:
R1: Magic ring, 6 SC.
R2: 6 increases (12 SC).
R3: 12 SC (1 SC in each stitch).
Repeat to make two ears.
R4: Chain 3 (CH), then attach one ear. Continue crocheting: 12 SC around the first ear, 3 SC across the chain, 12 SC around the second ear, 3 SC back along the chain. (30 stitches in total).
Step 3: Shaping the Bunny
R5: 30 SC (1 SC in each stitch).
R6: Work 6 repetitions of (4 SC, increase). This increases the total to 36 stitches.
R7: 36 SC.
R8: Continue shaping with 6 repetitions of (5 SC, increase). You’ll now have 42 stitches.
R9: Crochet 14 SC, then switch to a new yarn color for the bunny’s “shirt” or a decorative band. Work 8 SC in the new color, then 20 SC back in the original color.
R10: Crochet 13 SC in the original color, switch to the second color for 10 SC, then finish the row with 19 SC in the original color.
R11-12: Repeat the same color changes as Row 10 for consistency.
R13: Crochet 14 SC in the original color, 8 SC in the second color, then 20 SC back in the original.
R14: 42 SC in the original color.
Step 4: Closing the Body
R15: Begin decreasing with 6 repetitions of (5 SC, decrease). (36 stitches).
R16: Continue with 6 repetitions of (4 SC, decrease). (30 stitches).
R17: Crochet 6 repetitions of (3 SC, decrease). Stuff the bunny firmly with cotton. (24 stitches).
R18: 6 repetitions of (2 SC, decrease). (18 stitches).
R19: 6 repetitions of (1 SC, decrease). Add more stuffing if necessary. (12 stitches).
R20: 6 decreases to close the opening. Use a yarn needle to weave in the tail and secure it.
Pattern: Headphones
Headphone Covers
Make 2 pieces:
R1: Start with a magic ring and crochet 7 SC into the ring.
R2: Work 7 increases to bring the total to 14 SC.
Connecting the Headphones
R3: Crochet 14 SC around the edge of each headphone piece. For a neat finish, join the two covers with a seamless slip stitch.
Headband:
Chain 23 and attach one end to the first headphone cover. Turn the work and crochet 23 slip stitches (SL) back along the chain. Connect the other end to the second headphone cover.
Optional: Use a small amount of stuffing to lightly fill the headphone covers for a 3D effect.
Assembly
Attach the Ears: Sew the ears onto the top of the bunny’s head using a yarn needle. Position them slightly tilted for a playful look.
Secure the Headphones: Sew the headphone covers over the bunny’s ears, adjusting their position as needed. Ensure the headband arches over the top of the head snugly.
Add Facial Details: Use safety eyes or embroider small eyes and a nose onto the bunny’s face. You can also stitch a small smile for extra charm.
Finishing Touches
Keychain Attachment: Use pliers to attach a jump ring to the top of the bunny’s head. Add a keyring or a lobster clasp, and your music-loving bunny is ready to join you wherever you go!
Customization Ideas: Experiment with different yarn colors for the bunny’s body and headphones. Add tiny embellishments, like a crocheted bow or a small embroidered logo, to make your bunny truly unique.
Enjoy Your Adorable Bunny Companion
No comments
Write a comment