Water Marble Mugs
Have you ever tried making water marble mugs? They are such a fun and creative way to personalize your drinkware! Simply swirl a few drops of nail polish on the surface of water inside a container, then dip your mug inside to create a unique marble pattern. It's a fantastic DIY project that is enjoyable for all ages and sure to impress your friends and family. So, gather your favorite nail polish colors and get ready to turn your plain mugs into works of art!
Here’s what you need to make DIY marble mugs
Plain white mugs– This is a great deal on a set of 6 white mugs!
Nail polish – I have found that the quality of the nail polish does matter.
Bowl – Large enough for your mugs to dip in.
Room temperature water
Toothpick
Water
How to make DIY water marble mugs
Step 1- Sticker
This step is optional, but a fun addition to personalize the mugs with a name using stickers. Adhere the sticker to the mug making sure that it’s fully stuck to the mug. You don’t want any nail polish to get under the stickers.
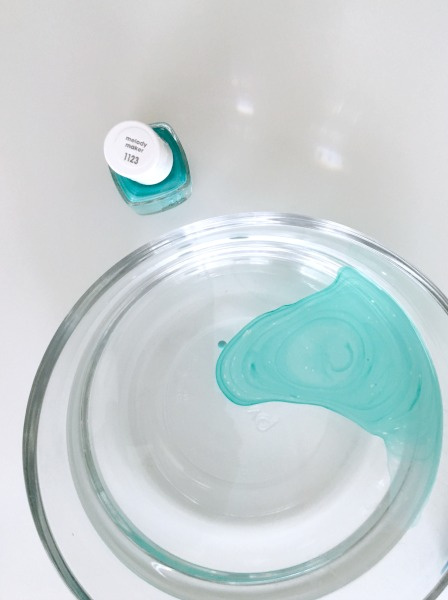
Step 2- Fill a bowl with water
Fill a bowl with room temperature water. If the water is too hot it will dry up your nail polish before you get a chance to dip your mug.
Step 3- Add drops of nail polish
Strat by dropping 3-5 drops of one color of nail polish into the bowl of water. Then, add a few more drops of another color nail polish to create a bulls eye pattern on top of the water. This step is time sensitive since nail polish can dry, so don’t over think the pattern. Oh and the more colors the merrier! I’ve used the before and used up to 10 colors of nail polish. It also looks great to use only 1 color of nail polish. It’s totally up to you!
Step 4- Swirl
This step is optional. You can choose to make a pattern or leave it as a more natural marble effect. My kids love this step so I always let them use a toothpick to pull the nail polish into a pattern. Try not to take more than 2-3 minutes between step 3 & 4.
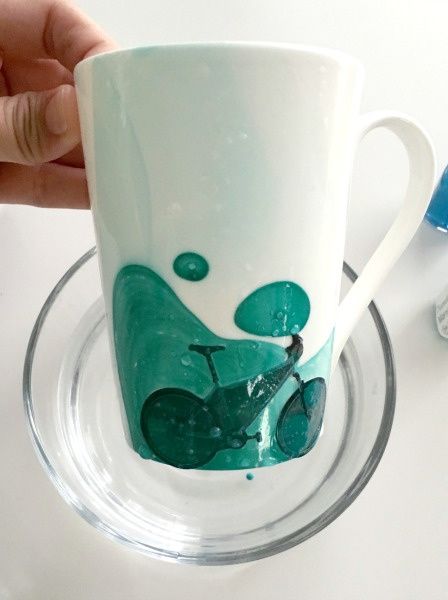
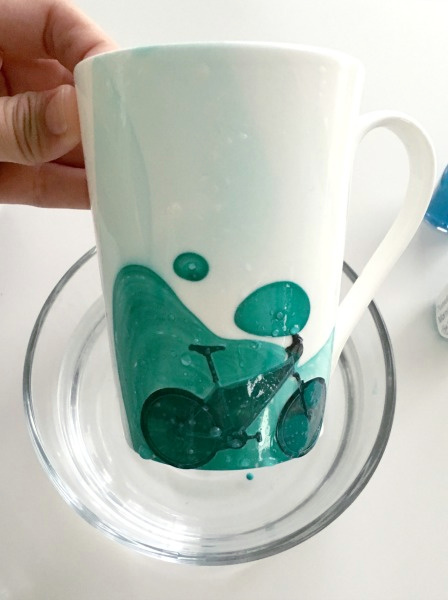
Step 5- Dip
Once you’re happy with pattern and colors you created in the water dip your mug into the bowl and watch the water marble adhere to the mug. It’s that easy!
Strep 6- Blot with a paper towel
Sometimes I use a the toothpick to remove the access nail polish from the around the mug in bowl. When the mug is out, use a paper towel to blot the drips and set the mug aside to dry. You can always dip again if you want to add more water marble effect to the mug. If for some crazy reason you don’t love the design you created you can always use nail polish remover to take off the design and try the entire process again!
Step 7- Remove the Sticker
When the mug is dry, remove the stickers and voila! Gorgeous water marbled mugs! For both of the mugs below, I dipped twice. You can tell the first time I dipped I had the bicycle sticker on the mug and used a green nail polish. For the second dip, I took the sticker off and water marbled with a bright blue.
No comments
Write a comment