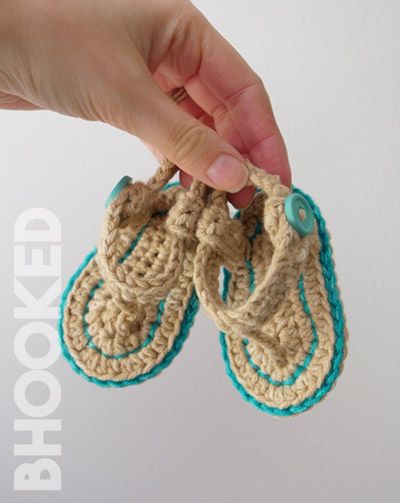
Crochet baby sandals are not just footwear; they're tiny works of art that are sure to make your little one look extra adorable! These handmade creations come in a variety of colors and designs, perfect for adding a touch of cuteness to any baby outfit. They are not only stylish but also practical, providing comfort and protecting your baby's feet while allowing them to wiggle their little toes freely. Whether you're looking for a special gift for a new parent or simply want to dress up your baby in something unique, these crochet baby sandals are a charming choice that will surely bring smiles to everyone who sees them. So, why not pamper your little bundle of joy with these charming and comfy sandals?
Finished Size
4″ long; 2.25″ wide; 0-3 months
Gauge
Use finished sole to measure gauge.
These easy crochet baby sandals work up in about 2 hours total. You will start by crocheting the soles, each consisting of two identical pieces that are stitched together. You will use a surface crochet technique to add a decorative (and functional) element before adding the straps.
The side straps, ankle strap and toe strap are all crocheted separately and sewn together to finish them off.
These crochet baby sandals use the invisible join method to finish off rounds. You can see instructions on how to do this in the tutorial.
Sole (Make 4)
Round 1: With A, ch 9. 1 sc in 2nd ch from hook. 1 sc in next 5 ch. 1 hdc in next chain. 7 hdc in last chain, rotating sole as you go. (Working in opposite side of chain) 1 hdc in next ch. 1 sc in next 5 ch. 3 sc in last ch. Do not join, continue working in a spiral. Mark first stitch of each round with a stitch marker. (23 sts)
Round 2: 2 sc in first st. 1 sc in next 6 sts. 1 hdc in next st. 2 hdc in next st. 1 hdc in next st. 3 hdc in next st. 1 hdc in next st. 2 hdc in next st. 1 hdc in next st. 1 sc in next 6 sts. 2 sc in next st. 1 sc in next st. 2 sc in last st. (30 sts)
Round 3: 2 hdc in first st. 1 hdc in next 10 sts. 2 hdc in next st. 1 hdc in next st. 3 hdc in next st. 1 hdc in next st. 2 hdc in next st. 1 hdc in next 10 sts. 2 hdc in next st. 1 hdc in next st. 2 hdc in last 2 sts. (38 sts) Remove marker and make 1 sc in that st. Cut yarn and finish round with an invisible join.
Sole Assembly
Step 1: With wrong sides towards each other, lay two soles on top of one another.
Step 2: With B, fasten on in any heel stitch. Ch 1 (not st). Using the BLO of the bottom piece and FLO of the top piece, slst in each st around sole to crochet them together. Cut yarn and finish round with an invisible join.
Step 3: With B, fasten on in any heel stitch in the space between the second and third rounds catching both layers of the sole. Evenly space surface crochet stitches around the sole averaging about on surface crochet stitch per sole stitch. Cut yarn and finish round with an invisible join.
Side Strap (Make 4)
Row 1: With A, ch 13. 1 sc in 2nd ch from hook. 1 sc in each rem ch. Turn. (12 sts)
Row 2: Ch 1 (not st). 1 sc in each st to last. 1 sc last st. (12 sts) Fasten off leaving a 4-6″ tail.
Ankle Strap (Make 2)
Row 1: With A, ch 27. 1 sc in 2nd ch from hook. 1 sc in each rem ch. Turn. (26 sts)
Row 2: Ch 1 (not st). 1 sc in each st to last. 1 sc last st. (to create button hole) Ch 4 and join with a slst to the first st of the first row (on underside of side strap). Fasten off leaving a 6″ tail.
Sandal Assembly
Step 1: Fold side strap in half and thread tail on darning needle. Situate folded strap on side of sole approximately .75″ from back of sole. Sew it in place.
Step 2: Feed ankle strap through the side strap from step 1.
Step 3: Fold other side strap in half and thread tail on darning needle. Situate folded strap on side of sole directly across from other side strap. Sew it in place.
Step 4: Feed ankle strap (non-button hole end) through folded side strap from step 3. With tail from ankle strap, sew the side strap closed with the ankle strap flush with the front of the side strap.
Step 5: Attach button to side strap from step 4.
Step 6: Repeat steps 1-5 for other sandal, being certain to flip the placement of the button hole for the opposite foot.
Step 7: Using a cut of yarn, secure the remaining side strap to the ankle strap with a simple tack stitch.
Toe Strap Assembly
Step 1: Join color A in 8th st from button hole. Ch 7.
Step 2: Remove hook but keep loop active (do not fasten off). Insert hook from the bottom through the sole at the place where you want the toe strap to be. Place active loop back on hook and pull it through the sole. Fasten off and secure the tail.