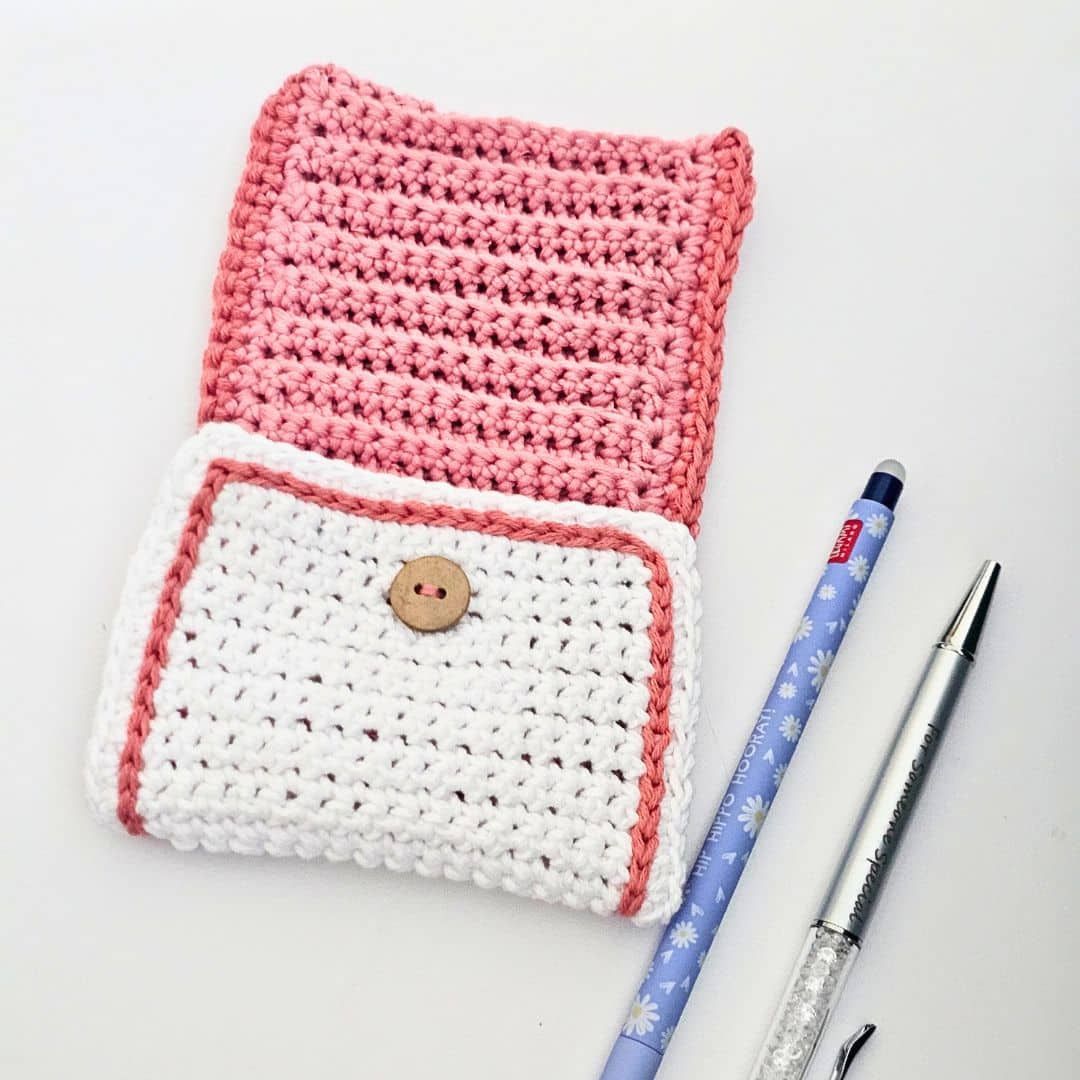
Crochet Pencil Case
Crochet pencil cases are the perfect blend of creativity and functionality! Not only do they keep your pencils organized, but they also add a touch of handmade charm to your everyday accessory collection. Whether you opt for a classic design or experiment with colorful yarns and intricate patterns, each crochet pencil case is a unique reflection of your personality. The process of crocheting a pencil case can be a relaxing and fulfilling experience, allowing you to unwind while creating something practical and stylish. So, grab your crochet hook, choose your favorite yarn, and let's get crafting! Who knew organizing your pencils could be this much fun?
Materials
Yarn – Any DK-weight yarn can be substituted.
The prototype was made using Lionbrand Cobboo (#3, 51% Cotton, 49% Rayon from Bamboo per 3.5 oz/100g Ball)
Colors
Color A – Terracotta
Color B – White
Estimated Yardage
Color A – 40 yards
Color B – 20 yards
Hook and other materials
4 mm Crochet Hook
Yarn needle
Button – 8 mm
Darning Needle
Gauge
Gauge isn’t crucial to this project.
Crochet Pencil Case Pattern notes
Please kindly read through the pattern before starting.
Similar #3 weight yarn can be substituted; please check the gauge.
Adjustments to your Crochet Pencil Case Pattern:
Length: increase or decrease the repeats until you have the required length to cover your pencils
Skill level – Easy
Terms – US Terminology
Stitch Abbreviations
Chain(s) – ch(s)
Single Crochet – sc
Repeat – rep
Slip stitch – sl st
Special Stitch
Back Loop
Finished Measurement
8” by 5”
How to Crochet a Pencil Case Holder for Beginners
With color A
Row 1: Chain 17, sc in 2nd ch from hook and in each ch across, turn. 16 sc
Row 2: Ch 1, sc in first st, sc in BLo across until the last st, sc in last st, turn. 16 sc
Rows 3 – 44: Repeat Row 2
Continue the repeats until it measures 13”
Increase or decrease the number of repeats for a length long enough to cover your pencils.
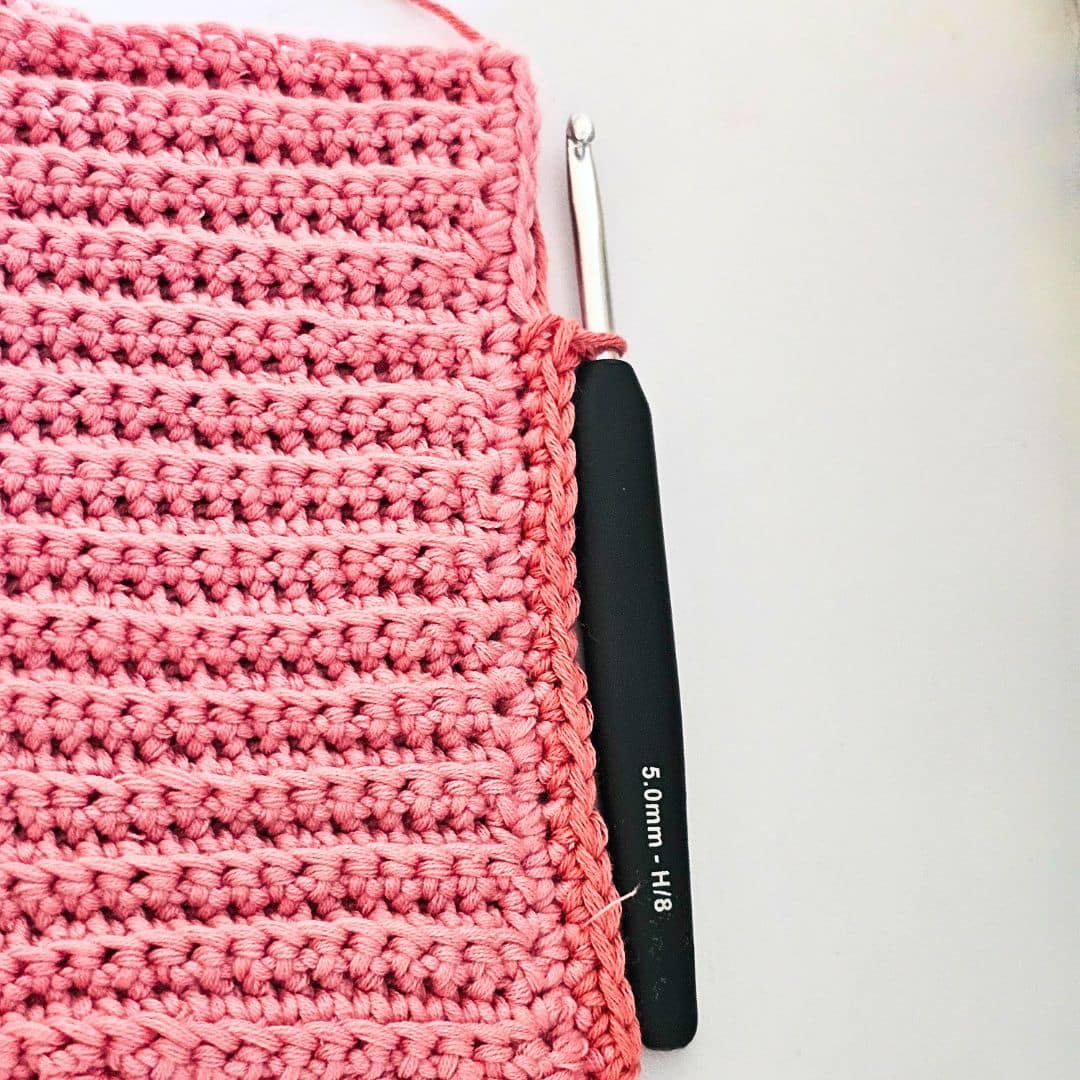
Edging
Crocheting across both long sides and just one short end.
Continue with A.
Row 1: Ch 1, sc in each st around the whole panel, aim for (2 sc, ch 2, 2 sc) at each corner.
To fold
Fold the lower part of the panel over; this gives you an equal half.
Crocheting across the long side of the folded panel.
Row 1: Ch 1, sc over both sizes until you get to the end, fasten off.
Join yarn with a sl st on the other side of the panel, repeat row 1
Fasten off.
Cover
Join Color B with a sl st
Crocheting across the 4th short end, which is the continuation of the part made above.
Into both loops
Row 1: Ch 1, sc in each st across, turn. 16 sc
Rows 2- 4: Repeat Row 1
Button hole
Row 5: Ch 1, sc in 6 sts, ch 3, skip next 4 sts, sc in the remaining sts, turn.
Row 6: Ch 1, sc in each st and ch sps, turn.
Rows 7 – 8: Ch 1, sc in each st across, turn. 16 sc
Sew the button on the main panel, ensuring it aligns with the button hole.
Edging
Crocheting across the 3 sides, as in each st across.
Fasten off.
Optional
Join color A to the base of the cover, crocheting across the 3 sides, sl st across the last row.
Weave in all ends.
No comments
Write a comment