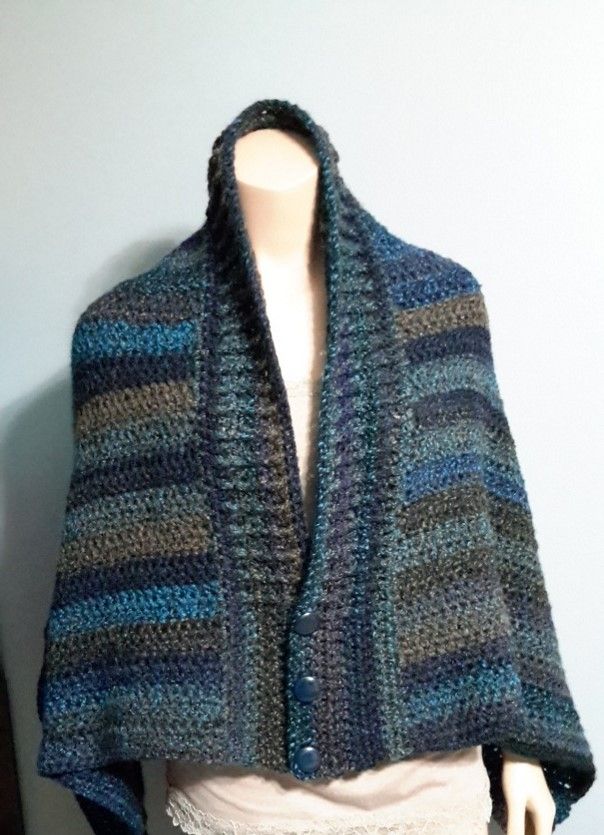
Crochet Barcelona Convertible Shrug
The Crochet Barcelona Convertible Shrug is a versatile and stylish addition to any wardrobe. This beautifully crafted piece can be worn in a multitude of ways, making it perfect for both casual outings and more formal occasions. The intricate crochet design not only adds a touch of elegance but also provides warmth and comfort. Whether you choose to wear it as a shrug, shawl, or wrap, you'll surely turn heads with this fashion-forward garment. It's a must-have item for anyone looking to elevate their outfit effortlessly while staying cozy and chic.
Supplies:
6.5 mm (US Size K / 10.5) Crochet Hook
700-900 of bulky weight yarn
Sewing needle for ends
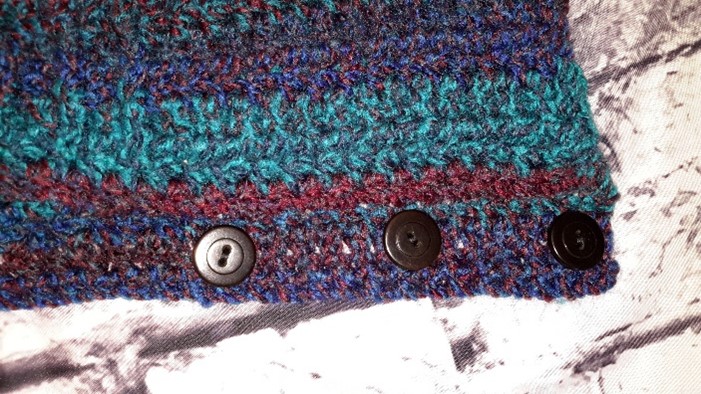
6 buttons, 1” diameter
Yarn:
Loops & Threads Barcelona, Bulky (5) 100% Acrylic, 328 yds, 300 m, 7 oz, 200 g, per skein. Shown in Blue Ridge and Dusk. Pattern requires 2 – 3 skeins/ 700 – 900 yds
Finished Size:
Women: One size fits most
Abbreviations (US Terms):
bpdc: back post double crochet
ch: chain
dc: double crochet
hdc: half double crochet
FO: Finish Off
fpdc: front post double crochet
sl st: slip stitch
WS: wrong side
Gauge:
10 stitches x 6 rows = 4 inches
Skill level:
Beginner
Shrug Pattern
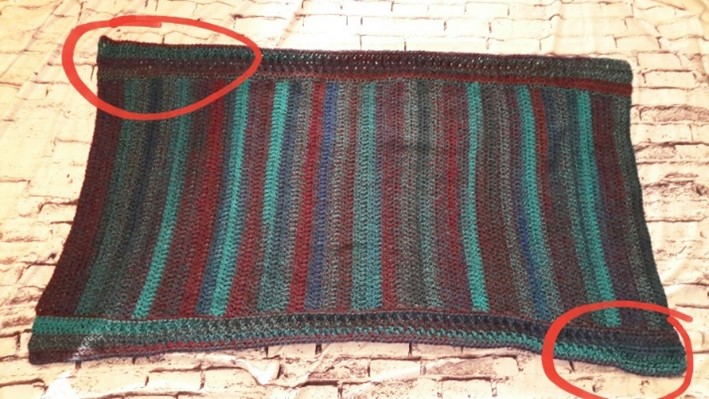
The main part of the shrug will be worked in a large rectangle.
Row 1: Foundation hdc 54 (or ch 55, hdc in 2nd ch and each ch across). (54)
Row 2: Ch 2, turn, dc across. (54)
Row 3: Ch 1, turn, hdc across. (54)
Rows 4 – 83: Repeat Row 2 and Row 3, 40 more times each.
Shrug Edging:
Turn so you are working across the ends of the rows.
Row 1: Ch 1, work 1 sc into the end of each hdc row and 2 sc into the end of each dc row across. (124)
Row 2: Ch 2, turn, dc in each st across.
Row 3: Ch 2, turn, dc 14, *dc, fpdc, repeat from * to last 14 sts, dc 14.
Row 4: Ch 2, turn, dc 14, *bpdc, dc, repeat from * to last 14 sts, dc 14.
Rows 5 -6: Repeat Row 3 and Row 4
Row 7: Ch 1, turn, sc across, FO. (124)
With front of work facing you, reattach yarn in first stitch on opposite side with a sl st.
Repeat Edging Rows 1 – 7 on second side.
With WS facing you, attach 1st button to the 2nd DC from the end, attach 2nd button in 8th DC from the end, and 3rd button in 14th DC from the end of Row 6.
Repeat for second side. See red circles on photo below for button placement.
No comments
Write a comment