Crochet Birthday Wish Granny Square
Celebrate a special occasion with a handmade crochet birthday wish granny square! This unique and thoughtful gift is perfect for adding a personal touch to any birthday celebration. Each granny square is carefully crafted with colorful yarn and intricate stitches to create a beautiful and one-of-a-kind design. Whether you're gifting it to a friend, family member, or loved one, this crochet birthday wish granny square is sure to be a cherished keepsake that will be treasured for years to come. Not only is this crochet birthday wish granny square a heartfelt present, but it also serves as a versatile item that can be used in a variety of ways. You can incorporate it into a larger crochet project, such as a blanket or pillow, or simply display it as a decorative piece in your home. The possibilities are endless when it comes to how you can enjoy and appreciate this handmade creation. So, why not spread some birthday cheer with a crochet birthday wish granny square today?
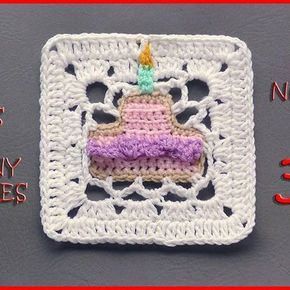
Materials:
–Red Heart Super Saver Yarn in as many colors as you want.
–H-5.00mm Crochet Hook
–Yarn Needle
–Scissors
NOTES:
-You can use a smaller or larger hook to make this square depending on your tension. I wouldn’t use anything larger than an I-5.5mm Crochet Hook though.
-The finished square measures 7 inches (18 cm)
-This square is worked from the center outward
Special stitches:
Ch(s): chain(s)
YO: Yarn Over
St(s): Stitch(es)
Sl st: slip stitch
SK: Skip
SC: Single Crochet
HDC: Half-Double Crochet
DC: Double Crochet
Beg. Popcorn: Ch up 3, 4DC in same sp, remove hook, put hook in ch up 3, put loop back on hook, pull through and pull tight.
Popcorn: 5DC in same sp, remove hook, put hook in 1st dc of grouping, put loop back on hook, pull through and pull tight.
Picot: Ch 3, sl st in 3rd ch from hook. Picot made.
Long DC: Double crochet in Picot of Petal
Pattern:
Ch 13
Rnd 1: Sc in 2nd ch from hook and across. (12)
Rnd 2: Work in BLO, Ch up 1, turn, Sc across
Rnd 3: Work in FLO Ch 1, turn, SC across
Rnd 4: Repeat row 2, fasten off, weave in ends.
Rnd 5: Sk 3 sts, Attach yarn in BLO of next st, ch 1, sc in same st and in next 5 sts, leaving last 3 sts unworked. (6 sts)
Rnd 6: Ch 1, turn, SC in FLO across. (6 sts)
Rnd 7: Ch 1, turn, Work in BLO, SC across. (6 sts)
Assembly: SC around cake (40 sts evenly) See video tutorial for specific stitches.
Rnd 8: (See video tutorial to learn how to do this round) In top right st of the top layer of cake: Ch 1, sc in same st, Ch 4, sk 4 sts, sc in next st, Ch 4, sk 2 sts, sc in next st, ch 4, sk 3 sts, sc in next st, ch 4, sk 3 sts, sc in next st, [ch 4, sk 2 sts, sc in next st] 5 times, ch 4, sk 3 sts, sc in next st, ch 4, sk 2 sts, sc in next st, ch 4, sk last sts, sl st to 1st sc.
Rnd 9: Sl st in ch 4 sp, ch 1, SC in same sp, *Ch 4, SC in next ch sp, repeat from * around. Sl st to beg sc
Rnd 10: Sl st in ch 4 sp, Ch up 3 (counts as DC), 3 DC in same sp, *[4 DC, ch 2, 4 DC] in next sp, 4 DC in next 2 ch sps, repeat from * around. Sl st to beg. ch up 3.
Rnd 11: DC in each st around, [2dc, ch 2, 2dc] in corners. Fasten off
Weave in all ends.
Frilly siding:
Turn square upside down,
Working in front loops of bottom layer of cake:
Sc in 1st st, *ch 3, sc in next st, repeat from * across. Fasten off, weave in ends.
Candle:
Row 1: Attach yarn to edge round on top center of cake, ch up 1, sc in same st and next st
Row 2, Ch 1, turn, SC in 2 sts
Fasten off, weave in ends.
With Yellow, attach yarn to st, ch 3, sl st in next st, fasten off, weave in ends.
Enjoy!!