Crochet Adorable Snowman
Crocheting an adorable snowman is a delightful way to add charm and warmth to your winter décor. The process of creating this cute little figure involves using soft white yarn and carefully crafting each part - from the round body to the tiny arms and smile. You can personalize your snowman with colorful buttons for eyes and a carrot-shaped nose, giving it a unique touch. Once finished, your crochet snowman will bring smiles and joy to any room it's placed in, making it a heartwarming addition to your holiday decorations. So grab your crochet hook and some yarn, and let's get started on crafting a lovable snowman to spread cheer wherever it goes!
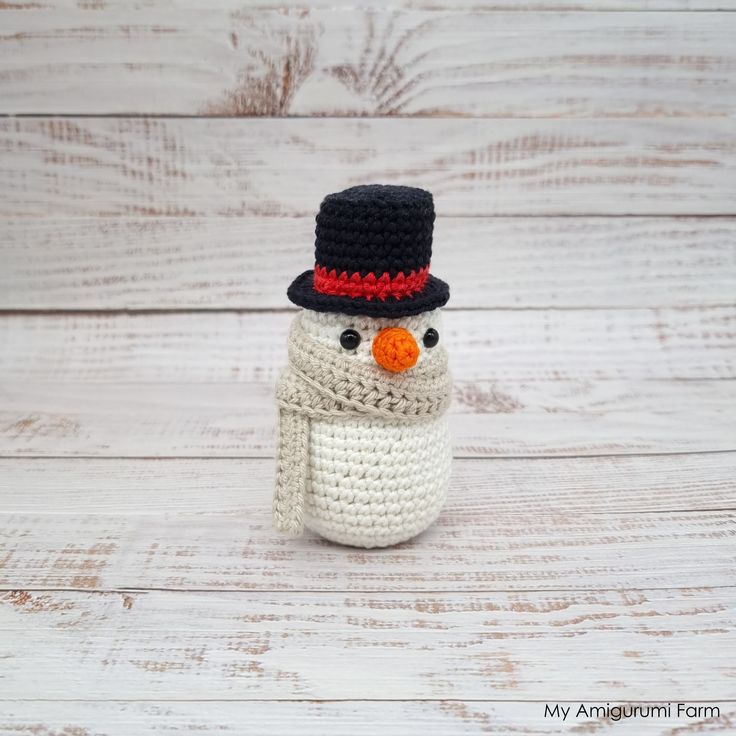
Size 11 cm / 4.33 inch in height
Tools & Materials
- Crochet hook size 2.5 mm
- Black safety eyes x 2 – size 6 mm
- Polyester Craft Filling for toys
- Tapestry needle and craft pins
- Scissors
- Stitch marker or a piece of yarn to mark the end of a round
Yarn
- Orange (Rico Essentials Cotton DK, Pumpkin (87), 100% Cotton, 50g)
- Red (Stylecraft Natural DK Bamboo + Cotton, Rouge (7136), 60% Bamboo 40% Cotton, 100g)
- White (Stylecraft Natural DK Bamboo + Cotton, Chalk (7127), 60% Bamboo 40% Cotton, 100g)
- Natural (Stylecraft Natural DK Bamboo + Cotton, Natural (7146), 60% Bamboo 40% Cotton, 100g)
- Black (Stylecraft Natural DK Bamboo + Cotton, Pitch (7153), 60% Bamboo 40% Cotton, 100g)
Skills required / abbreviations / info
- MG – magic ring (make specified number of single crochet stitches into the loop)
- Sc – single crochet
- Inc – 2sc increase (crochet 2 single crochet stitches into the same stitch)
- Dec – 2tog decrease (crochet 2 stitches together)
- BLO – back loops only
- FLO – front loops only
- CH – chain stitch
- Hdc – half double crochet (yarn over, pull through 3 loops on hook)
- Hdc inc – half double crochet increase (crochet 2 hdc crochet stitches into the same stitch)
- F/O – finish off
- R – spiral round
- Row – row
- ( )* – repeat the sequence in brackets to the end of the round
- (12) – number of stitches expected at the end of the round
- Work in spiral rounds, do not turn/join unless stated otherwise
SNOWMAN (colour white)
R 1 mg, 6sc (6)
R 2 (inc)* (12)
R 3 (sc 1, inc)* (18)
R 4 (sc 2, inc)* (24)
R 5 (sc 3, inc)* (30)
R 6 - 11 sc 30 (6 rnds) (30)
Insert safety eyes between rounds 8 – 9, within a distance of 5 holes (count holes between the stitches). Stuff with polyester filling as you go. When completed, F/O and weave in remaining thread.
R 12 (sc 3, dec)* (24)
R 13 (in FLO: sc 3, inc)* (30)
R 14 (sc 4, inc)* (36)
R 15 - 24 sc 36 (10 rnds) (36)
R 25 (sc 10, dec)* (33)
R 26 (sc 9, dec)* (30)
R 27 (in BLO: sc 3, dec)* (24)
R 28 (sc 2, dec)* (18)
R 29 dec to the end
NOSE (colour orange)
R 1 mg, 6sc (6)
R 2 (sc 2, inc)* (8)
R 3 sc 8 (8)
R 4 (sc 3, inc)* (10)
Make 1sl st to the next stitch to even out the nose. Stuff with polyester filling. Leave open, leave longer tail for sewing. Attach to the head between rounds 8 – 10.
HAT (colours black and red)
Start with colour BLACK
R 1 mg, 6sc (6)
R 2 (inc)* (12)
R 3 (inc)* (24)
R 4 sc 24 (24)
R 5 BLO 24 (24)
R 6 - 9 sc 24 (4 rnds) (24)
Change colour to RED
(don’t F/O red yarn when done, instead leave longer tail for sewing, then cut off – it will be used to attach the hat to the top of the head)
R 10 - 11 sc 24 (2 rnds) (24)
Change colour to BLACK
R 12 (in FLO: CH 1; hdc inc)* (48) – when done, join with sl st to initial chain and F/O
- Place on the top of the head, secure with as many pins as possible to keep its shape round and position straight.
- Using needle and red sewing tail, attach to the head – make stitches where colour change is, between rounds 11 – 12, covering the red stitches only.
- When about ¾ of the ‘Hat’ is attached, leave a small hole and stuff it with polyester filling. Once ‘Hat’ is properly stuffed, finish sewing and weave in remaining thread.
SCARF (colour natural)
CH 101
Row 1 starting from the 2nd chain from the hook, make hdc 100, turn (100)
Row 2 CH 1, hdc 100 (100)
Leave longer tail for sewing. Wrap around the Snowman’s neck. Using needle and sewing tail, secure in place.
love it thanks you very much