Make a Beautiful Crochet Dress — Free Step-by-Step Pattern (One Size XS–M)
This free crochet pattern guides you through making an elegant sleeveless dress worked in Premier Hipster Cotton (Desert Skies). The pattern uses a simple shell/cluster stitch repeat to create a lacy, textured fabric that drapes nicely. Suitable for crocheters comfortable with basic stitches (sc, dc, ch, sl st) and reading row instructions.
Crocheting a beautiful dress is such a delightful way to showcase your creativity and style! The intricate stitches and lovely patterns come together to create a one-of-a-kind piece that is both charming and elegant. Whether you're making it for a special occasion or simply to enjoy the process, the end result is sure to be a stunning garment that you can be proud of. So gather your favorite yarn and hooks, and let's crochet our way to a truly beautiful dress that will surely turn heads and make you feel fabulous!
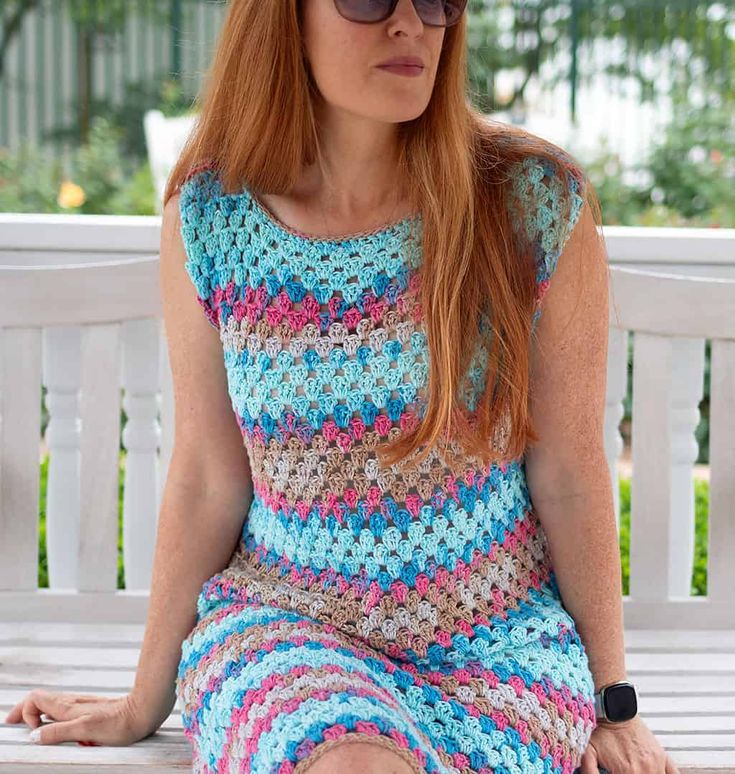
Finished sleeveless crochet dress made in Premier Hipster Cotton, Desert Skies — photographed flat to show stitch pattern and shaping.
Materials:
- Yarn: Premier Hipster Cotton in Desert Skies (5 skeins)
- Crochet hook: size US H
Gauge: 15 sc and 16 rows = 4 inches
Size: One size fits XS-M
Bust measures approximately 40 inches
Hips measure approximately 44 inches
Pattern instructions:
For the front & the back (make 2)
With A, ch 71
Row 1: (RS). 1 sc in 2nd ch from hook. 1 sc in each ch to the end of the chain. Turn. (70 sc)
Row 2: Ch 3 (counts as dc here and throughout). 1 dc in first sc. *Skip next 2 sc. 3 dc in next sc. Rep from* to last 3 sc. Skip next 2 sc. 2 dc in last sc. Turn. 22 groups of 3 dc, with 2 dc at either side edge.
Row 3: Ch 3. Skip next dc. 3 dc in sp between last skipped dc and next dc-group. *3 dc in sp between next 2 dc-groups. Rep from * to last 2 dc. Skip next dc. 1 dc in last dc. Turn.
Row 4: Ch3. 1 dc in first dc.*3dc in sp between next 2 dc-groups. Rep from * to last dc. 2 dc in the top of the last dc. Turn.
Rows 5 and 6: Same as 3rd and 4th rows.
Repeat rows 3 to 6, until the piece measures approximately 25 inches, ending on either 4th or 6th row of the pattern. Fasten off.
Shape armholes:
Row 1: (RS). Skip first 3 dc. Join with sl st to next dc. Ch3. Skip next dc.3 dc in space between last skipped dc and next dc-group. *3 dc in sp between next 2 dc-groups. Rep from * to last 5 dc. Skip next dc. 1 dc in next dc. Turn. Leave remaining sts unworked. 20 groups of 3 dc, with 2 dc at either side edge.
Continue even in pattern until the armhole measures approximately 7 inches, ending on 4th or 6th row of pat.
Shape Left Shoulder:
Row 1: Ch3. Skip next dc. 3 dc in space between the last skipped dc and next dc-group. (3 dc in sp between next 2 dc-groups) 4 times. Skip next dc. 1 dc in next dc. Turn. Leave remaining sts unworked.
Next row: Pat across row. Fasten off.
Ch3. Skip next dc. 3 dc in space between last skipped dc and next dc-group. (3 dc in sp between next 2 dc-groups) 4 times. Skip next dc. 1 dc in next dc. Turn. Leave remaining sts unworked.
Next row: Work across row in pattern. Fasten off.
Shape Right Shoulder:
With RS facing, skip next 32 dc. Join yarn to next dc. Ch 3. Skip next dc. 3 dc in sp between last skipped dc and next dc-group. (3 dc in sp between next 2 dc-groups) 4 times. Skip next dc. 1 dc in last dc. Turn.
Next row: Work across row in pattern. Fasten off.
FINISHING
Sew shoulder seams. Sew side seams.
Neck edging: With RS facing, join yarn with slip stitch to right shoulder seam. Ch 1. Work 1 rnd of sc evenly around neck edge. Join with sl st to first sc. Fasten off.
Sleeve edging: With RS facing, join yarn with slip stitch to right shoulder seam. Ch 1. Work 1 rnd of sc evenly around neck edge. Join with sl st to first sc. Fasten off.
Notes & tips:
- Check gauge before starting to ensure finished measurements match the pattern. Adjust hook size if necessary.
- Use stitch markers to mark beginning of rounds/rows and armhole shaping points to avoid mistakes when counting shells.
- Block finished pieces lightly if needed to even out the stitch pattern before seaming.
- To size up or down, add or subtract multiples of the pattern repeat across the beginning chain and adjust length as desired.