Bright & Breezy Crochet Summer Fun Sweater — Free Pattern and Step-by-Step Guide
Lightweight, colorful and easy to customize, the Crochet Summer Fun Sweater is a breathable shell-stitch top perfect for warm-weather outings. This pattern builds the garment from two rectangular shell-stitch panels (front and back), sews them together, then adds striped, textured sleeves — ideal if you want a quick, eye-catching summer wardrobe piece. The pattern is worked in worsted-weight yarn using basic stitches (DC, TR, SC) with simple shell repeats, and can be adjusted to fit by changing chain count and length.
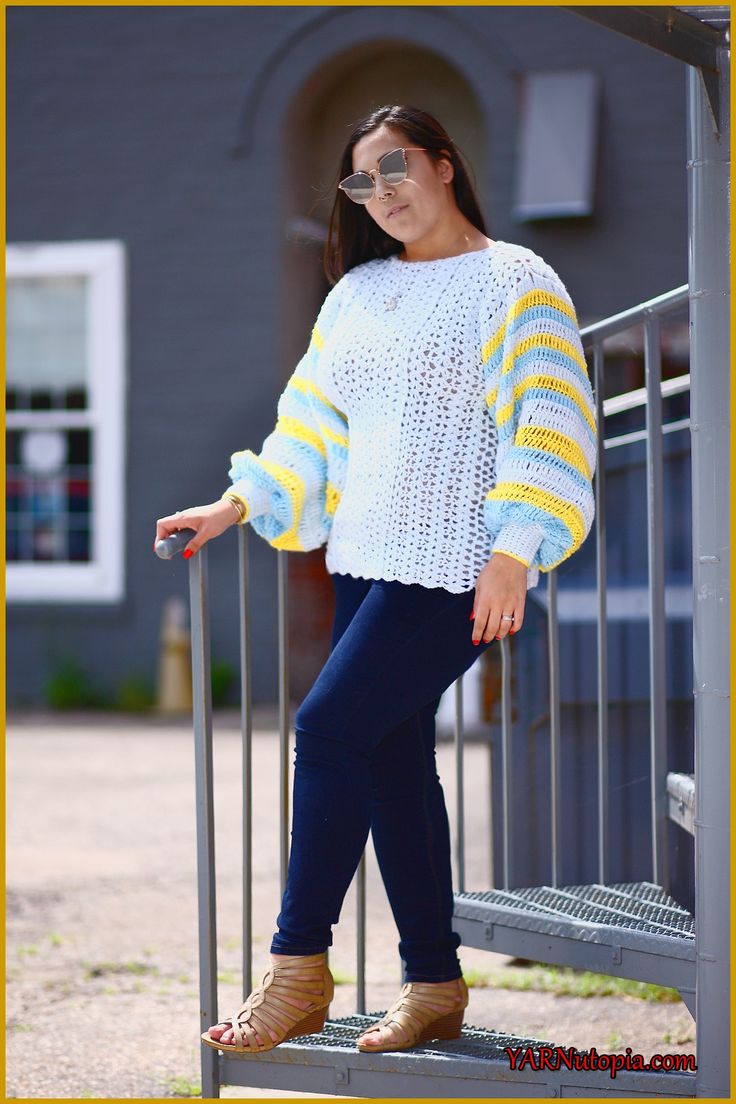
This project took the designer about 3 days to create. The instructions below include materials, notes on sizing, stitch abbreviations and the full written pattern for the front/back panels and sleeves. Read through the full pattern before you begin, and adjust chain counts and row counts to fit your measurements.
Materials
- Brava Worsted by WeCrochet (Main Color). Example used: Clarity — 1080 yards
- Mighty Stitch by WeCrochet in Sunshine — 200 yards
- Sky color (example) — 200 yards
- Size I (5.50 mm) crochet hook
- Yarn needle and scissors
Notes
- Use a smaller hook or fewer rows to make a smaller garment; use a bigger hook or more rows to make a larger one.
- Pattern written in US terms.
- Neck hole measures about 20 inches around (and it stretches).
- Shoulder seam is about 5 inches sewn.
- Sleeve length shown is 24 inches, but you can change the number of rounds to make sleeves longer or shorter.
- Length from top of shoulder to bottom of sweater is about 23 inches (increase for a tunic).
- Bust measurement for the sample is 40 inches. Each front and back panel should be half your bust measurement wide.
- Construction: crochet front panel, crochet back panel, sew panels together, then add sleeves.
- For front/back panels: odd-numbered rows = WS (wrong side/inside), even-numbered rows = RS (right side/outside).
- Sew in ends as you go when making sleeves to keep things tidy.
Special Stitches / Abbreviations
Ch(s): chain(s); YO: yarn over; St(s): stitch(es); Sl st: slip stitch; SK: skip; SC: single crochet; DC: double crochet; TR: treble crochet; BLO: back loop only; Shell: [2DC, Ch 1, 2DC] in specified location.
Pattern
Front Panel and Back Panel:
The front and back panel are made exactly the same — make 2 and sew them together.
With Main Color
Ch 75 (or any multiple of 5 that is HALF of your Bust Measurement)
Row 1: Shell in the 6th Ch from hook, *Sk 2 Chs, DC in next Ch, Sk 2 Chs, Shell in next Ch, repeat from * across ending with DC in last ch, Turn. (You want to end this row with one double crochet, if you have extra chains, you can ignore those and sew them in later when we sew our panels together.)
Before going onto Row 2, Mark 2 lines where you want your ribbing lines to be, these should be evenly spaced. My written instructions are for the pattern I’m demonstrating, but you can understand the idea and do it according to your measurement and stitch count.
Row 2: Ch 3 (counts as DC), *Shell in ch 1 sp of next Shell, Sk 2 sts, DC in next st, repeat from * until you get to your marked st, FPDC on marked st, **Shell in ch 1 sp of next shell, Sk 2 sts, DC in next st, repeat from ** until you get to the next marked st, FPDC on marked st, ***Shell in Ch 1 sp of next shell, Sk 2 sts, DC in next st, Repeat from *** until the end, ending with DC in last st, Turn.
Row 3: Ch 3 (counts as DC), *Shell in ch 1 sp of next Shell, Sk 2 sts, DC in next st, repeat from * until you get to your marked st, BPDC on marked st, **Shell in ch 1 sp of next shell, Sk 2 sts, DC in next st, repeat from ** until you get to the next marked st, BPDC on marked st, ***Shell in Ch 1 sp of next shell, Sk 2 sts, DC in next st, Repeat from *** until the end, ending with DC in last st, Turn.
Rows 4-40: repeat Rows 2 and 3 (you can continue this method until you have the shirt as long as you want it to be. I ended on Row 40)
Fasten off, weave in ends.
After both front and back panel are made, Sew them together up the sides (leaving room for arm holes) and across the shoulders (leaving room for a head hole). Be sure that your foundation row is the top of the shirt and your last row is the bottom of the shirt. You want the wavy look to be at the bottom of the shirt, and the shells to be upside down.
Sleeves:
Do this method for BOTH arm holes to make BOTH sleeves.
Round 1: Attach main color (Clarity) to any section of the arm hole (I started at the armpit), Ch 3 (does not count as a stitch), Evenly space 70 TR around entire Arm Hole. (see video tutorial for visual instructions) I worked around the ch 3 sps from each row of the body part of the shirt. Sl st to first TR, Fasten off, Turn.
Rnd 2: With new color (Sunshine), Ch 3, TR in each st around, sl st to first TR, Fasten off, Turn.
Rnd 3: With new color (Sky), Ch 3, TR in each st around, sl st to first TR, Fasten off, Turn.
Rnd 4: With main color, (Clarity), Ch 3, TR in each st around, sl st to first TR, Fasten off, Turn.
Rnd 5: With new color (Sunshine), Ch 3, TR in each st around, sl st to first TR, Fasten off, Turn.
Rnd 6: With new color (Sky), Ch 3, TR in each st around, sl st to first TR, Fasten off, Turn.
Rnd 7: With main color (Clarity), Ch 3, TR in each st around, sl st to first TR, Fasten off, Turn.
Rnd 8: With new color (Sunshine), Ch 3, TR in each st around, sl st to first TR, Fasten off, Turn.
Rnd 9: With new color (Sky), Ch 3, TR in each st around, sl st to first TR, Fasten off, Turn.
Rnd 10: With main color (Clarity), Ch 3, TR in each st around, sl st to first TR, DO NOT fasten off, Turn.
Rnd 11: Continue with main color Clarity, Ch 3, TR in each st around, sl st to first TR, Fasten off, Turn.
Rnd 12: With new color (Sunshine), Ch 3, TR in each st around, sl st to first TR, DO NOT fasten off, Turn.
Rnd 13: Continue with same color Sunshine, Ch 3, TR in each st around, sl st to first TR, Fasten off, Turn.
Rnd 14: With new color (Sky), Ch 3, TR in each st around, sl st to first TR, Fasten off, Turn.
Rnd 15: With main color (Clarity), Ch 3, TR in each st around, sl st to first TR, Fasten off, Turn.
Rnd 16: Continue with main color Clarity, Ch 3, TR in each st around, sl st to first TR, Fasten off, Turn.
Rnd 17: With new color (Sunshine), Ch 3, TR in each st around, sl st to first TR, DO NOT fasten off, Turn.
Rnd 18: Continue with same color Sunshine, Ch 3, TR in each st around, sl st to first TR, Fasten off, Turn.
Rnd 19: With new color (Sky), Ch 3, TR in each st around, sl st to first TR, DO NOT fasten off, Turn.
Rnd 20: Continue with same color Sky, Ch 3, TR in each st around, sl st to first TR, Fasten off.
Be sure you are looking at the OUTSIDE of your sleeve and then attach your main color to any stitch and continue onto Round 21.
Making the cuff
Rnd 21: Ch 1, SC2TOG in each st around. (you will have half the number of sts around plus one extra SC, I had 36 sts around), Sl st to first SC, Ch 1, DO NOT TURN.
Rnd 22: Working in BLO, SC2TOG in each st around, sl st to first SC, Ch 1, Do not turn. (18 sts)
Rnds 23-32: working in BLO, SC in each st around, Sl st to first SC, Ch 1, do not turn.
Fasten off main color, attach Sunshine in any st around. Work in BOTH LOOPS
Rnd 33: SC in each st around.
Fasten off, weave in all ends.
Enjoy!!