Crochet Adorable Butterfly
Crocheting adorable butterflies is such a delightful and creative craft to try out! These little fluttering creatures can add a touch of whimsy and charm to any project you incorporate them into. With their intricate patterns and vibrant colors, each butterfly you crochet is like a miniature work of art. Whether you're a seasoned crocheter or just starting out, there's something so rewarding about bringing these beautiful creatures to life with your own hands. So go on, grab your crochet hook and let your creativity take flight with these charming butterflies!
Materials
To make Butterfree you will need:
– A Crochet hook, 2.5mm
– Yarn in the following colors: Purple, Turquoise, Red, White, Black
– A tapestry needle and scissors
– Stuffing
– A stitch marker to help you keep track of the start of the round
Please note that you can make Butterfree using any size crochet hook and yarn weight for a smaller or bigger result. I like using DK as it’s most commonly available. If you make amigurumi, it is usually recommended to go down a bit from the recommended hook size for the yarn to allow for a no-hole look (we don’t want to see the stuffing show through in between stitches)! Using DK yarn and a 2.5mm crochet hook, Butterfree should be about 17cm tall.
Stitches & Abbreviations
The pattern is written using US crochet terms in continuous spirals. You will need to know the following kinds of stitches:
– Chaining (Ch)
– Magic Ring (MR)
– Single crochet (sc)
– Half double crochet (Hdc)
– Double crochet (Dc)
– Decrease (dec); preferably using the invisible decrease method
– Increase (inc)
– Slip stitch
And now, let’s get started!
Head (in purple)
Round 1: In a MR, sc 6
Round 2: Inc around (12)
Round 3: (Sc, inc) around (18)
Round 4: (Sc 2, inc) around (24)
Round 5: (Sc 3, inc) around (30)
Round 6-11 (6 rounds): Sc around (30)
Round 12: (Sc 3, dec) around (24)
Round 13: (Sc 2, dec) around (18)
Round 14: (Sc, dec) around (12)
Round 15: Dec around (6)
Body (in purple)
Round 1: In a MR, sc 6
Round 2: Inc around (12)
Round 3: (Sc, inc) around (18)
Round 4: (Sc 2, inc) around (24)
Round 5-6: Sc around (24)
Round 7: (Sc 2, dec) around (18)
Round 8: Sc around (18)
Round 9: (Sc 4, dec) around (15)
Round 10: Sc around (10)
Eyes (in red; make 2)
Round 1: In a MR, sc 6
Round 2: Inc around (12)
Round 3: hdc, dc, dc, hdc, sl, fasten off
Eye highlights (in white; make 2)
Round 1: In a MR, sc 6, slip stitch to first stitch, fasten off
Legs (in turquoise; make 2)
Round 1: In a MR, sc 6
Round 2: Sc around (6)
Round 3: (Sc 2, inc) around (8)
Round 4-7 (4 rounds): Sc around (8)
Round 9: (Sc 2, dec) around (6)
Mouth (in turquoise)
Row 1: Ch 4, sc, dc, sc, fasten off
Hands (in turquoise; make 2)
In a MR, sc 4. Then, chain 1, slip into the ring. Repeat once more. Chain 1 again and slip to the first sc you made. Fasten off
Upper wing (in white; make 2)
Note: This section (and the next one) will not feature stitch counts.
Row 1: Ch 13, sc 11, slip into last chain
Row 2: Sc 11, inc
Row 3: Inc, sc 11, slip stitch
Row 4: Sc 11, dec
Row 5: Skip the first stitch, sc 11, slip stitch to the row below
Row 6: Skip the first stitch, sc 9, hdc, 3 dc in last stitch
Row 7: 2 dc in the fist stitch, hdc 2, sc 9, slip stitch
Row 8: Sc 9, hdc 3, dc
Row 9: Dc 2, hdc 2, sc 5, slip stitch, leave rest unworked
Row 10: Sc 8, (hdc, dc) in last stitch
Row 11: 2 dc in the first stitch , dc, hdc, sc 10 (youll be crocheting across the ledge where we left a part unworked 2 rows ago), slip stitch to 2 rows below
Row 12: Skip the first stitch, sc 3, hdc 4, dc 6, 2 dc in the last stitch
Row 13: Skip the first stitch, sl 4, sc 10, slip stitch to 2 rows below
Row 14: Skip the first stitch, sl, sc 11, hdc, 2 dc in last stitch
Row 15: 2 dc in the first stitch, dc, 2 hdc, sc 9, sl
Row 16: Sc 11, hdc, dc, 2 dc in the last stitch
Row 17: Skip first stitch, sc 14, sc 4 along the side of the wing, sl
Row 18: Skip first stitch, sl, sc 15, hdc, 2 hdc in last stitch
Row 19: 2 hdc in the first stitch, hdc, sc 16, sl
Row 20: Skip first stitch, sc 17, 2 hdc in the last stitch
Row 21: 2 hdc in the first stitch, hdc, sc 15, sl
Row 22: sc 15, hdc, dc 2
Row 23: Skip first stitch, hdc 12, sc 5, then sc 5 along the side of the wing, sl, fasten off.
Lower wing (in white; make 2)
Row 1: Ch 12, sc 11
Row 2: Sc 9, hdc, 2 hdc in last stitch
Row 3: Skip first stitch, sl, ch 2, sc, sc in the same stitch as the sl, then sc 9, sl
Row 4: Skip the first stitch, sl, sc 10
Row 5: Skip the first stitch, sc 9, sl
Row 6: Skip the first stitch, sl, sc 7, inc
Row 7: Skip first stitch, sl, sc 3, sc, fasten off
Antennae (in black: make 2)
Round 1: In a MR, sc 6
Round 2-4 (3 rounds): Sc around (6)
Round 5: (Sc, dec) around (4)
Round 6-13 (8 rounds): Sc around (4), fasten off
Assembly
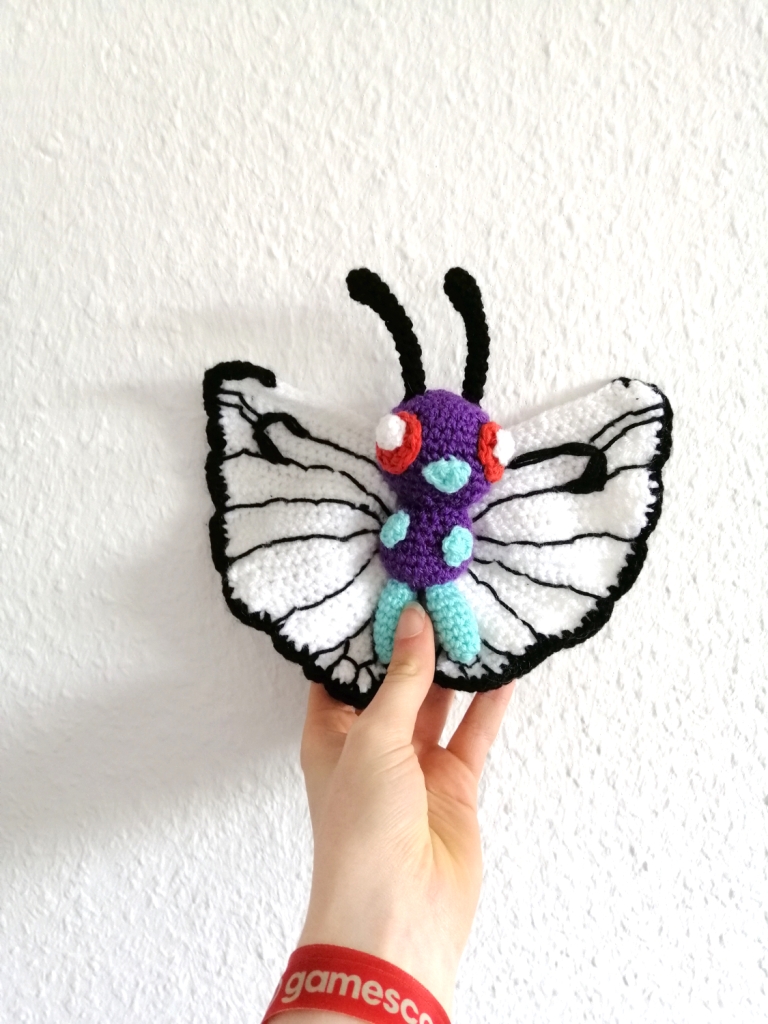
First of all, we need to finish the wings. Start by Sewing together the upper and lower wings; they should overlap by approximately 1 or 2 rows. Then continue by crocheting a border around the wing to add the black outside. There is no rule for this, just try to do one stitch per row and you’ll be fine. Use a picture for orientation on where to start and where to end. Next, taking some black yarn/thread, carefully embroider on the pattern of the wings. This is very tedious work, but you can do it! Just take your time! Next, sew the head and body together. Add the legs, mouth and hands. Sew on the eyes and then sew the eye highlights onto the eyes. Sew on the antennae and then, finally, the wings.
And that’s it!