Cute Crochet Bunny Ice Cream Amigurumi — Easy Pattern & Materials (9 cm)
Create a sweet, small amigurumi that combines a fluffy bunny with an ice cream cone. This easy pattern produces a finished toy about 9 cm tall and 7 cm wide using Alize Cotton Gold yarn and a 2.5 mm hook. Follow the step-by-step rounds for the head, ears, cone and cheeks, then sew the pieces together for a charming pastel decorative toy or gift.
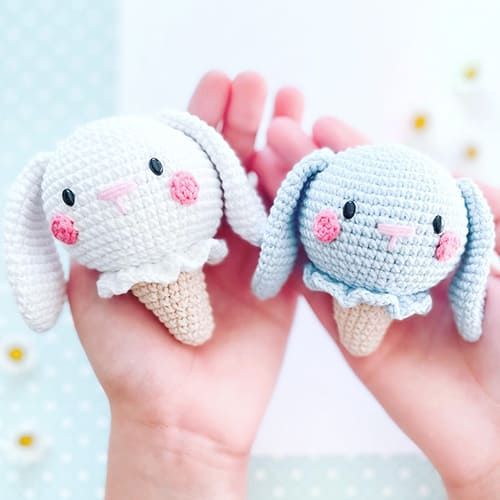
How adorable are Crochet Bunny Ice Cream Amigurumi creations? These sweet and cuddly amigurumi are sure to melt your heart with their cuteness! The combination of a fluffy bunny with a delicious ice cream cone makes for the perfect whimsical toy or decor piece. Imagine the joy of crafting them yourself or gifting them to someone special. With their soft pastel colors and charming details, these amigurumi bunnies are a delightful way to add a sprinkle of happiness to any space.
Abbreviations
Hdc- half double crochet
dc- double crochet
BLO- back loops only
FLO- front loops only
inc- increase
dec- decrease
sc- single crochet
ch- chain
slst- slip stitch
st- stitch
Rnd- round
Skill level: Easy
Materials
2,5mm crochet hook
Alize cotton gold yarns color: (548) beige, (055) white, (040) blue, (518) rosa and (033) warm pink
Fiberfill stuffing
Oval safety eyes 0,6mm
Stitch marker
Tapestry needle
Wooden stick to help fill and shape the amigurumi
Pins
Finished size;
9cm tall
7cm wide
Using the same yarns and hook size indicated in this pattern
Head
Ice (white or blue yarn)
Rnd 1. start 6sc in a magic ring (6)
Rnd 2. inc in all 6 stitches (12)
Rnd 3. (sc 1; inc in the next) x 6 (18)
Rnd 4. (sc 2; inc in the next) x 6 (24)
Rnd 5. (sc 3; inc in the next) x 6 (30)
Rnd 6. (sc 4; inc in the next) x 6 (36)
Rnd 7. (sc 5; inc in the next) x 6 (42)
Rnd 8. (sc 6; inc in the next) x 6 (48)
Rnd 9. (sc 7; inc in the next) x 6 (54)
Rnd 10-17. (8 rounds) sc in all 54 stitches (54)
Rnd 18. (sc 7; dec) x 6 (48)
Rnd 19. (sc 6; dec) x 6 (42)
Rnd 20. (sc 5; dec) x 6 (36)
Rnd 21. (sc 4; dec) x 6 (30)
Rnd 22. (sc 3; dec) x 6 (24)
Rnd 23. (FLO): sc 1 in the next st, ch 2, dc 2 in the same stitch, (dc 3 in the next st) x 23 (72)
Invisible fasten off and weave in the yarn end.
Ears (x2)
(White or blue yarn)
Rnd 1. start 6sc in a magic ring (6)
Rnd 2. sc in all 6 stitches (6)
Rnd 3. increase in all 6 stitches (12)
Rnd 4. (sc 1; inc in the next) x 6 (18)
Rnd 5. sc in all 18 stitches (18)
Rnd 6. (sc 2; inc in the next) x 6 (24)
Rnd 7-11. (5 rounds): sc in all 24 stitches (24)
Rnd 12. (sc 2; dec) x 6 (18)
Rnd 13-17. (5 rounds): sc in all 18 stitches (18)
Rnd 18. (sc 1; dec) x 6 (12)
Rnd 19-22. (4 rounds): sc in all 12 stitches (12)
Invisible fasten off, leaving a long tail for sewing. (Don’t stuff)
Cone
(Beige yarn)
Rnd 1. start 6sc in a magic ring (6)
Rnd 2. (sc 1; inc in the next) x 3 (9)
Rnd 3. sc 1, inc in the next st, (sc 2; inc in the next) x 2, sc 1 (12)
Rnd 4. sc in all 12 stitches (12)
Rnd 5. (sc 3; inc in the next) x 3 (15)
Rnd 6. sc in all 15 stitches (15)
Rnd 7. sc 2, inc in the next st, (sc 4; inc in the next) x 2, sc 2 (18)
Rnd 8. sc in all 18 stitches (18)
Rnd 9. (sc 5, inc in the next) x 3 (21)
Rnd 10. sc in all 21 stitches (21)
Rnd 11. sc 3, inc in the next st, (sc 6; inc in the next ) x 2, sc 3 (24)
Stuff firmly with fiberfill
Invisible fasten off, leaving a long tail for sewing.
Cheeks (x2)
(Pink yarn)
Rnd 1. 6sc in a maigc ring (6)
Slst in the first stitch and fasten off, leaving a long tail for sewing.
Assembly
Sew the ears in the round 7 with 13/14 stitches apart
Insert the eyes between rounds 12 and 13 with 7 stitches apart
Embroider the nose with pink yarn between rounds 13 and 14
Sew the cheeks a little below and beside the eyes
Check that the head and cone parts are firmly stuffed with fiberfill
Sew the cone to the head with a tapestry needle
Tips
- Use a stitch marker to keep track of the beginning of each round.
- Add fiberfill gradually and use the wooden stick to push stuffing into tight areas so the head and cone keep their shape.
- Weave in ends securely and hide seams neatly for a tidy finish.