Cute Little Hippo Amigurumi Crochet Pattern — Step-by-Step for a 3.5" Sitting Toy
This Little Hippo Amigurumi is a charming handmade crochet toy that sits about 3.5" tall. The pattern below includes a materials list and step-by-step rounds for crocheting the body (head and body in one piece), muzzle, belly patch, ears, and legs, plus assembly notes and placement for safety eyes. It's a lovely project to make as a small gift, nursery decor, or collectible amigurumi.
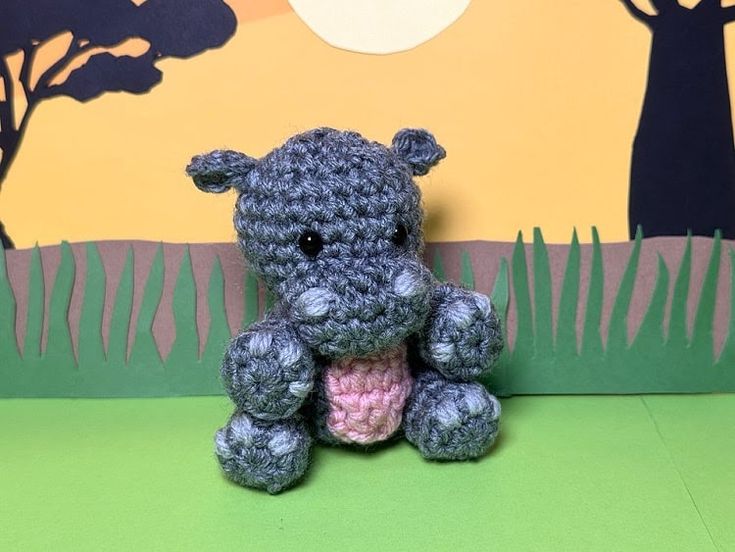
Finished Size: about 3.5" tall sitting
You will need:
medium weight yarn in gray, light gray, and pink (sample made in Loops and Threads Impeccable in True Grey, Pale Gray, and Soft Rose)
G crochet hook (4/4.25 mm)
2- 6 mm safety eyes
Polyfil fiberfill
yarn needle
stitch markers
scissors
Instructions overview: The body and head are made in one piece, the other pieces are made separately and sewn on. Most pieces begin with a magic ring (mr). The muzzle starts with a chain and is crocheted around both sides of the chain to work in the round. The belly patch is worked back and forth in rows.
Body
Make 1 with gray, beginning with magic ring
Round 1: in mr, ch 1, 6 sc (6 sc)
Round 2: 2 sc in each st (12 sc)
Round 3: [2 sc in first st, 1 sc in next st] repeat around (18 sc)
Rounds 4-8: 1 sc in each st (18 sc)
Begin stuffing and continue stuffing as you work
Round 9: sc2tog around (9 sc)
Round 10: 2 sc in each st (18 sc)
Round 11: [2 sc in first st, 1 sc in next 2 sts] repeat around (24 sc)
Round 12-15: 1 sc in each st (24 sc)
Round 16: [sc2tog, sc in next 2 sts] repeat around (18 sc)
Insert safety eyes between rounds 13 and 14 about 3 stitches apart
Round 17: [sc2tog, sc in next st] repeat around (12 sc)
Round 18: sc2tog around (6 sc)
Finish off, weave in ends
Muzzle
Make 1 with gray yarn, beginning with chain and working around both sides, continuing in the round
ch 5
Round 1: in 2nd ch from hook work 1 sc, 1 sc in each of next 2 ch, 3 sc in last ch, turn so you are working along the other side of the ch in the unworked loops, 1 sc in each of next 2 ch, 2 sc in same ch as first st (10 sc)
Round 2: 2 sc in first st, 1 sc in each of next 2 sts, 2 sc in next st, 1 sc in next st, 2 sc in next st, 1 sc in each of next 2 sts, 2 sc in next st, 1 sc in next st (14 sc)
Round 3: 1 sc in each st (14 sc)
Finish off and cut yarn leaving long tail for sewing
Add a little bit of stuffing and sew the muzzle to the head just below the eyes
Stitch nostrils with light gray yarn on the muzzle
Belly
Make 1 with pink yarn, beginning with magic ring
ch 3
Row 1: sc in 2nd ch from hook and next ch (2 sc)
Row 2: ch 1, turn, 2 sc in each st (4 sc)
Rows 3-4: ch 1, turn, 1 sc in each st (4 sc)
Row 5: ch 1, turn, sc2tog twice (2 sc)
Finish off and cut yarn, leaving long tail for sewing
Stitch the belly to the front of the body
Ears
Make 2 with gray yarn, beginning with magic ring
Round 1: in mr, ch 1, 6 sc, do not join at the end of the round (6 sc)
Finish off and cut yarn, leaving long tail for sewing
Pinch the ends of the ear together and sew to the sides of the head
Legs
Make 4 with gray yarn, beginning with magic ring
Round 1: in mr, ch 1, 6 sc (6 sc)
Round 2: [2 sc in first st, 1 sc in next st] repeat around (9 sc)
Round 3: 1 sc in blo of each st (9 sc)
Round 4-5: 1 sc in each st (9 sc)
Round 6: [sc2tog, 1 sc in next st] repeat around (6 sc)
Finish off and cut yarn leaving a long tail for sewing
You may want to add a tiny bit of stuffing to the end of each leg to help it keep its shape
Using the light gray yarn stitch 3 little toe/toenails on each foot by making 2 stitches for each one going around the edge created by your back loop stitches in round 3, from the bottom of the foot, up around the edge through the side of the leg
Sew two of the legs/arms to the side of the body just below the head, sew the other two to the bottom side of the body in a sitting position
Finishing tips: Weave in any remaining ends securely and adjust stuffing to achieve the desired shape. Position the muzzle, belly patch, ears, and legs symmetrically before sewing for a neat finished look.