How to Crochet an Adorable Bunny Amigurumi — Step‑by‑Step Pattern
Create a sweet, handmade companion with this step‑by‑step Crochet Bunny Amigurumi pattern. This guide provides the full stitch-by-stitch instructions and materials list to make a small cuddly bunny with a white muzzle, pink nose and a pompom tail. Perfect for crocheters who enjoy amigurumi projects — follow the rounds below, sew the pieces together, and finish with the eyes and tail.
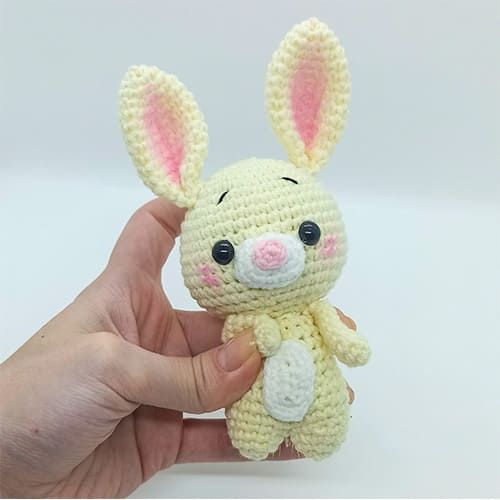
Finished yellow crochet bunny amigurumi with white muzzle and pompom tail — a handmade cuddly toy.
Materials
- Yellow (or milky) yarn, white yarn, a little pink yarn (for the nose). Suitable acrylic (for example, “Children’s novelty”), semi-cotton or cotton.
- Hook No. 1.5 (or any other suitable for your chosen yarn)
- Filler (holofiber)
- Half beads black (8–10 mm) for eyes
- Pompom (for tail)
Abbreviations
MR: Magic ring
Sc: Single crochet
Inc: Increase
Dec: Decrease
Ch: Chain
Slst: Slip stitch
Head
Yellow (milky):
Rnd 1: 6 sc in MR (6)
Rnd 2: 6 inc (12)
Rnd 3: (sc, inc) х 6 (18)
Rnd 4: (2 sc, inc) х 6 (24)
Rnd 5: (3 sc, inc) х 6 (30)
Rnd 6: (4 sc, inc) х 6 (36)
Rnd 7: 36 sc (36)
Rnd 8: (5 sc, inc) х 6 (42)
Rnd 9-16: 42 sc (42)– 8 row
Rnd 17: (5 sc, dec) х 6 (36)
Rnd 18: (4 sc, dec) х 6 (30)
Add filler.
Rnd 19: (3 sc, dec) х 6 (24)
Rnd 20: (2 sc, dec) х 6 (18)
Rnd 21: (sc, dec) х 6 (12)
Rnd 22: 6 dec (6)
Pull the hole, hide the thread.
Muzzle
White:
Rnd 1: Make on a chain of 4 ch, crochet (from the second loop from the hook): 2 sc, 3 sc in the last st of the chain, 2 sc on the other side of the chain, inc. in the last stitch (8)
Rnd 2: inc, sc, 3 inc, sc, 2 inc (14)
Rnd 3: 14 sc (14)
Leave a thread for sewing.
Legs and Body
Yellow (milky):
We crochet the first leg:
Rnd 1: 6 sc in MR (6)
Rnd 2: 6 inc (12)
Rnd 3-4: 12 sc (12)– 2 row
We cut the thread.
We crochet the second leg:
Rnd 1: 6 sc in MR (6)
Rnd 2: 6 inc (12)
Rnd 3-4: 12 sc (12)– 2 row
We do not cut the thread! We continue crocheting (we will crochet the body).
Rnd 5: we crochet sc in the first leg, we continue crocheting on two legs (23 more sc). In total, in a row you should get 24 sc.
Rnd 6: (3 sc, inc) х 6 (30)
Rnd 7-8: 30 sc (30)– 2 row
Rnd 9: (3 sc, dec) х 6 (24)
Rnd 10-11: 24 sc (24)– 2 row
Rnd 12: (2 sc, dec) х 6 (24)
Rnd 13-14: 18 sc (18)– 2 row
Leave a thread for sewing on the head. Add filler.
Tummy
White:
Rnd 1: Make on a chain of 5 ch, crochet 3 sc in a chain (from the second loop from the hook), 4 sc in the last stitch, continue crocheting on the other side of the chain: 2 sc, 3 sc in the last stitch (12)
Rnd 2: inc, 2 sc, 3 inc, 4 sc, 2 inc (18)
Leave a thread for sewing.
Handles (Make 2)
Yellow (milky):
Rnd 1: 6 sc in MR (6)
Rnd 2: (2 sc, inc) х 2 (8)
Rnd 3-8: 8 sc (8)– 6 row
Fold the edge in half, crochet 4 sc for both walls of the part. Leave a long tail for sewing.
Nose
Pink:
Rnd 1: 6 sc in MR (6), connection sc to the beginning of the row.
Leave a long tail for sewing.
Ears (Make 2)
Yellow (milky):
Rnd 1: 5 sc (5)
Rnd 2: 5 inc (10)
Rnd 3: (4 sc, inc) х 2 (12)
Rnd 4: 12 sc (12)
Rnd 5: (sc, inc) х 6 (18)
Rnd 6-12: 18 sc (18)– 7 row
Rnd 13: (sc, dec) х 6 (12)
Rnd 14: 12 sc (12)
Fold the edge in half, crochet 6 sc for both walls of the part. Similarly, crochet the second ear. Sew to the bunny.
Finishing
Glue the tail (pompom). Glue the eyes, sew on all the details, you can tint the ears and cheeks, decorate the bunny with a carrot. Use the long tails left on pieces to securely sew the muzzle, tummy, ears and handles in place. Hide and secure all thread ends.