DIY Crochet Heart Potholders — Free Pattern & Step-by-Step Guide
Crochet heart potholders are practical and decorative — perfect for protecting your hands from hot pots while adding a cozy, handmade touch to your kitchen. This pattern uses DK cotton and a 4 mm hook to create a heart motif with bobble stitches. Follow the row-by-row instructions and the border finish to make a sturdy, heat-resistant potholder. Below you'll find size, materials, stitch notes, a bobble stitch explanation, the full row pattern and the border instructions.
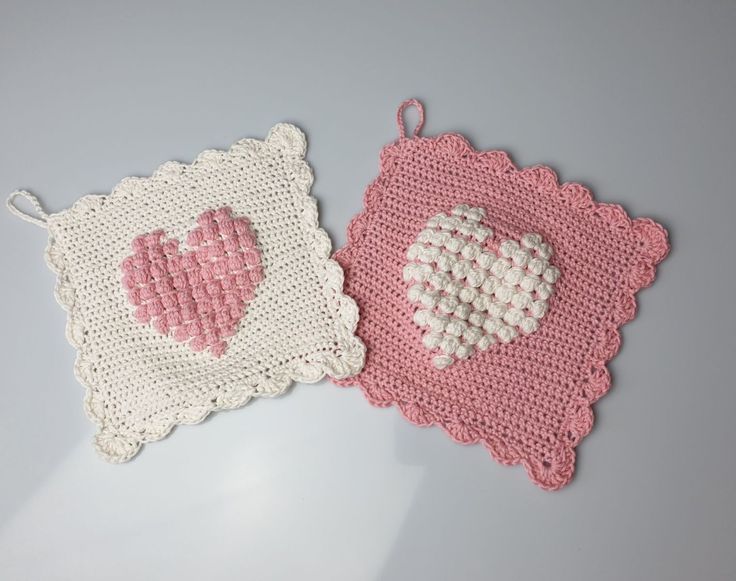
Finished heart-shaped potholders made from DK cotton yarn — approx. 20 x 20 cm each.
Size:
With 4 mm hook and DK Cotton yarn approx.: 20 x 20 cm
With 34 Rows and 35 stitches
Material:
Crochet hook in 4 mm
DK Cotton yarn in 2 Colors
Color A: 30 gr.
Color B: 10 gr.
Abbreviations:
- SC = Single crochet
- CH = Chain
- BO = Bobble stitch with 5 DC
- DC = Double crochet
- Slst = Slip stitch
Info (important to read):
CH (chain stitch) is never counted as a stitch.
To simplify the written pattern, the author lists x sc in Color A, x sc in Color B — Color A is the main color and Color B is used for the heart bobbles.
Each row has 35 stitches, either bobble stitches or single crochet stitches; each row shows at the end how many bobble stitches are in that row.
Bobble stitch:
The Bobble stitch is worked with 5 DC together in one stitch. Yarn over, insert hook into stitch, yarn over and pull through once but don’t finish the DC; repeat so you have worked this part of the DC five times in the same stitch (you should have 6 loops on the hook). Yarn over again and pull through all loops at once. One bobble stitch is always followed by an SC in the next stitch.
Bobble placement and puff direction:
Bobble stitches are made on the back side and should puff away from you. Make sure to pull the last thread through firmly enough so the bobble puffs.
Color change:
Work the last stitch of one color until the last pull-through (hook in stitch, yarn over, pull through) and use the new color for the last pull-through through the loops. For a color change after a bobble stitch, work the 5 DC in the current color and finish the stitch with the new color.
Carrying the thread:
The main color thread is carried along the back rows until needed again. The heart-color thread is carried back from the end of the heart on front rows (held in the back so it won’t show through too much) until the start of the heart pattern so it’s in position for the next bobbles. Start bringing in the second color only when it is needed, and stop carrying it in the row where the last bobble in that color is worked.
The Graph:
If you prefer to work from a graph instead of the written rows: odd (uneven) rows are read from right to left and even rows from left to right. The x marks where bobbles are worked. The SC stitches between the bobbles are always worked in the same color as the bobbles except in rows 23 and 25 where the middle 3 and 7 SC stitches are worked in the main color to shape the heart. The even rows are all single crochet stitches in Color A (the main color).
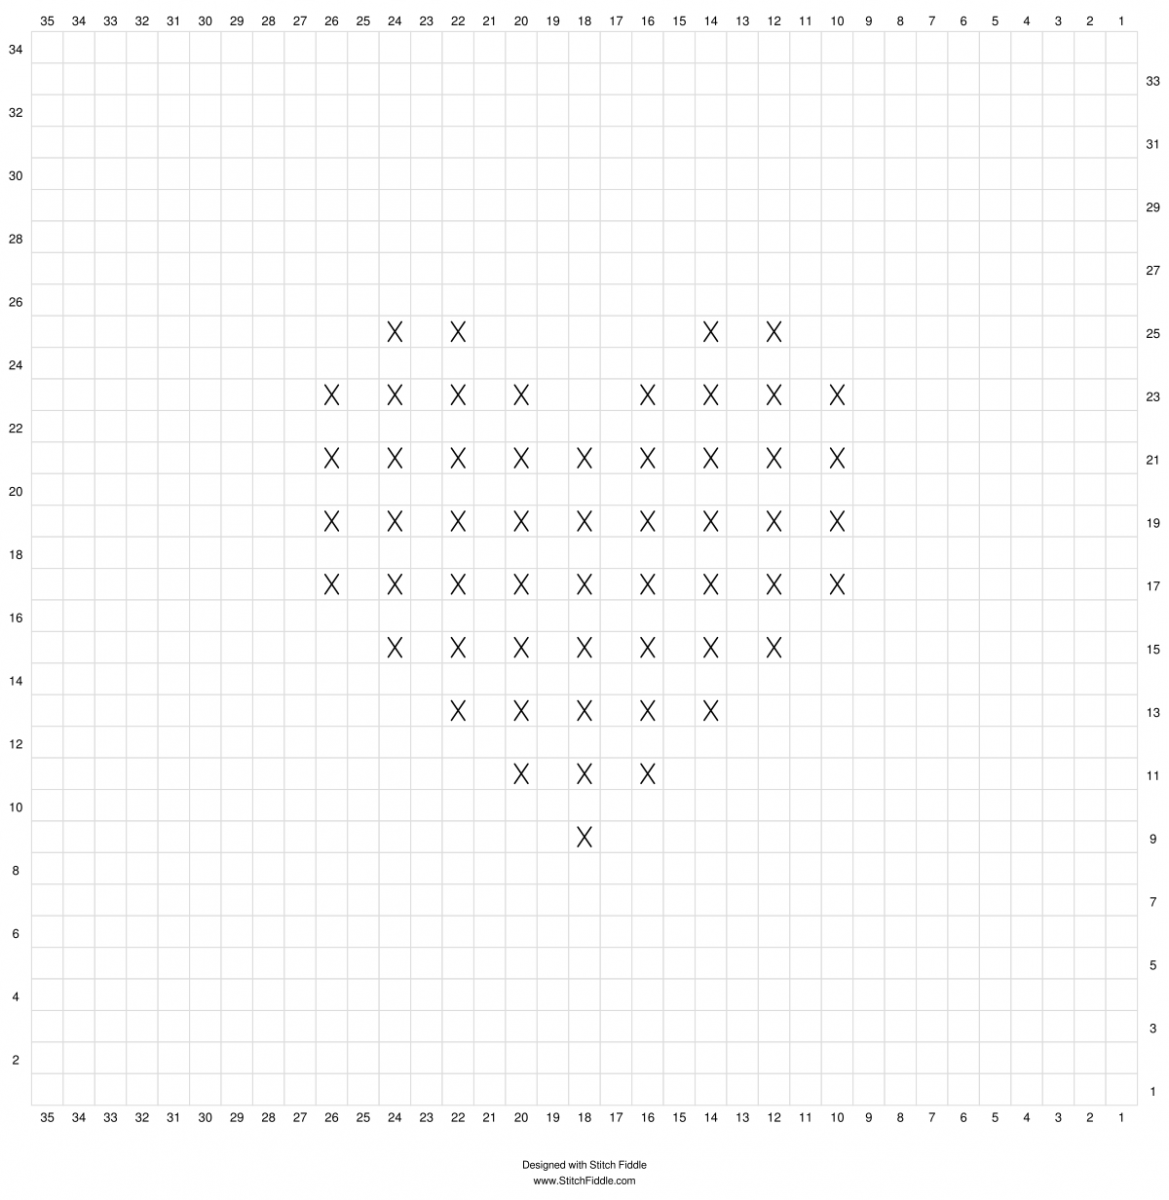
Graph for the heart motif — X marks indicate where to work bobble stitches to form the heart.
Row by Row Explanation:
Cast on 36 chain stitches — not too tight.
1. Row: SC in 2nd from hook and in all following stitches in Color A
2. Row: 1 CH, turn, 35 SC in Color A
3. Row: 1 CH, turn, 35 SC in Color A
4. Row: 1 CH, turn, 35 SC in Color A
5. Row: 1 CH, turn, 35 SC in Color A
6. Row: 1 CH, turn, 35 SC in Color A
7. Row: 1 CH, turn, 35 SC in Color A
8. Row: 1 CH, turn, 35 SC in Color A
9. Row: 1 CH, turn, 17 SC in Color A, 1 BO in Color B, 17 SC in Color A (1 BO)
10. Row: 1 CH, turn, 35 SC in Color A
11. Row: 1 CH, turn, 15 SC in Color A, 1 BO in Color B, 1 SC in Color B, 1 BO in Color B, work this 2 times, 15 SC in Color A (3 BO)
12. Row: 1 CH, turn, 35 SC in Color A
13. Row: 1 CH, turn, 13 SC in Color A, 1 BO in Color B, 1 SC in Color B, 1 BO in Color B, work this 4 times, 13 SC in Color A (5 BO)
14. Row: 1 CH, turn, 35 SC in Color A
15. Row: 1 CH, turn, 11 SC in Color A, 1 BO in Color B, 1 SC in Color B, 1 BO in Color B, work this 6 times, 11 SC in Color A (7 BO)
16. Row: 1 CH, turn, 35 SC in Color A
17. Row: 1 CH, turn, 9 SC in Color A, 1 BO in Color B, 1 SC in Color B, 1 BO in Color B, work this 8 times, 9 SC in Color A (9 BO)
18. Row: 1 CH, turn, 35 SC in Color A
19. Row: 1 CH, turn, 9 SC in Color A, 1 BO in Color B, 1 SC in Color B, 1 BO in Color B, work this 8 times, 9 SC in Color A (9 BO)
20. Row: 1 CH, turn, 35 SC in Color A
21. Row: 1 CH, turn, 9 SC in Color A, 1 BO in Color B, 1 SC in Color B, 1 BO in Color B, work this 8 times, 9 SC in Color A (9 BO)
22. Row: 1 CH, turn, 35 SC in Color A
23. Row: 1 CH, turn, 9 SC in Color A, 1 BO in Color B, 1 SC in Color B, 1 BO in Color B, work this 3 times, 3 SC in Color A, 1 SC in Color B, 1 BO in Color B, work this 3 times, 9 SC in Color A (8 BO)
24. Row: 1 CH, turn, 35 SC in Color A
25. Row: 1 CH, turn, 11 SC in Color A, 1 BO in Color B, 1 SC in Color B, 1 BO in Color B, 7 SC in Color A, 1 BO in Color B, 1 SC in Color B, 1 BO in Color B, 11 SC in Color A (5 BO)
26. Row: 1 CH, turn, 35 SC in Color A
27. Row: 1 CH, turn, 35 SC in Color A
28. Row: 1 CH, turn, 35 SC in Color A
29. Row: 1 CH, turn, 35 SC in Color A
30. Row: 1 CH, turn, 35 SC in Color A
31. Row: 1 CH, turn, 35 SC in Color A
32. Row: 1 CH, turn, 35 SC in Color A
33. Row: 1 CH, turn, 35 SC in Color A
34. Row: 1 CH, turn, 35 SC in Color A
Don’t fasten off.
Border:
1. Round:
Ch 1 and work 34 SC stitches down the side, work 2 CH stitches in the corner, 35 SC stitches across the bottom, again 2 CH stitches in the corner, 34 SC stitches up the second side, again 2 CH stitches in the corner and 35 SC stitches across the top. Work then 18 CH stitches in the first corner and attach them with a slst in the first stitch of this round for the hanger.
2. Round:
** Jump over 2 stitches and work 5 DC in the next stitch, jump over 2 stitches and work 1 SC in the next stitch ** — work this pattern along the edge. If there are 3 stitches left instead of 2 just jump over those 3 stitches. Work 10 DC stitches in the edge. Continue the same along the bottom row, the second side row and the top row, and finish with a slst in the hanger chain.
Tips:
- Keep tension even while carrying the contrast color to avoid puckering.
- Test the bobble direction as you work on a small swatch so the heart puffs outward consistently.